Introduction
Building a shed is one of the most rewarding DIY projects I’ve ever tackled. Not only does it provide additional storage and functionality to my backyard, but it also allows me to customize a structure that fits my exact needs. Whether you’re building a shed for tools, gardening equipment, or as a small workshop, having a well-planned approach is essential.
In this article, I’ll walk you through the entire process of building a shed, from planning and selecting materials to construction and finishing touches. I’ll also provide insights based on my own experiences and link to my previous article on shed doors for a deeper dive into that specific aspect of shed building. By the end, you’ll have all the knowledge you need to construct a sturdy, weather-resistant shed that lasts for years.
Planning Your DIY Shed
1. Determine Your Shed’s Purpose
Before you start building, think about what you’ll be using the shed for. Will it be for storage, a garden workspace, or a workshop? Understanding your needs will help determine the size, layout, and features you’ll need.
2. Choosing the Best Location
The placement of your shed is crucial. Look for a spot that is:
- Level: Uneven ground can lead to structural issues.
- Accessible: You should be able to easily access the shed, especially if storing large equipment.
- Well-Drained: Avoid areas that collect water to prevent moisture damage.
- In Compliance with Local Codes: Some areas require permits for sheds over a certain size. Check your local regulations before starting.
3. Selecting the Right Shed Design
Common shed designs include:
- Gable Roof Shed: A classic option with a pitched roof that provides good drainage.
- Lean-To Shed: Great for placing against existing structures with a slanted roof.
- Barn-Style Shed: Features high ceilings and extra storage space.
- Modern Shed: A minimalist design with clean lines, ideal for contemporary homes.
Tools and Materials Needed
Essential Tools
- Measuring tape
- Hammer and nails
- Circular saw
- Level
- Drill and screws
- Safety gear (gloves, goggles, ear protection)
Materials List
- Pressure-treated lumber for the frame
- Plywood or OSB sheets for flooring and walls
- Roofing materials (asphalt shingles, metal sheets, or cedar shakes)
- Concrete blocks or footings for the foundation
- Hinges and handles for the doors
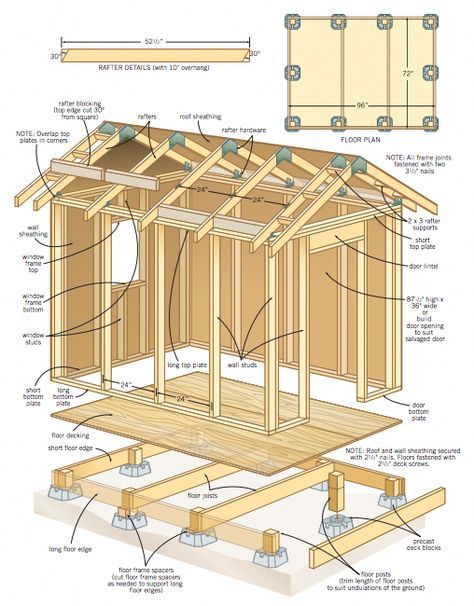
Step-by-Step Guide to Building a Shed
Step 1: Preparing the Site
Clear the area of debris, rocks, and vegetation. Level the ground using a shovel and tamper. Mark the perimeter using stakes and string to outline the shed’s footprint.
Step 2: Laying the Foundation
A solid foundation is crucial for a long-lasting shed. You can use:
- Concrete Slab: The most durable option, ideal for heavy-duty sheds.
- Gravel Pad with Concrete Blocks: A cost-effective and easier alternative.
- Wooden Skid Foundation: Suitable for temporary or movable sheds.
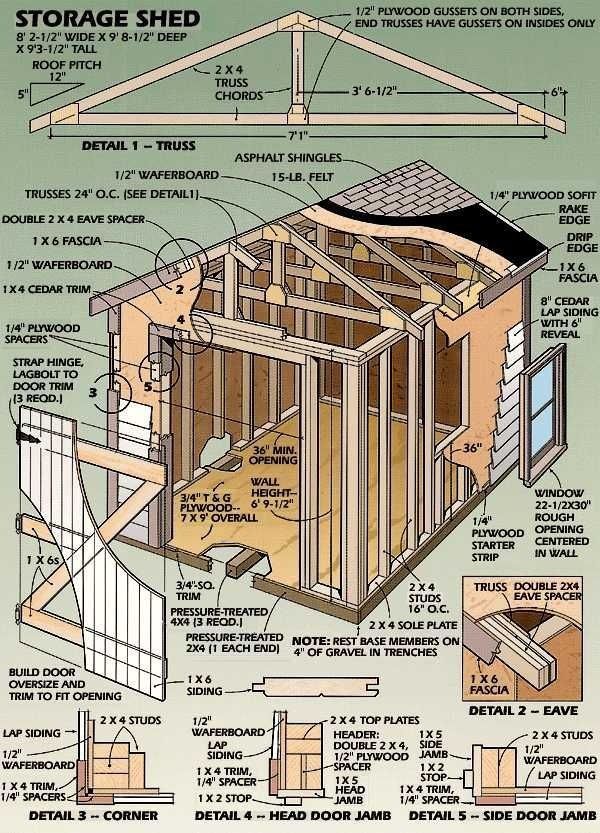
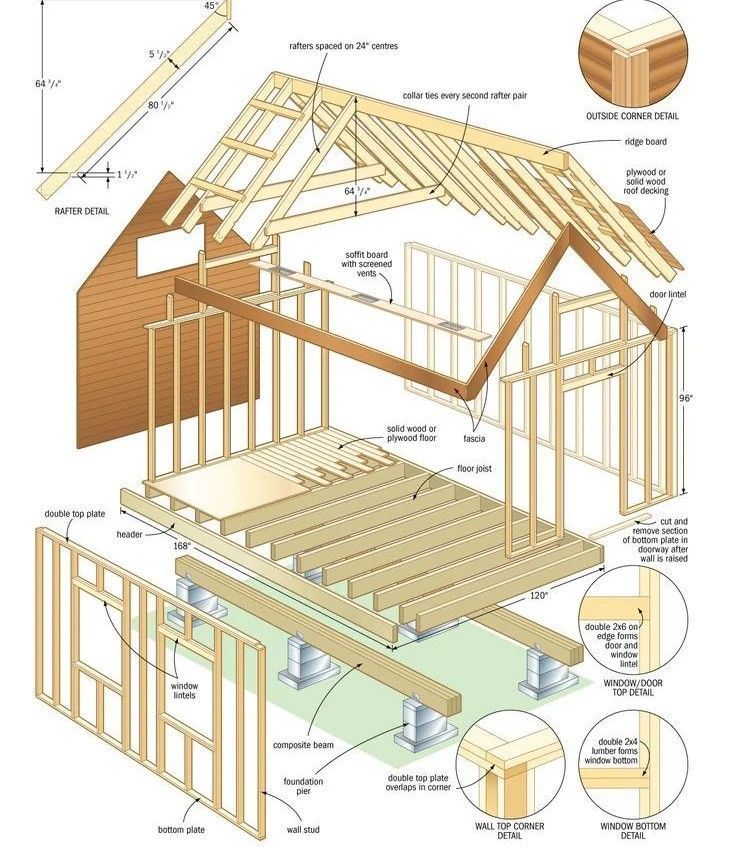
Step 3: Building the Floor Frame
Construct a wooden frame using pressure-treated 2×6 or 2×8 boards. Attach joists every 16 inches and secure them with nails or screws. Cover the frame with plywood sheets to create a sturdy floor.
Step 4: Constructing the Walls
Build each wall frame separately, including openings for windows and doors. Secure the frames together using screws and braces. Raise each wall into position and attach it to the floor.
Step 5: Installing the Roof Structure
Attach roof trusses or rafters, ensuring they are evenly spaced. Cover the roof with plywood, then install your chosen roofing material. Proper roofing prevents water damage and prolongs your shed’s lifespan.
Step 6: Adding Doors and Windows
Install pre-made or custom-built doors and windows. For detailed instructions on constructing sturdy shed doors, check out my previous article here.
Step 7: Finishing Touches
- Apply exterior siding for weather resistance.
- Paint or stain to protect the wood from moisture.
- Add shelves, hooks, or storage solutions inside.
- Install gutters to direct rainwater away from the shed’s base.
Common Questions and Solutions
1. Do I Need a Permit to Build a Shed?
Permit requirements vary depending on location and shed size. Sheds under 100 square feet often don’t require permits, but always verify with your local building authority.
2. What’s the Best Wood for Shed Construction?
Pressure-treated lumber is ideal for framing and foundations, while cedar and redwood work well for siding due to their natural resistance to rot.
3. How Can I Ensure My Shed is Waterproof?
- Use weatherproof sealants around windows and doors.
- Install a proper roofing system with flashing.
- Raise the shed above ground level to prevent water damage.
4. What’s the Best Way to Organize a Shed?
Maximize storage space by adding shelves, pegboards, and overhead storage. Use labeled bins to keep smaller items organized.
Conclusion
Building a shed from scratch is a fulfilling project that adds value to your home. By following these steps, you’ll create a durable, functional shed tailored to your needs. Whether for storage, a workspace, or a hobby retreat, a well-built shed is an excellent investment.
If you’re looking for high-quality, easy-to-follow shed building plans, I highly recommend checking out Ryan’s Shed Plans. These plans offer detailed blueprints, step-by-step instructions, and material lists, making shed construction easier, even for beginners.
Click here to explore Ryan’s Shed Plans

Affiliate Disclosure
This article contains affiliate links. If you purchase through one of these links, I may earn a small commission at no extra cost to you. This helps support my work in providing valuable DIY content. Thank you for your support!
Discover more from WoodReality
Subscribe to get the latest posts sent to your email.

Pingback: How to Build a Storage Shed from Scratch: A Step-by-Step Guide – WoodReality
Pingback: How to Build a Firewood Storage Shed (Step-by-Step Guide) – WoodReality