Introduction
As someone deeply passionate about woodworking, I know the thrill of crafting something from start to finish in a short time. For beginners or anyone looking for unique project ideas, I’ve picked out some quick easy wood projects that are not only doable but also bring joy and functionality into your daily life. These projects are tailored to teach you the basics while providing you with practical pieces for your home or gifts.
Why Quick Easy Wood Projects?
- Time-Efficient: Perfect for those with limited time but a desire to create.
- Skill Building: These projects introduce you to basic woodworking without overwhelming complexity.
- Unique Content: Opportunities to explore creativity in a straightforward way.
- Practical Results: Each project offers something useful or decorative for your home or garden.
Essential Tools for Quick Projects
- Basic Saw: A handsaw or compact electric saw.
- Measuring Tape: For accurate dimensions.
- Pencil: To mark your cuts.
- Sandpaper: To smooth wood surfaces.
- Wood Glue: For joining wood pieces.
- Drill (optional): For projects needing holes or screws.
Project 1: DIY Wooden Napkin Holder

Transform your kitchen with a DIY napkin holder that’s both functional and a testament to your simple wood crafts skills. Here’s how to make it:
- Select Wood: Use scrap wood or buy a small piece of hardwood. I often find that even the smallest pieces of wood can become something beautiful.
- Cut to Size: Two pieces for the sides and one for the base, ensuring the holder can accommodate folded napkins. Remember, precision here makes for a professional look.
- Assemble: Glue the sides to the base, forming an open box. The beauty of this project is in its simplicity; it’s all about getting those angles right.
- Sand: Smooth all edges to prevent snags. I like to take my time here, ensuring every part feels nice to the touch.
- Finish: Apply a protective finish to match your kitchen woodworking decor. I recommend a clear varnish for a natural look or a color that ties into your kitchen’s theme.
Project 2: Hanging Wall Planter
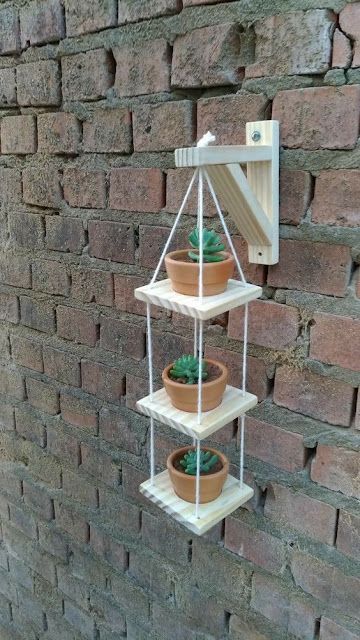
Bring life to your space with a DIY hanging planter, perfect for those interested in small wood projects or easy garden projects:
- Choose Your Wood: Opt for weather-resistant wood like cedar for outdoor use. I love working with cedar because of its natural beauty and durability.
- Design: Cut two pieces for the sides, one for the bottom, and two small pieces for the top to create a hanging point. Sketching out your design first can save time and materials.
- Assembly: Glue and nail/screw the pieces together to form a box with an open top. I find that using clamps while the glue dries ensures a sturdy construction.
- Hanging Holes: Drill holes at the top for hanging. Make sure these are evenly spaced for balance.
- Sand and Seal: Smooth, then seal with an outdoor finish for longevity. I always feel a sense of accomplishment when my projects can stand up to the elements.
Project 3: Magnetic Knife Holder

Upgrade your kitchen with a DIY magnetic knife holder, ideal for kitchen wood projects or woodworking for small spaces:
- Wood: Hardwood for durability and aesthetics. I prefer something like maple or walnut for its strength and look.
- Magnetic Strip: Purchase or repurpose a strong magnetic strip. I’ve found that these can often be found in thrift stores, giving a new life to old materials.
- Cut: Wood to fit the magnetic strip length, add a small back for mounting. This is where your precision in cutting really pays off.
- Attach Magnet: Secure the magnet inside the wood, ensuring it’s flush. I take extra care here to ensure the magnet is powerful enough to hold your knives securely.
- Mount: Sand, finish, and mount in your kitchen for a sleek, space-saving solution. I love how this project combines functionality with minimalist design.
Project 4: Custom Address Number Sign
Make your home stand out with a DIY address sign that doubles as home decor wood projects:
- Material: Use reclaimed or new wood for a rustic or clean look. I find that using reclaimed wood adds character and a story to your piece.
- Design: Cut out numbers or use stencils/paint to add numbers. I enjoy the creative process here, choosing fonts that match the home’s style.
- Assembly: If cutting numbers, attach them to a base board or directly to the wood. This part can be quite meditative, fitting each piece into place.
- Finish: Sand and apply a weather-resistant finish. I often go for an oil-based finish for its deep penetration and protection against the weather.
- Mount: Attach to your home or garden area for a personalized touch. Seeing your creation welcome people to your home is one of the best feelings.
Project 5: Wooden Mobile Phone Stand

Keep your tech organized with a DIY phone stand, a perfect example of tech woodworking projects and simple woodwork for gadgets:
- Wood Selection: Pick a piece of hardwood for stability. I like to choose wood with a tight grain for strength.
- Shape: Cut into a form that supports a phone in landscape or portrait mode. I sketch out the design to visualize how it will support different phone sizes.
- Notch: Carve or saw a notch where the phone will sit. This step requires patience but is crucial for the stand’s functionality.
- Sand: Smooth all surfaces. I make sure the phone can slide in and out easily but stay secure.
- Finish: Apply a finish that matches your tech gadgets or space. I often opt for a matte finish to avoid fingerprints.
Common Challenges and Solutions
- Precision: Use guides for cuts. Imperfections can be part of the charm or corrected with sanding. I’ve learned to embrace small mistakes as they often add uniqueness.
- Gluing: Ensure even glue application; clamps are essential. I’ve found that patience here leads to stronger bonds.
- Finishing: Test finishes on scrap wood first. This has saved me from many potential mishaps.
FAQs on Quick Easy Wood Projects
Q: Can these projects be done with minimal tools? Absolutely, these are chosen for their simplicity, requiring only basic tools. I started with just a few tools and learned as I went.
Q: How can I make these projects unique? Personalization through design, wood choice, or finish can set your projects apart. I love adding personal touches like custom engravings or stains.
Q: What if I’m unsure about my skills? These projects are meant for beginners; start simple, learn, and grow with each project. I remember my first project was far from perfect, but it was mine.
Conclusion
These quick easy wood projects offer you a fantastic entry into the world of woodworking. Each project not only teaches you something new but also provides you with something functional or decorative for your space. Whether you’re looking to furnish your home, garden, or simply indulge in some creative time, these projects provide the perfect start.
If you’re anything like me and can’t wait to dive deeper into woodworking, I’ve got something special for you. I’ve personally explored Ted’s Woodworking Plans, and I must say, it’s like having a master woodworker whispering project ideas into your ear. With thousands of plans, from simple to complex, you’re sure to find inspiration for your next project. Here’s the official website where you can join me on this woodworking journey.
Disclosure: This article contains affiliate links. If you purchase through this link, I earn a small commission at no additional cost to you, which helps me continue to share my passion for woodworking.
Remember, every piece you make adds to your skills and your story. Happy crafting, and I look forward to seeing what you create next!
Discover more from WoodReality
Subscribe to get the latest posts sent to your email.

Pingback: Mastering Woodturning: A Comprehensive Guide for Beginners – WoodReality