Hey there, fellow woodworking and outdoor enthusiasts! Let me tell you a story. A few summers ago, I packed my old tent, some rusty cooking gear, and headed out for a weekend camping trip. The trip was great, but I think about how much more enjoyable it would be if my gear wasn’t so… well, basic. That’s when it hit me: why not build my own camping equipment? Not only would it be a fun challenge, but I could also tailor it to my exact needs and add a personal touch.Since then, I’ve built several pieces of DIY wooden camping gear, and let me tell you, it’s transformed my camping experience. There’s something incredibly satisfying about using gear that you’ve crafted with your own hands. In this article, I’m going to walk you through some fantastic projects that will not only enhance your outdoor adventures but also give you a real sense of accomplishment. So, grab your tools, and let’s dive into the world of DIY wooden camping gear!
Why Choose Wooden Camping Gear?
Before we get started, let’s talk about why wood is an excellent choice for camping gear. Here are a few reasons that convinced me to switch from standard store-bought equipment:
- Durability: Wood is incredibly strong and can withstand the rigors of outdoor use. Properly treated wood can last for years, even in harsh conditions.
- Aesthetic Appeal: Let’s face it; wood looks fantastic! There’s something classic and timeless about wooden gear that adds a touch of rustic charm to any campsite.
- Sustainability: Using sustainably sourced wood is an eco-friendly option. It’s a renewable resource that, when managed responsibly, has a lower environmental impact compared to plastics and metals.
- Customization: With DIY wooden camping gear, you have complete control over the design and dimensions. You can tailor each piece to fit your specific needs and preferences.
- Satisfaction: The feeling of using something you’ve made yourself is unbeatable. It adds an extra layer of enjoyment to your camping experience.
Now that we’re on the same page about the benefits, let’s get into some exciting project ideas.
Project 1: Folding Camp Table

A sturdy and portable camp table is essential for any camping trip. It’s perfect for cooking, eating, or even playing cards around the campfire. Here’s how to build a simple, folding camp table:Materials You’ll Need:
- 1 sheet of ¾-inch plywood (approximately 2ft x 4ft)
- 4 wooden legs (18-24 inches long)
- 2 hinges
- Wood screws (1-inch and 1 ½-inch)
- Wood glue
- Sandpaper (various grits)
- Wood stain or sealant
- Measuring tape
- Pencil
- Saw (circular or hand saw)
- Drill with various drill bits
- Clamps
Step-by-Step Instructions:
- Cut the Plywood: Measure and cut the plywood into two equal pieces (approximately 2ft x 2ft each). These will be the tabletop sections.
- Prepare the Legs: If you’re using pre-cut legs, ensure they are all the same length. If you’re cutting them yourself, use a saw to achieve consistent lengths. Sand them down to a smooth finish.
- Attach the Legs: Position the legs on the underside of one tabletop section, near the corners. Use wood glue and 1 ½-inch wood screws to secure them in place. Make sure the legs are evenly spaced and securely attached.
- Connect the Tabletop Sections: Place the two tabletop sections side by side. Attach the hinges along the center seam on the underside of the table. Use wood screws to secure the hinges to both sections, allowing the table to fold in half.
- Sand and Finish: Sand the entire table to remove any rough edges or splinters. Start with a coarser grit sandpaper (e.g., 80-grit) and gradually move to finer grits (e.g., 220-grit) for a smooth finish.
- Apply Stain or Sealant: Apply a wood stain or sealant to protect the table from moisture and UV damage. Follow the manufacturer’s instructions for application and drying times. I personally prefer a natural stain to highlight the wood grain.
- Test the Folding Mechanism: Ensure the table folds and unfolds smoothly. If there’s any resistance, check the hinges and adjust as necessary.
Tips and Tricks:
- Use a countersink bit to pre-drill holes for the screws. This prevents the wood from splitting.
- Apply wood glue to all joints for added strength.
- Consider adding a locking mechanism to keep the table securely open when in use.
Project 2: Utensil Organizer
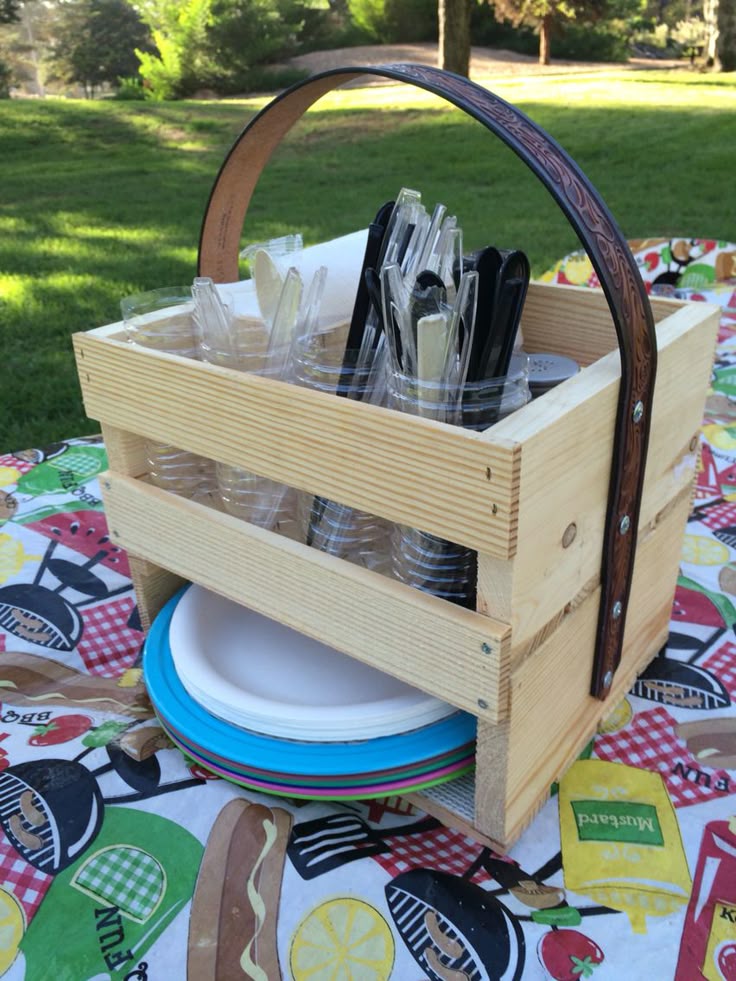
Keeping your cooking utensils organized at the campsite can be a real challenge. This DIY wooden camping gear project solves that problem with a simple and functional utensil organizer.Materials You’ll Need:
- Pine boards (various sizes, depending on your desired organizer dimensions)
- Wood glue
- Small nails or brad nails
- Sandpaper
- Wood stain or sealant
- Measuring tape
- Pencil
- Saw
- Hammer or nail gun
- Clamps
Step-by-Step Instructions:
- Cut the Boards: Measure and cut the pine boards into the necessary pieces for the organizer. You’ll need:
- Base board (e.g., 6 inches x 12 inches)
- Side boards (e.g., 4 inches tall, to create the box-like structure)
- Dividers (optional, to create separate compartments for utensils)
- Assemble the Frame: Use wood glue and nails to assemble the side boards around the base board. Ensure the corners are square and the boards are flush. Clamp the pieces together while the glue dries.
- Add Dividers (Optional): If you want to create separate compartments, measure and cut the divider boards. Glue and nail them into place inside the frame.
- Sand and Finish: Sand the entire organizer to remove any rough edges or splinters. Apply a wood stain or sealant to protect the wood from moisture.
- Add Hanging Hooks (Optional): If you want to hang the organizer, attach small hooks or eyelets to the back or sides.
Tips and Tricks:
- Use a miter saw for precise cuts to ensure the corners fit together perfectly.
- Consider adding a handle for easy carrying.
- Customize the size and number of compartments to fit your specific utensils.
Project 3: Lantern Stand
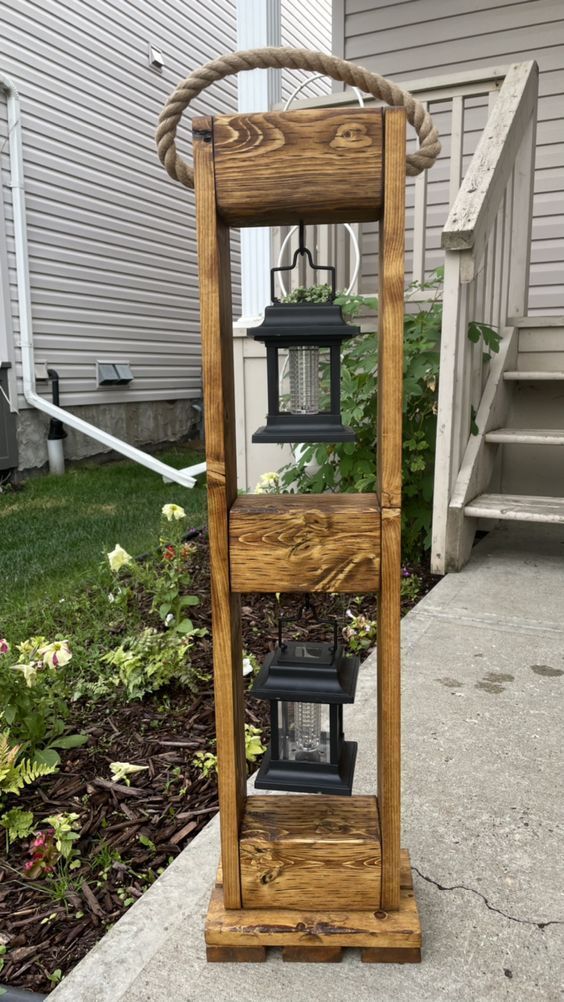
A good lantern stand is essential for illuminating your campsite at night. This DIY wooden camping gear project is simple, sturdy, and easy to build.Materials You’ll Need:
- Wooden pole (approximately 4-5 feet long)
- Wooden base (e.g., a square or round piece of plywood)
- Metal hook or eyelet
- Wood screws
- Wood glue
- Sandpaper
- Wood stain or sealant
- Drill
- Measuring tape
- Pencil
- Saw
Step-by-Step Instructions:
- Prepare the Pole: Sand the wooden pole to remove any rough edges or splinters. Apply a wood stain or sealant to protect it from the elements.
- Prepare the Base: If you’re using a square or round piece of plywood, ensure it’s stable and level. Sand the edges to make them smooth.
- Attach the Pole to the Base: Position the pole in the center of the base. Use wood glue and wood screws to secure it in place. Drill pilot holes to prevent the wood from splitting.
- Attach the Hook: Drill a small hole at the top of the pole. Screw in the metal hook or eyelet. This is where you’ll hang your lantern.
- Sand and Finish: Sand any remaining rough edges. Apply a final coat of stain or sealant to protect the entire stand.
Tips and Tricks:
- Use a heavy base to prevent the stand from tipping over.
- Consider adding a decorative touch, such as carving or painting the pole.
- Make sure the hook is strong enough to hold the weight of your lantern.
Sharing Your Gear and the Joys of DIY
Once you’ve completed these DIY wooden camping gear projects, you’ll not only have functional and beautiful camping equipment, but you’ll also have the satisfaction of knowing you built it yourself.
Want to see a real-world example of what you can achieve with some woodworking skills and a passion for the outdoors? Check out this inspiring video
Conclusion: Embrace the Adventure
Building your own DIY wooden camping gear is not just about saving money or creating functional equipment; it’s about embracing the adventure and connecting with nature on a deeper level. The satisfaction of using gear that you’ve crafted with your own hands is truly unmatched.So, what are you waiting for? Grab your tools, gather your materials, and start building your own unforgettable camping experiences. And don’t forget to share your creations with the world. Happy woodworking, and happy camping!
If you’re serious about woodworking and want access to a vast library of detailed plans, I highly recommend checking out Ted’s Woodworking Plans. With over 16,000 projects, ranging from simple crafts to complex furniture, there’s something for every skill level. The plans include step-by-step instructions, detailed diagrams, and material lists, making it easy to bring your woodworking visions to life.
Affiliate Disclosure:Please note that I may earn a commission if you purchase Ted’s Woodworking Plans through the affiliate link above. I only recommend products that I believe will add value to my readers. Your support helps me continue to create helpful content.
Discover more from WoodReality
Subscribe to get the latest posts sent to your email.

Pingback: Build Your Own Adventure: DIY Wooden Camping Gear for Unforgettable Trips - Just another WordPress site