Introduction
There’s something magical about walking through a beautifully crafted wooden garden arbor. It’s like stepping into a secret garden, where climbing roses or jasmine drape over a charming wooden frame, creating a fairytale entrance. I’ve always loved the elegance an arbor adds to an outdoor space, so I decided to build one myself—and let me tell you, the experience was incredibly rewarding!
Whether you want a cozy spot for your morning coffee, a grand entrance to your garden, or a sturdy frame for climbing plants, a wooden arbor is a fantastic DIY project. In this guide, I’ll walk you through how I built mine from scratch. By the end, you’ll have a sturdy, beautiful arbor that transforms your garden into a picture-perfect retreat.
Step 1: Planning Your Wooden Garden Arbor
Before picking up a single tool, the first step is proper planning. Trust me, a well-thought-out design will save you time, money, and frustration. Here’s how I started:
Choosing the Right Design and Style
There are so many styles of garden arbors! Some are simple, with clean rectangular frames, while others have decorative arches, lattice panels, or even benches. I wanted mine to have a classic curved arch with lattice sides for climbing plants.
If you’re unsure about the style, consider these factors:
- Garden theme: Modern, rustic, or traditional?
- Purpose: A grand entrance, a seating area, or just a plant trellis?
- Skill level: Some designs are easier for beginners than others.
Determining the Perfect Location
I knew my arbor had to be positioned where it would get maximum visual impact. Here are some placement ideas:
- Over a garden pathway for a grand entrance.
- Near a bench to create a shaded reading nook.
- By the fence as a standalone decorative feature.
Measuring the Area Properly
Once I chose the spot, I measured carefully. Standard arbors are about 7-8 feet tall and 4-6 feet wide, but you can adjust this based on your space. Just make sure it’s proportional to your garden.
Step 2: Gathering Materials and Tools
With the plan in place, it was time to gather everything I needed.
Best Wood for a Garden Arbor
The type of wood you choose will determine how long your arbor lasts. I considered several options:
- Cedar: Naturally weather-resistant, great for outdoor structures.
- Redwood: Beautiful and durable but more expensive.
- Pressure-treated lumber: Budget-friendly but needs sealing.
I went with cedar because it’s resistant to rot and insects, plus it smells amazing!
Essential Tools You’ll Need
Here’s a quick list of tools that made my job easier:
- Saw (circular or miter saw) – For cutting wood precisely.
- Drill and screws – For secure assembly.
- Level and measuring tape – Ensuring straight lines.
- Sandpaper or sander – To smooth out rough edges.
- Post hole digger – If anchoring the arbor into the ground.
Other Materials
- Galvanized screws and bolts (rust-resistant).
- Wood stain or sealant for weather protection.
- Quick-set concrete (if anchoring posts in the ground).

Step 3: Cutting and Preparing the Wood
Now came the fun part—cutting the wood!
Measuring and Marking Before Cutting
I double-checked all my measurements and marked the wood carefully. A chalk line or pencil helps ensure straight cuts.
Cutting the Beams and Posts
For my arbor, I needed:
- Four vertical posts (4×4 lumber, 8 feet tall)
- Two horizontal beams (2×6 lumber, 6 feet long)
- Curved arch pieces (2×4 lumber, cut into shape)
Using a circular saw, I made precise cuts. For the arch, I traced a gentle curve onto the wood and cut it with a jigsaw.
Sanding and Treating the Wood
Once cut, I sanded every piece until smooth. Then, I applied a wood preservative to protect against moisture and pests.
Step 4: Assembling the Arbor Framework
Now it was time to assemble!
Setting Up the Posts Securely
I dug 2-foot deep holes for the posts and secured them with quick-set concrete. This step is crucial for stability, especially if you live in a windy area.
Attaching Horizontal Beams and Supports
With the posts in place, I attached horizontal beams across the top using bolts and brackets for extra strength.

Step 5: Adding Decorative Elements
Once the main structure was in place, it was time to make my arbor stand out with beautiful decorative features. While this step is optional, adding aesthetic details enhances the visual appeal and functionality of your arbor.
Designing and Attaching the Arch
Since I wanted a classic curved top, I created an arched beam using two 2×6 boards. Here’s how I did it:
- Marking the Arch Curve – I used a flexible strip of wood to trace a smooth curve on both boards.
- Cutting the Curve – A jigsaw was the best tool for this, giving me clean, even cuts.
- Sanding for a Smooth Finish – I lightly sanded the edges to avoid rough splinters.
- Securing the Arch to the Frame – Using sturdy metal brackets, I attached the arch on top of the vertical posts.
For a simpler design, you could skip the curve and go with a flat top by using straight beams instead.
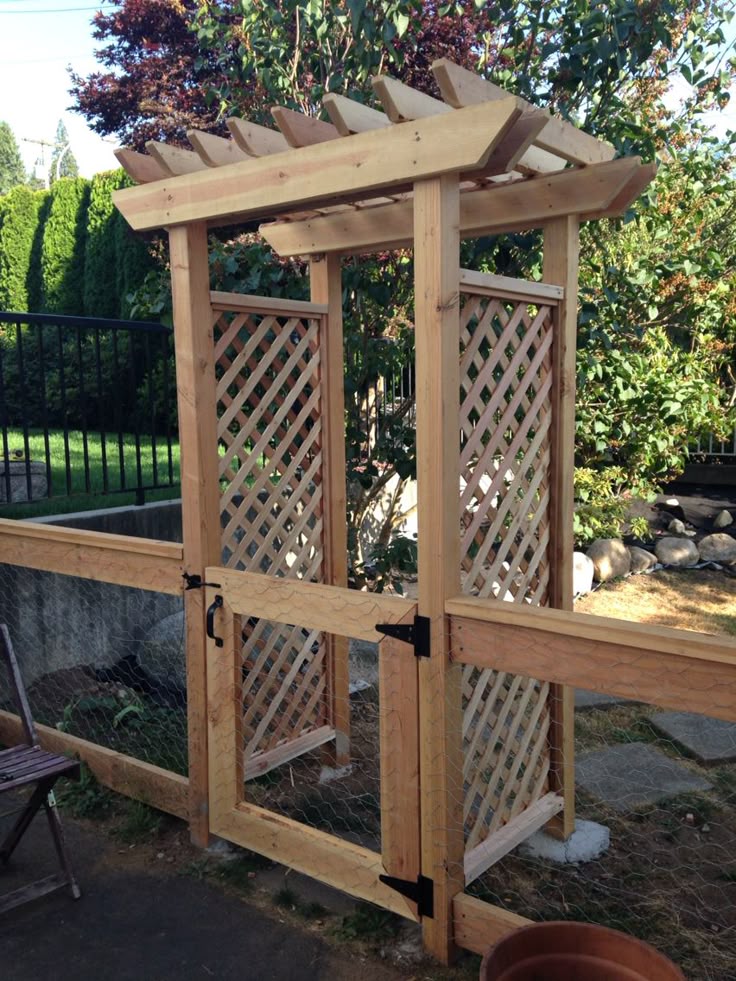
Adding Lattice Panels for Climbing Plants
One of my favorite elements of any garden arbor is the climbing plants that weave their way up the frame. To support vines and flowers, I added lattice panels to the sides of my arbor.
- I used pre-made wooden lattice panels, which I cut to fit the side openings.
- I secured them using small screws and wood glue for extra stability.
- For an extra decorative touch, I framed the lattice with thin wooden trim.
Customizing with Trims and Paint
For a final touch, I added decorative wooden trims along the edges of the arch and vertical posts. Then, I had to decide—paint or stain?
- Paint: If you want a bold color that pops, outdoor paint is a great option.
- Stain: If you love the natural wood look (like I do), use a stain that enhances the wood grain.
Since I used cedar, I went with a clear stain to protect the wood while maintaining its natural beauty.
Step 6: Securing the Arbor in Place
Building the arbor was one thing, but securing it properly was just as important. The last thing I wanted was for my beautiful arbor to wobble or tip over during a storm.
Anchoring the Posts Properly
There are two main ways to secure an arbor:
- Digging Post Holes and Using Concrete (Permanent Method)
- I dug 2-foot-deep holes at each post location.
- I placed the posts in the holes and poured in quick-set concrete.
- Once the concrete was dry, the posts were rock-solid.
- Using Post Anchors (For Decks or Patios)
- If you’re installing your arbor on a wooden deck or concrete patio, post anchors are a great option.
- They keep the posts stable while allowing for some flexibility if you ever need to move the arbor.
I personally used the concrete method since my arbor was installed in the garden.
Checking for Alignment
Once the posts were in place, I used a level to double-check that everything was straight. Adjustments at this stage are much easier than later!

Step 7: Finishing Touches and Weatherproofing
With everything built and secured, the final step was to weatherproof and decorate my arbor to ensure it lasted for years.
Painting or Staining the Wood
To keep my arbor looking fresh and prevent weather damage, I applied an outdoor wood stain with UV protection. This keeps the wood from fading, cracking, or rotting over time.
If you prefer paint, make sure to use exterior-grade paint that resists moisture.
Applying a Protective Sealant
Even with high-quality wood, I wanted extra protection against rain and pests. I used a clear wood sealant, which acts as a water-repellent barrier.
Decorating with Lights, Vines, or Flowers
Once my arbor was fully set up, it was time for the fun part—decorating!
- I wrapped solar-powered string lights around the top for a cozy, illuminated look at night.
- I planted climbing roses and jasmine at the base, which will eventually cover the arbor in fragrant blooms.
- I even hung small lanterns from the lattice panels for added charm.
Step 8: Maintaining Your Garden Arbor
Even though a wooden garden arbor is durable, regular maintenance is key to keeping it in perfect shape for years.
Regular Cleaning and Inspections
I make it a habit to:
- Brush off dirt, leaves, and debris every few weeks.
- Wash the wood with a mild soap solution to prevent mold buildup.
- Inspect for loose screws or nails and tighten them if necessary.
Repairing Damage and Re-Staining
- If I notice small cracks, I fill them with wood filler and sand them down.
- Every 2-3 years, I apply a fresh coat of stain or sealant to maintain water resistance.
Preventing Rot and Insect Infestations
To keep my arbor safe from pests and decay:
- I ensure the base stays dry by keeping soil and mulch away from the posts.
- I use a natural wood preservative to prevent termites and fungi.
Read Also:
DIY Potting Bench Plans: How I Built the Ultimate Garden Workspace
How to Build a Wooden Fence: A Step-by-Step DIY Guide
Conclusion
Building a wooden garden arbor is one of the most rewarding DIY projects I’ve ever tackled. Not only does it add a stunning focal point to my garden, but it also serves as a functional structure for climbing plants.
With the right materials, careful planning, and a bit of patience, you can create an arbor that enhances your outdoor space for years to come. If you’re passionate about woodworking or love DIY projects, I highly recommend giving this a try!
Take Your Woodworking Skills to the Next Level!
If you enjoyed this guide and want detailed, step-by-step woodworking plans, check out Teds Woodworking Plans. This collection includes 16,000+ detailed project plans, making it perfect for beginners and experienced woodworkers alike.
👉 Click here to explore Teds Woodworking Plans!
(Affiliate Disclosure: I may earn a commission if you purchase through this link, at no extra cost to you.)
Frequently Asked Questions (FAQs)
1. How long does it take to build a wooden garden arbor?
It depends on your experience and design complexity. A simple arbor takes 1-2 days, while more detailed designs may take a weekend or more.
2. What is the best wood for an outdoor arbor?
Cedar and redwood are excellent choices because they are naturally rot-resistant and long-lasting.
3. Do I need a permit to build an arbor?
In most cases, no permit is required, but check with your local building regulations, especially if the arbor is large.
4. Can I build an arbor without using concrete?
Yes, you can use post anchors instead, but concrete provides the best stability for long-term durability.
5. What plants grow best on a garden arbor?
Climbing roses, jasmine, clematis, and wisteria all thrive on an arbor, adding beauty and fragrance to your garden.
Hope you found this guide helpful! If you have any questions or need advice, feel free to ask.
Happy woodworking! 😊
Please don’t forget to leave a review.
Discover more from WoodReality
Subscribe to get the latest posts sent to your email.

Pingback: How to Build a Raised Garden Bed from Wood: The Ultimate DIY Guide – WoodReality
Pingback: How to Build a Wooden Garden Bridge – A Step-by-Step Guide – WoodReality