Introduction
Having a shed is a great way to store garden tools, bikes, or even small equipment, but if the entrance sits a few inches above the ground, getting heavy items inside can be a real struggle. That’s where a shed ramp comes in!
A well-built shed ramp provides smooth access, prevents unnecessary lifting, and makes rolling heavy equipment in and out effortless. Whether you have a lawnmower, wheelbarrow, or even a motorcycle, a ramp can make shed use far more convenient.
Why Build Your Own Shed Ramp?
Sure, you could buy a premade ramp, but building one yourself ensures:
✅ A custom fit for your specific shed height and width
✅ Use of high-quality materials for durability
✅ Cost savings compared to pre-made solutions
✅ A sense of accomplishment with a DIY project
By following this step-by-step guide, you’ll learn how to calculate the proper dimensions, choose the right materials, and construct a durable, long-lasting ramp for easy access to your shed. Plus, I’ll include a FREE downloadable shed ramp blueprint and a helpful video tutorial to make the process easier.
Planning Your Shed Ramp
Determining the Right Size and Angle
One of the most important steps in building a shed ramp is getting the size and angle right. If your ramp is too steep, it can be unsafe and difficult to use. On the other hand, if it’s too long, it may take up unnecessary space in your yard.
How to Determine the Right Length & Slope
To calculate the proper ramp length, use this simple formula:Length=Height of the Shed BaseSlope Ratio\text{Length} = \frac{\text{Height of the Shed Base}}{\text{Slope Ratio}}Length=Slope RatioHeight of the Shed Base
Recommended Slope Ratios:
- 1:8 (gentle slope) – Best for heavy equipment like lawnmowers
- 1:10 (moderate slope) – Suitable for wheelbarrows and bikes
- 1:12 (ADA standard slope) – Ideal for walkers or disability access
🔹 Example Calculation: If your shed base is 16 inches high and you want a 1:8 slope, the ramp length should be:16×8=128 inches (10.6 feet)16 \times 8 = 128 \text{ inches (10.6 feet)}16×8=128 inches (10.6 feet)
Choosing the Best Materials
The type of materials you use will determine the durability, strength, and weather resistance of your ramp.
Best Wood for Shed Ramps
- Pressure-Treated Lumber – Resistant to moisture and rot
- Exterior Plywood – Great for a solid surface
- Composite Decking – Low-maintenance and weatherproof
Fasteners & Hardware
- Galvanized Screws & Bolts – Prevent rusting
- Concrete Blocks or Gravel – For base support and stability
Tools and Materials Needed
Essential Tools
✔️ Measuring Tape – To calculate dimensions
✔️ Level – To ensure even placement
✔️ Circular Saw – For cutting lumber
✔️ Power Drill – For securing screws and bolts
✔️ Carpenter’s Square – To check alignment
Materials List
✔️ 2×6 or 2×8 pressure-treated boards (for the ramp frame)
✔️ Decking boards or exterior plywood (for the ramp surface)
✔️ Concrete blocks or gravel (for base support)
✔️ Lag screws and galvanized nails (for attachment)
✔️ Weatherproofing stain or paint (to protect the wood)
How to Calculate the Slope and Length of the Ramp
Now that you have the basic materials and tools, let’s go deeper into the slope calculation to ensure your ramp is functional and safe.
1. Measuring the Shed Height
- Place a level on the shed floor, extending outwards.
- Measure vertically from the ground to the bottom of the shed door opening.
2. Applying the Slope Ratio
- Use the formulas above to determine the ideal ramp length.
3. Considering Space Limitations
- If space is limited, you may need a steeper ramp but add traction strips to prevent slipping.
4. Accounting for Ground Conditions
- If the area is uneven, you may need to add a gravel base or concrete footings.

Step 1: Preparing the Area
Before construction begins, you need to clear and level the ground where the ramp will sit.
How to Prepare the Ground for the Ramp:
- Clear any debris, grass, or rocks to create a smooth surface.
- Mark the ramp area using stakes and string to outline the width and length.
- Dig a shallow trench at the base of the ramp area (about 2-3 inches deep) to prevent shifting.
- Lay a gravel base for extra stability.
✔️ Pro Tip: If your shed is on soft ground, consider using concrete pavers or bricks under the ramp for added support.
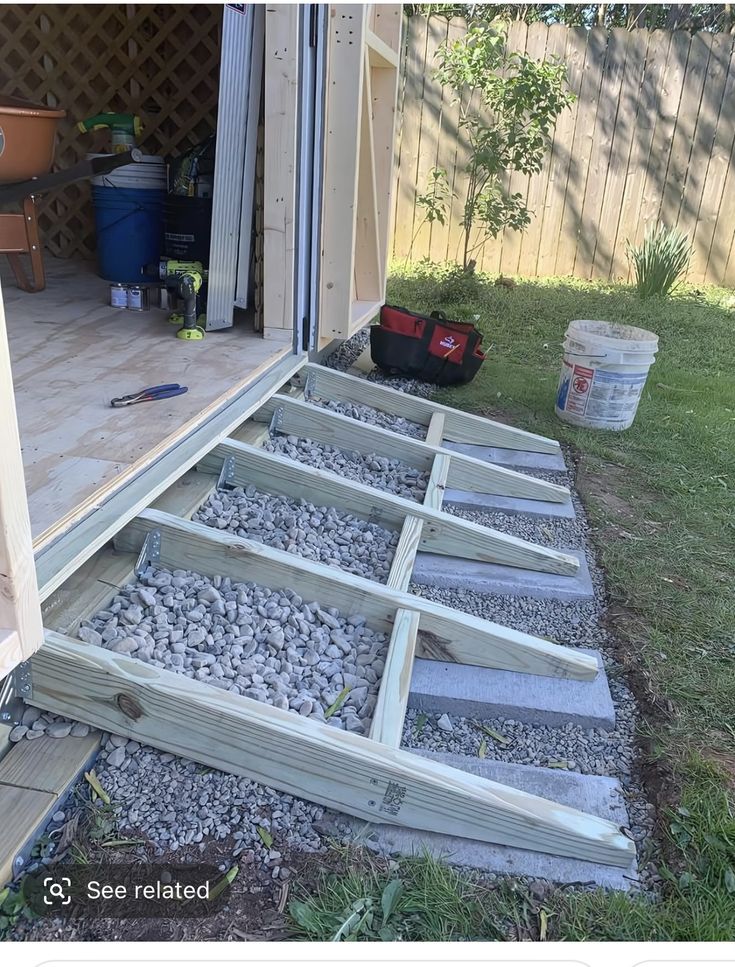
Step 2: Building the Ramp Frame
Now that we have the area prepared and measurements ready, it’s time to build the frame.
1. Cutting the Frame Boards
- Cut two long side rails using 2×6 or 2×8 pressure-treated lumber based on the ramp length you calculated earlier.
- Cut cross supports (also called joists) to reinforce the frame. Space them every 12-16 inches apart for added stability.
✔️ Pro Tip: If your ramp is longer than 8 feet, consider using a center support beam to prevent sagging.
2. Assembling the Frame
- Place the side rails parallel to each other on a flat surface.
- Attach the cross supports between them using galvanized screws or bolts.
- Ensure everything is square and level using a carpenter’s square.
✔️ Pro Tip: Use wood glue along with screws to strengthen the joints.
3. Attaching the Frame to the Shed
- Align the ramp frame with the bottom of the shed’s entrance.
- Secure it using lag bolts into the shed’s base or floor joists.
- Double-check that the frame is sturdy and level before proceeding.
Step 3: Installing the Decking
With the frame secured, the next step is to attach the ramp surface.
1. Choosing the Decking Material
- Pressure-treated plywood (easiest to install, solid surface)
- Wooden decking boards (strong, provides natural traction)
- Composite decking (weatherproof, long-lasting)
2. Installing the Decking
- If using plywood, cut it to the ramp size and attach it using galvanized screws every 8 inches.
- If using decking boards, space them ¼ inch apart to allow for drainage.
- Ensure the boards extend slightly beyond the frame for a finished look.
✔️ Pro Tip: For extra strength, use 2-inch screws instead of nails to prevent loosening over time.
Step 4: Adding Traction for Safety
A wooden ramp can become slippery, especially in wet conditions. Adding traction improves safety.
Best Ways to Add Grip to Your Ramp:
✔️ Non-slip traction strips – Easy to install, durable
✔️ Sand and paint mixture – Mix sand into outdoor paint for grip
✔️ Rubber mats – Great for extreme weather conditions
✔️ Metal grip plates – Ideal for ramps used in icy conditions
✔️ Pro Tip: If you live in a rainy or snowy area, use anti-slip tape or traction mats for extra safety.
Step 5: Sealing and Protecting the Ramp
To make your ramp last longer, weatherproof it with a sealant.
1. Choosing the Right Sealant
- Exterior wood stain – Protects against moisture and UV rays
- Polyurethane sealer – Adds a waterproof layer
- Weatherproof paint – A budget-friendly option
2. Applying the Sealant
- Use a paintbrush or roller to apply an even coat.
- Let it dry for 24-48 hours before use.
- Apply a second coat for extra protection.
✔️ Pro Tip: Reapply the sealant every 1-2 years to extend your ramp’s life.

Common Mistakes to Avoid
🚫 Incorrect Slope – A ramp that’s too steep is unsafe. Stick to the recommended ratios.
🚫 Using Untreated Wood – Untreated wood will rot quickly. Use pressure-treated lumber.
🚫 Not Anchoring the Ramp Properly – If the ramp isn’t secured, it can shift over time. Use lag bolts and a solid base.
🚫 Skipping the Sealant – Weatherproofing is essential to prevent wood rot and warping.
Alternative Shed Ramp Ideas
If a wooden ramp isn’t ideal for your needs, consider these alternatives:
✔️ Metal Ramps – Durable, ideal for motorized equipment
✔️ Concrete Ramps – Permanent, requires more effort but lasts a lifetime
✔️ Prefabricated Ramps – Ready-made, quick installation
Free Shed Ramp Blueprint Download
To make things even easier, I’ve found a free shed ramp blueprint that you can download and use for reference:
🔗 Download Free Shed Ramp Plans Here
These plans include detailed measurements, material lists, and step-by-step instructions.
Video Tutorial: Watch & Learn
For those who prefer visual instructions, check out this step-by-step YouTube tutorial on building a shed ramp:
📹 Watch the tutorial here:
This video will help you see the process in action, making it even easier to follow along!
Conclusion and Final Tips
Building a shed ramp is a simple but rewarding DIY project that makes accessing your shed effortless. By following this guide, you now know how to:
✅ Calculate the correct slope and length
✅ Choose the best materials for durability
✅ Build a strong and stable frame
✅ Install decking and add traction for safety
✅ Seal and protect your ramp for long-term use
With proper care, your shed ramp will last for years, making yard work and storage much easier.
Get Professional Shed Plans
If you’re looking for even more detailed shed-building plans, I highly recommend Ryan’s Shed Plans.
Why Choose Ryan’s Shed Plans?
✔️ 12,000+ shed designs with step-by-step instructions
✔️ Easy-to-follow blueprints for beginners
✔️ Material lists included for simple shopping
🔗 Get instant access here → Ryan’s Shed Plans
✅ Affiliate Disclosure: This post contains affiliate links. If you purchase through them, I may earn a commission at no extra cost to you.
FAQs
1. What is the ideal slope for a shed ramp?
The ideal slope depends on how you’ll use the ramp:
- 1:8 ratio – Best for heavy equipment like lawnmowers
- 1:10 ratio – Suitable for wheelbarrows and bikes
- 1:12 ratio – Recommended for easier walking or ADA compliance
For example, if your shed door is 16 inches high, a 1:8 slope would require a ramp that is 128 inches (10.6 feet) long.
2. What type of wood should I use for a shed ramp?
It’s best to use pressure-treated lumber because it is resistant to moisture, rot, and insects. Here are some options:
- 2×6 or 2×8 boards for the ramp frame
- Exterior plywood or composite decking for the surface
- Galvanized screws and bolts for assembly (rust-resistant)
If you want a low-maintenance option, consider composite decking, which is weatherproof and lasts longer.
3. How do I make my shed ramp slip-resistant?
Since wooden ramps can become slippery, especially in wet or icy conditions, consider these anti-slip solutions:
- Non-slip traction strips (easy to install)
- Adding sand to exterior paint for extra grip
- Rubber mats or metal grip plates
- Grooved decking boards for better traction
For areas with frequent rain or snow, traction strips and rubber mats work best.
4. How do I attach the ramp to the shed?
To securely attach the ramp to the shed:
- Use lag screws or bolts to fasten the ramp frame to the shed’s floor joists.
- Ensure the ramp is flush with the shed floor for a smooth transition.
- If needed, use concrete blocks or a gravel base to prevent shifting.
A strong attachment ensures stability and safety when using the ramp.
5. How do I protect my shed ramp from weather damage?
To extend the lifespan of your shed ramp, follow these protection tips:
- Apply a weatherproof sealant or wood stain to prevent moisture damage.
- Re-seal the ramp every 1-2 years to maintain durability.
- Use pressure-treated wood to prevent rot.
- Ensure proper drainage by leaving small gaps between decking boards.
A well-maintained ramp can last 10+ years with proper care.
Discover more from WoodReality
Subscribe to get the latest posts sent to your email.
