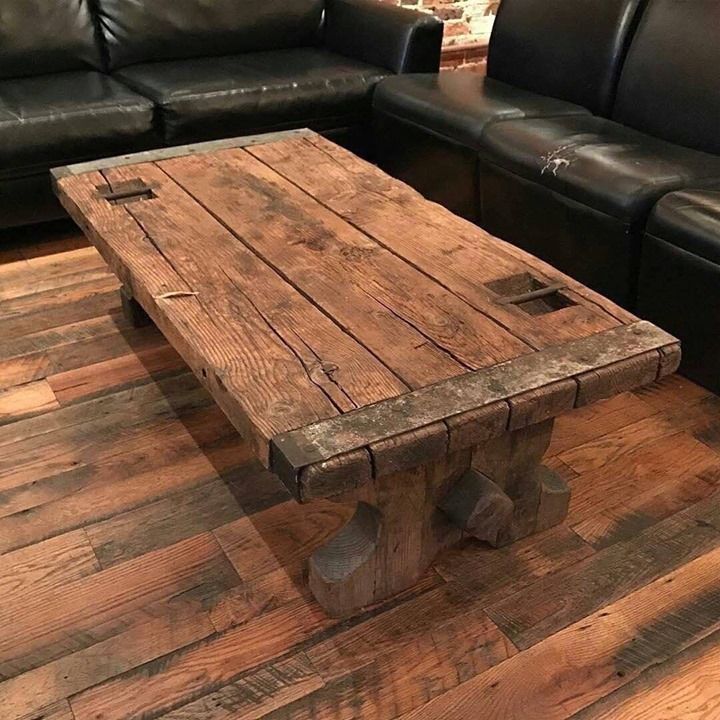
A rustic coffee table is more than just furniture—it’s a statement piece that adds warmth, character, and charm to your living space. Whether you love farmhouse aesthetics, vintage decor, or a cozy cabin vibe, a handcrafted rustic coffee table is the perfect addition to your home.
The best part? You can build one yourself, even if you’re a beginner! This detailed guide will walk you through every step of creating a beautiful, sturdy, and functional coffee table using affordable materials and basic tools.
We’ll cover: ✅ Choosing the right wood
✅ Essential tools and materials
✅ Cutting, assembling, and finishing
✅ Adding rustic charm (distressing, staining, and sealing)
✅ FREE downloadable blueprint
✅ Video tutorial for visual learners
🪵 Introduction: Why Build a Rustic Coffee Table?
A DIY rustic coffee table is not only an affordable way to furnish your home, but it also allows you to create something unique and meaningful. Store-bought furniture often lacks personality and durability, whereas a handmade table becomes a conversation piece that reflects your style.
Here’s why building a rustic coffee table is a fantastic project:
✔ Cost-Effective – Buying a solid wood rustic coffee table can cost $500-$1500, while building one yourself costs under $100.
✔ Beginner-Friendly – You only need basic tools and simple techniques.
✔ Customizable – Choose your wood type, stain color, and size to match your space.
✔ Stronger & Longer-Lasting – Unlike mass-produced furniture, a handcrafted table will last for generations.
Let’s dive into the step-by-step process of making a stunning and sturdy rustic coffee table!
🛠 Designing Your Rustic Coffee Table
Before starting, it’s crucial to plan your table’s design. Here’s what to consider:
1️⃣ Choosing the Right Wood
Your choice of wood affects the strength, appearance, and durability of your table.
✅ Best Wood for Rustic Coffee Tables:
- Reclaimed Wood – The most authentic rustic look, but may require sanding & treatment.
- Pine – Affordable, easy to work with, and stains beautifully.
- Oak – Sturdy and durable but heavier.
- Maple or Walnut – High-end, rich grain but more expensive.
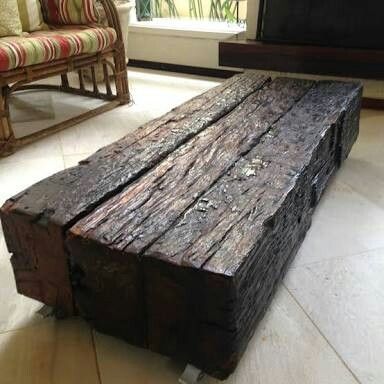
If you want a truly rustic, farmhouse-style table, reclaimed wood is the best choice. It already has a weathered and distressed look, adding instant character to your table.
2️⃣ Essential Tools You Need
You don’t need expensive tools—just the basics:
✅ Must-Have Tools:
✔ Circular Saw (or Miter Saw) – For cutting wood
✔ Drill – To attach the legs and frame
✔ Orbital Sander – For smooth finishing
✔ Clamps – Essential for securing pieces while gluing
✔ Tape Measure & Pencil – For accurate measurements
✔ Wood Glue & Screws – For a strong hold
If you want more advanced woodworking plans, Teds Woodworking Plans has step-by-step blueprints for every skill level!
📐 Step-by-Step Guide to Building a Rustic Coffee Table
Now, let’s start building! Follow these steps carefully.
🔨 Step 1: Gathering Materials
Here’s what you’ll need:
🪵 Materials:
- Tabletop: (5) 1×6 wooden planks (each cut to 48” long)
- Table Legs: (4) 4×4 posts (cut to 17” height)
- Apron (Frame Pieces): (2) 2x4s (cut to 40” long) & (2) 2x4s (cut to 22” long)
- Wood Glue & 2.5” Wood Screws
💡 Pro Tip: Reclaimed wood adds character to your table. If you can’t find any, distress your wood using a hammer or chains.
🪚 Step 2: Measuring and Cutting the Wood
Measure twice, cut once! Here’s how to prepare your wood:
1️⃣ Tabletop: Cut (5) planks at 48 inches long.
2️⃣ Legs: Cut (4) sturdy 4×4 posts at 17 inches high.
3️⃣ Apron (Frame Pieces): Cut (2) 40-inch boards and (2) 22-inch boards.
🛑 Before Assembly: Sand all pieces using 80-grit sandpaper and finish with 220-grit for smooth edges.
🪛 Step 3: Assembling the Table Frame
The frame is what supports the table. Here’s how to build it:
1️⃣ Attach the apron to the legs using wood glue & screws.
2️⃣ Use clamps to keep everything square & level while drilling.
3️⃣ Ensure the frame is sturdy before adding the tabletop.
🛑 Pro Tip: Use a carpenter’s square to make sure everything is aligned perfectly.
🪵 Step 4: Creating and Attaching the Tabletop
The tabletop is the star of the show! Here’s how to attach it:
1️⃣ Lay out the planks side by side.
2️⃣ Use wood glue between each board and clamp tightly.
3️⃣ Secure with screws from underneath to avoid visible holes.
4️⃣ Let the glue dry overnight before staining.
🛑 Before moving to the next step: Check that the tabletop is even & smooth.
🪵 Step 5: Adding Rustic Features
A rustic coffee table is all about charm, texture, and an aged appearance. To achieve this authentic farmhouse look, you can distress the wood and add metal accents for a unique touch.
🔨 Distressing the Wood (Optional, But Recommended!)
If you’re using new lumber, it may look too “perfect.” To give it a weathered and vintage feel, try these distressing techniques:
🔥 Easy Ways to Distress Wood:
✅ Hammer & Nails: Lightly tap the surface with a hammer or nail heads to create small dents and imperfections.
✅ Chains & Screws: Drop a small chain or screw pack onto the wood to create natural-looking scratches.
✅ Steel Wool & Vinegar: Soak steel wool in vinegar overnight and brush it onto the wood. This oxidizes the surface, creating a naturally aged patina.
✅ Sandpaper & Wire Brush: Use a wire brush or sandpaper to rough up the edges and corners for a worn look.
💡 Pro Tip: Test distressing techniques on scrap wood before applying them to your actual table!

🛠️ Adding Metal Accents for a Farmhouse Style
To enhance the rustic appeal, consider adding metal brackets, bolts, or decorative corner braces.
Ideas for a Farmhouse-Inspired Look:
✔ Black iron corner brackets – Adds an industrial touch.
✔ Antique-style drawer pulls – If you want a storage drawer in your table.
✔ Decorative nails or rivets – Enhances the handcrafted appearance.
You can find decorative hardware at home improvement stores or online.
🎨 Step 6: Finishing Touches – Staining & Sealing
Staining and sealing your coffee table protects the wood and enhances its beauty. You can go for a classic dark stain, a weathered gray, or even a whitewashed farmhouse finish.
🖌️ Choosing the Best Stain for a Rustic Look
Popular rustic stain colors:
✅ Dark Walnut – A rich, deep brown perfect for a farmhouse style.
✅ Weathered Gray – Gives the table an aged, reclaimed-wood look.
✅ Provincial – A warm, natural tone with a classic rustic feel.
✅ Whitewash or Limewash – Ideal for a light, distressed farmhouse look.
💡 Pro Tip: Always test the stain on a scrap piece of wood before applying it to the entire table!
🖌️ How to Apply Stain & Sealant
1️⃣ Sand the Table Again: Use 220-grit sandpaper for a super smooth finish.
2️⃣ Apply the Stain: Use a brush or cloth, working in the direction of the grain. Wipe off excess stain after 5-10 minutes for a natural look.
3️⃣ Let It Dry: Stains take 6-8 hours to dry.
4️⃣ Apply a Protective Sealer: Choose polyurethane (for durability), wax (for a matte finish), or tung oil (for a natural look).
5️⃣ Final Sanding: After the sealant dries, lightly sand the surface with 400-grit sandpaper for a silky finish.
Your rustic coffee table is now finished and ready to use! 🎉
📥 Free Rustic Coffee Table Blueprint & Video Tutorial
For a detailed diagram and measurements, grab this FREE downloadable blueprint:
📥 Download Free Rustic Coffee Table Plans
Prefer a visual tutorial? Check out this video guide:
📖 Want More Woodworking Plans?
If you loved this project and want to explore 16,000+ woodworking plans, check out Teds Woodworking Plans.
Teds Woodworking includes:
✔ Step-by-step instructions for thousands of projects
✔ Beginner-friendly and easy-to-follow guides
✔ Detailed blueprints and material lists
It’s perfect for DIYers and woodworking enthusiasts looking to improve their skills!
🏁 Conclusion
Building a rustic coffee table is an incredibly rewarding project that adds warmth and charm to your home. Not only is it budget-friendly, but it also allows you to create a one-of-a-kind piece that reflects your style.
✔ You learn new woodworking skills
✔ You save money compared to store-bought furniture
✔ You get a stunning, custom-made coffee table
By following this step-by-step guide, you now have a gorgeous rustic coffee table to enjoy for years to come!
❓ FAQs
1️⃣ How long does it take to build a rustic coffee table?
It usually takes 1-2 days, depending on drying times for stain and glue.
2️⃣ Can I build this coffee table without expensive tools?
Absolutely! You only need basic tools like a saw, drill, sander, and clamps.
3️⃣ What’s the best wood for a rustic coffee table?
For an authentic rustic look, go with reclaimed wood, pine, or oak.
4️⃣ Can I customize the table size?
Yes! Simply adjust the wood dimensions to fit your space.
5️⃣ How do I protect my rustic coffee table from stains and damage?
Apply a durable polyurethane sealer to prevent spills and scratches.
🔗 Affiliate Disclosure
This article contains affiliate links, meaning I may earn a small commission if you purchase through my links at no extra cost to you.
🎉 That’s it! You now have a beautifully handcrafted rustic coffee table! Let me know if you have any questions. Happy building! 🛠️🔥
Discover more from WoodReality
Subscribe to get the latest posts sent to your email.
