Introduction
Building a simple wooden bench is a practical and rewarding project, whether for a garden, patio, workshop, or entryway. A wooden bench is not only functional but also adds charm and warmth to any space. Many store-bought benches can be expensive and lack the personal touch that a handmade piece carries.
By constructing a wooden bench from scratch, individuals have full control over the choice of materials, dimensions, and design. This project is suitable for beginners and experienced woodworkers alike. In this detailed guide, the entire process—from planning and selecting materials to assembling and finishing—will be broken down into simple, easy-to-follow steps.
Benefits of Building a Wooden Bench
Before diving into the construction process, it’s worth highlighting why building a DIY wooden bench is a great project.
1. Cost Savings
Wooden benches available in stores can range from $100 to $500, depending on material and craftsmanship. By building one at home, costs can be significantly reduced, often under $50 if using reclaimed wood.
2. Customization and Personalization
When constructing a bench from scratch, the size, color, finish, and decorative details can be tailored to personal preferences. Whether adding armrests, storage space, or engraving, customization possibilities are endless.
3. Skill Development
This DIY project provides an excellent opportunity to enhance woodworking skills, from measuring and cutting to assembling and finishing. It serves as a great introduction for beginners to develop confidence with tools.
4. Durability and Quality
Handmade wooden benches, when built with the right materials and techniques, are often sturdier than mass-produced alternatives. With proper sealing and maintenance, they can last for decades.
5. Eco-Friendliness
Using reclaimed or sustainably sourced wood helps reduce environmental impact. Rather than purchasing factory-produced furniture, which may contain harmful chemicals, building a wooden bench ensures control over materials and finishes.
Types of Wooden Benches
There are various styles of wooden benches, each serving a specific purpose. Selecting the right one depends on intended use, available space, and design preferences.
1. Outdoor Garden Benches
These benches are designed to withstand weather conditions and are commonly placed in backyards, patios, or parks. Cedar and teak are the best wood choices due to their resistance to moisture and insects.
2. Indoor Entryway Benches
Perfect for foyers or mudrooms, these benches offer seating while putting on shoes. Some include built-in storage compartments for added functionality.
3. Storage Benches
Featuring hidden compartments or drawers, these benches serve as both seating and storage space, making them ideal for small apartments or utility rooms.
4. Workbenches
Heavier and sturdier, workbenches are designed for workshops, garages, or craft rooms. They often include reinforced frames and tool storage features.
Planning Your Wooden Bench
Before starting construction, thorough planning is necessary to ensure the bench meets expectations in terms of durability, size, and design.
1. Selecting the Right Wood
Choosing the right type of wood is essential, as it affects the bench’s strength, longevity, and aesthetics.
| Wood Type | Pros | Cons | Best Use |
|---|---|---|---|
| Pine | Affordable, easy to work with | Soft, may dent easily | Indoor benches |
| Cedar | Naturally weather-resistant | Slightly expensive | Outdoor benches |
| Oak | Durable and strong | Heavy and expensive | Both indoor and outdoor |
| Teak | High resistance to moisture | Expensive | Outdoor furniture |
For beginners, pine is a good choice due to its affordability and ease of handling. However, if placing the bench outdoors, it’s advisable to use cedar, oak, or teak for better longevity.
2. Choosing the Bench Size
The size of the bench depends on available space and intended use. Standard dimensions for a wooden bench:
- Length: 4 to 6 feet
- Width (seat depth): 12 to 16 inches
- Height: 18 inches (comfortable sitting height)
If the bench is for two people, a 4-foot length is sufficient. For three people, a 6-foot length is recommended.
3. Style and Design Considerations
Some additional factors to consider before construction:
- Backrest or no backrest? Benches with backrests offer more comfort but require additional materials.
- Armrests? If adding armrests, they should be positioned at a comfortable height of 8-10 inches above the seat.
- Leg style? Options include classic straight legs, X-frame legs, or hairpin legs for a modern touch.
- Paint, stain, or natural finish? Choosing a finishing method depends on the desired aesthetic and level of protection needed.
Tools and Materials Needed
Essential Tools
A simple wooden bench requires only a few basic woodworking tools:
- Measuring tape – For accurate cuts.
- Carpenter’s square – Ensures 90-degree angles.
- Saw (circular saw or handsaw) – For cutting wood to size.
- Drill with drill bits – For assembling with screws.
- Screwdriver or power drill attachment – Speeds up assembly.
- Clamps – Holds pieces in place while securing.
- Sandpaper (120 and 220 grit) – For smoothing surfaces.
- Safety gear – Safety glasses, gloves, and hearing protection.
Required Materials
To construct a standard 4-foot wooden bench, the following materials are needed:
- Wood planks – 2×4 or 2×6 boards for legs and supports.
- Wood screws – 2.5-inch screws for strong joints.
- Wood glue – Enhances strength in addition to screws.
- Stain or paint – Protects and enhances the wood’s appearance.
- Polyurethane sealant (for outdoor benches) – Adds water resistance.

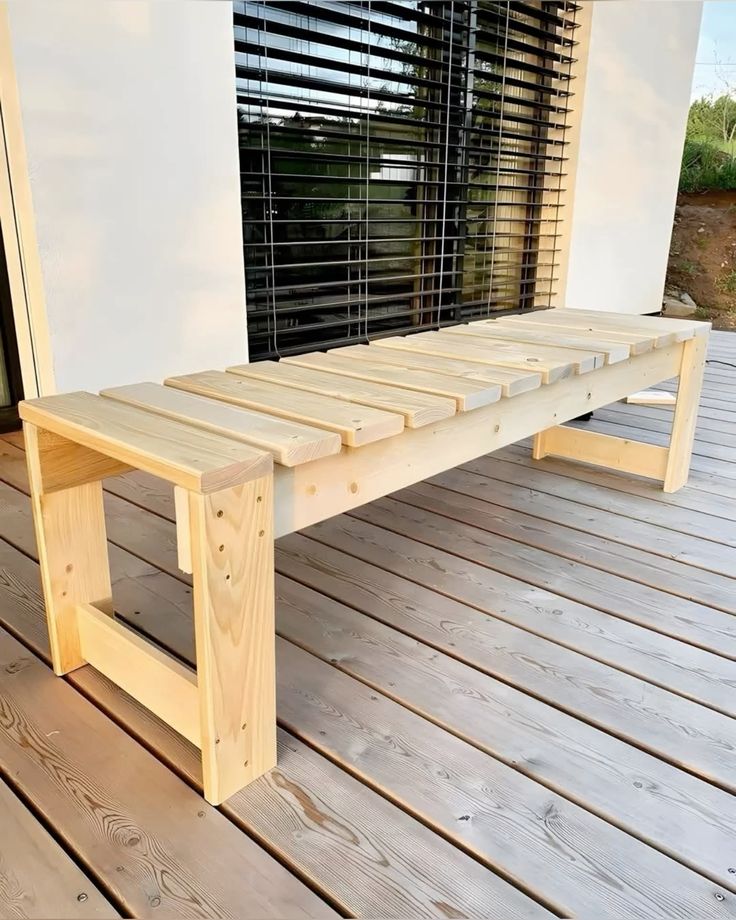
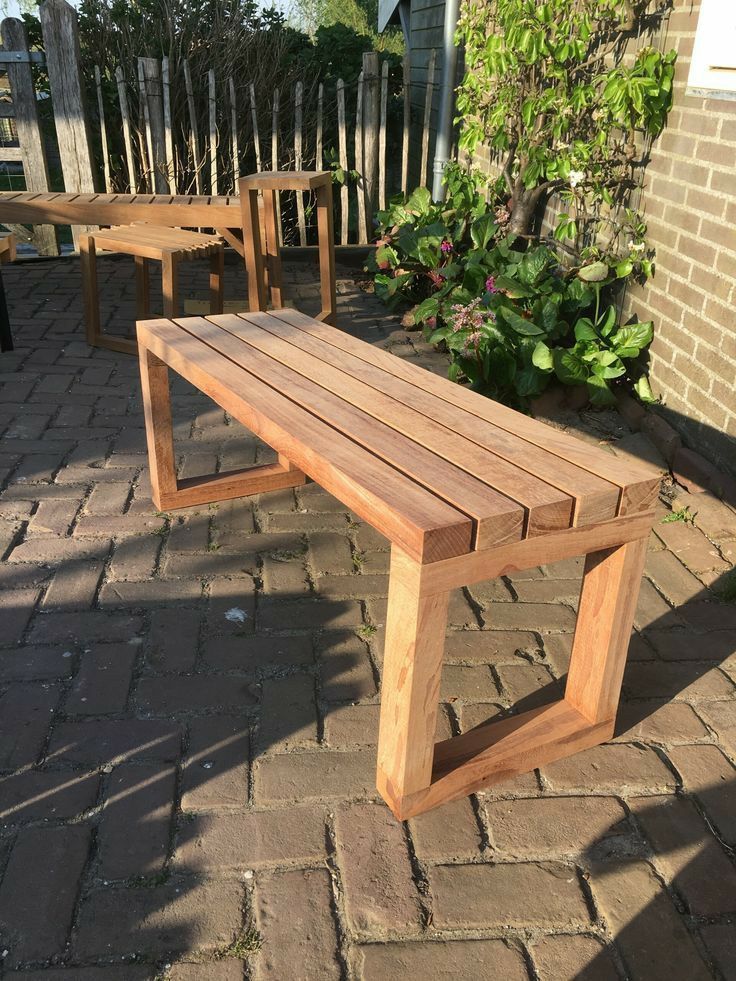
Step-by-Step Guide to Building a Simple Wooden Bench
Once the planning phase is complete, the construction process can begin. Below is a detailed step-by-step guide to building a sturdy, functional, and aesthetically pleasing wooden bench.
Step 1: Cutting the Wood
- Measure and Mark: Using a measuring tape and carpenter’s square, mark the wood according to the required dimensions.
- Cut the Planks: Use a circular saw or handsaw to cut the following pieces:
- Seat: (1) 2×12 board, 4 feet long
- Legs: (4) 2×4 boards, 18 inches long
- Supports: (2) 2×4 boards, 4 feet long
- Sand the Edges: Use 120-grit sandpaper to smooth rough edges and prevent splinters.
Step 2: Assembling the Bench Frame
- Build the Legs:
- Place two 18-inch leg boards parallel to each other, spaced according to the width of the seat.
- Attach a 4-foot support board across the top of the legs using wood glue and 2.5-inch screws.
- Repeat for the second set of legs.
- Attach the Side Supports:
- Align the two 4-foot side supports to the inside of the legs.
- Secure them using screws and wood glue.
- Ensure Stability: Before moving to the next step, check if the frame is sturdy and level.
Step 3: Attaching the Seat and Legs
- Position the Seat Plank: Place the 2×12 seat board on top of the frame, ensuring equal overhang on both sides.
- Secure with Screws: Drill pilot holes and use screws to fasten the seat to the frame securely.
- Check Alignment: Ensure the seat is level and centered before tightening the screws completely.
Step 4: Reinforcing the Bench
- Add Diagonal Braces (Optional): If extra stability is needed, cut two diagonal support braces and secure them between the legs and frame.
- Tighten All Screws: Double-check all connections to ensure they are secure.
Adding a Backrest (Optional)
For those who want additional comfort, adding a backrest is a great option.
- Cut Two Vertical Supports: Cut two 2×4 boards, 20 inches long, and attach them to the back legs.
- Install the Backrest Plank: Secure a 4-foot-long plank horizontally across the vertical supports.
- Angle for Comfort: To enhance ergonomics, tilt the backrest slightly backward (around 10 degrees).
Sanding and Finishing
Once the bench structure is complete, sanding and finishing are crucial to protect the wood and improve its appearance.
Step 1: Final Sanding
- Use 220-grit sandpaper to smooth the entire surface.
- Pay extra attention to edges and corners for a professional finish.
Step 2: Choosing a Finish
There are three primary finishing options:
| Finish Type | Pros | Cons |
|---|---|---|
| Wood Stain | Enhances natural grain | Needs a protective sealant |
| Paint | Wide range of colors | Can chip over time |
| Natural Sealer | Protects while keeping a raw look | Less color customization |
Step 3: Sealing the Wood
For outdoor benches, apply polyurethane or exterior-grade sealant to protect against moisture and UV damage.

Estimated Cost Breakdown
The total cost of building a simple wooden bench depends on the materials used. Below is a cost estimate for a 4-foot bench:
| Item | Estimated Cost |
|---|---|
| Lumber (Cedar or Pine) | $30 – $70 |
| Screws & Hardware | $10 – $20 |
| Wood Glue | $5 – $10 |
| Paint or Stain | $15 – $30 |
| Sealant (for outdoor use) | $10 – $25 |
| Total Cost | $70 – $150 |
Note: Costs vary based on wood type and local prices.
Free Blueprint for a Wooden Bench
To make this project even easier, here are some free blueprints:
👉 Click Here to get Free Bench Plans
detailed diagrams included, cut lists, and assembly instructions.
Video Tutorial: How to Build a Wooden Bench
For a visual step-by-step guide, watch this embedded YouTube tutorial:
Maintenance and Care Tips
A well-built wooden bench can last for decades if properly maintained. Whether placed indoors or outdoors, regular upkeep will preserve its strength and appearance.
1. Cleaning the Bench
- Dusting: For indoor benches, wipe the surface with a dry microfiber cloth regularly.
- Washing: For outdoor benches, use a mixture of mild soap and water every few months to remove dirt and grime.
- Avoid Harsh Chemicals: Do not use bleach or ammonia-based cleaners, as they can weaken the wood fibers.
2. Protecting Against Weather Damage
Outdoor benches are exposed to rain, humidity, and sun. To prevent damage:
- Reapply Sealant or Paint Every 1-2 Years: This keeps the wood protected from moisture and UV rays.
- Cover the Bench During Winter: If placed in a garden or patio, cover it with a waterproof tarp.
- Raise the Legs Slightly: Placing rubber feet or small bricks underneath prevents direct contact with wet ground.
3. Repairing Scratches and Dents
- Small Scratches: Lightly sand the affected area and reapply the finish.
- Deep Scratches or Dents: Use wood filler before sanding and refinishing.
Where to Find More Woodworking Plans
If you enjoyed building this wooden bench, there are countless other woodworking projects to try. Many resources offer free and premium plans for tables, chairs, shelves, and more.
Best Resources for DIY Woodworking Plans
- Teds Woodworking Plans – One of the largest collections of professional woodworking plans.
- Ana White’s DIY Projects – A great site with beginner-friendly furniture plans.
- Woodsmith Plans – Offers high-quality plans for various skill levels.
Teds Woodworking Plans is highly recommended for those looking for detailed blueprints with step-by-step guides, material lists, and expert tips.
Common Mistakes to Avoid
1. Choosing the Wrong Wood Type
- Softwoods like pine are easy to work with but need sealing for outdoor use.
- Hardwoods like oak are durable but more challenging to cut and assemble.
2. Weak Joints and Connections
- Always use wood glue along with screws for added strength.
- Drill pilot holes before inserting screws to prevent wood splitting.
3. Skipping Sanding and Finishing
- A rough bench is uncomfortable and prone to damage.
- Sanding smooths the surface and prepares it for staining or painting.
4. Ignoring Leveling and Stability
- Uneven benches wobble and can be uncomfortable.
- Always check for stability before securing all screws.
Conclusion
Building a simple wooden bench is a great beginner-friendly project that enhances both indoor and outdoor spaces. This guide covered everything from planning and selecting materials to step-by-step construction, finishing, and maintenance.
Whether for a garden, entryway, or workshop, a handcrafted wooden bench adds both beauty and function. Plus, it offers an affordable alternative to store-bought furniture, allowing for customization and long-term durability.
FAQs
1. What is the best wood for a wooden bench?
The best wood depends on its intended use:
- Pine – Affordable and ideal for indoor benches.
- Cedar or Teak – Best for outdoor benches due to natural weather resistance.
- Oak – Strong and durable for both indoor and outdoor use.
2. Can a wooden bench be used outdoors?
Yes, but it needs proper sealing to protect it from moisture and sun damage. Using exterior-grade wood and finishes helps increase its lifespan.
3. How long does it take to build a wooden bench?
A basic bench takes about 3-5 hours, depending on experience level. Adding a backrest or decorative details can extend the time needed.
4. What tools are absolutely necessary?
- Measuring tape – For accurate cuts.
- Saw (circular or handsaw) – For cutting wood.
- Drill and screws – For assembly.
- Sandpaper – For smoothing surfaces.
5. How can I make my wooden bench last longer?
- Apply a weatherproof finish for outdoor use.
- Store it indoors or cover it during rainy or winter seasons.
- Perform regular maintenance, including cleaning and resealing every year.
Final Thoughts
A DIY wooden bench is a perfect weekend project for beginners and experienced woodworkers alike. It offers affordable, functional, and customizable seating that can last for years with proper care.
If you found this guide helpful, consider exploring more detailed woodworking blueprints at Teds Woodworking Plans for advanced furniture projects.
Affiliate Disclosure
This article contains affiliate links, meaning a commission may be earned for purchases made through these links, at no additional cost to the reader.
Discover more from WoodReality
Subscribe to get the latest posts sent to your email.
