Last Updated: May 7, 2025 | By woodreality
Antique wooden furniture carries a timeless charm, telling stories of bygone eras through its intricate designs and weathered patina. Whether it’s a family heirloom, a thrift store gem, or a flea market find, restoring antique wooden furniture can breathe new life into these treasures while preserving their historical value. In this comprehensive guide, we’ll walk you through how to restore antique wooden furniture like a pro, covering everything from assessing the piece to applying the perfect finish. With the right tools, techniques, and patience, you can transform a worn-out antique into a stunning centerpiece for your home.
This guide is packed with expert tips, step-by-step instructions, and practical advice to help beginners and seasoned DIYers alike. Plus, we’ll share how to avoid common mistakes and achieve professional results. Before-and-after images (which you’ll add) will showcase the transformation, and we’ll even point you to resources like Ted’s Woodworking Plans for additional project inspiration. Let’s dive into the art of furniture restoration!
Why Restore Antique Wooden Furniture?
Restoring antique wooden furniture isn’t just about aesthetics—it’s about preserving history, sustainability, and craftsmanship. Here are some compelling reasons to take on a restoration project:
- Preserve Historical Value: Antiques often have unique designs or rare wood types that aren’t replicated in modern furniture.
- Eco-Friendly Choice: Restoring old furniture reduces waste and the demand for new materials.
- Cost-Effective: Refinishing an antique can be cheaper than buying high-quality new furniture.
- Personal Satisfaction: There’s immense pride in transforming a neglected piece into a showstopper.
- Increase Value: A well-restored antique can become a valuable asset for resale or as a family heirloom.
Whether you’re restoring a Victorian dresser, a Mid-Century chair, or an oak dining table, the process can be rewarding and fun. Let’s explore the tools and materials you’ll need to get started.
Tools and Materials for Restoring Antique Wooden Furniture
Before you begin, gather the right tools and materials to ensure a smooth restoration process. Here’s a comprehensive list:
Essential Tools
- Screwdrivers and Wrenches: For disassembling parts like drawers or hardware.
- Sandpaper (Various Grits): 80-grit for stripping, 120-150-grit for smoothing, 220-grit for finishing.
- Orbital Sander: Speeds up sanding large surfaces (optional but recommended).
- Putty Knife: For scraping off old finish or applying wood filler.
- Paint Scraper: To remove peeling paint or varnish.
- Tack Cloth: For wiping away dust between sanding and finishing.
- Brushes and Foam Applicators: For applying stain, sealant, or paint.
- Safety Gear: Gloves, dust mask, safety goggles, and ear protection.
- Cleaning Supplies: Rags, buckets, and sponges for prep work.
- Steel Wool (0000 Grade): For buffing or removing light scratches.
Materials
- Wood Cleaner: Mild dish soap or specialized wood cleaners like Murphy’s Oil Soap.
- Paint or Varnish Stripper: Chemical strippers like Citristrip for removing old finishes.
- Wood Filler: For repairing cracks, dents, or gouges.
- Wood Glue: For reinforcing loose joints.
- Stain or Paint: Choose based on the desired finish (e.g., oil-based stain for a natural look).
- Sealant: Polyurethane, lacquer, or wax to protect the restored surface.
- Replacement Hardware: New knobs, hinges, or screws if originals are damaged.
- Denatured Alcohol: For cleaning or testing finishes.
Optional but Helpful
- Heat Gun: For removing stubborn paint or varnish.
- Wood Hardener: To stabilize rotted or soft wood.
- Epoxy Resin: For major structural repairs.
- Drop Cloths: To protect your workspace.
Pro Tip: If you’re new to woodworking or want detailed plans for furniture projects, check out Ted’s Woodworking Plans. This resource offers thousands of blueprints, including restoration-inspired designs, to spark your creativity.
Step-by-Step Guide to Restoring Antique Wooden Furniture
Restoring antique furniture requires careful planning and execution. Follow these 10 steps to achieve professional results.
Step 1: Assess the Furniture’s Condition
Before diving in, evaluate the piece to determine its restoration needs:
- Structural Integrity: Check for loose joints, wobbly legs, or broken parts. Tap joints to test stability.
- Surface Condition: Look for scratches, dents, water stains, or faded finishes.
- Wood Type: Identify if it’s solid wood (e.g., oak, mahogany) or veneer, as this affects restoration techniques.
- Hardware: Inspect knobs, hinges, or decorative elements for damage or missing pieces.
- Historical Value: Research the piece’s era or style (e.g., Art Deco, Chippendale) to decide whether to preserve original features.
SEO Tip: Keywords like “assess antique furniture for restoration” or “how to evaluate old furniture” can be woven into this section for better ranking.
Example: If you’re restoring a 19th-century walnut dresser, avoid sanding off hand-carved details, as they add to its authenticity.
Step 2: Clean the Furniture
Dirt, grime, and wax buildup can hide the wood’s true condition. Clean the piece thoroughly:
- Mix a mild solution of dish soap and warm water.
- Dip a soft rag or sponge into the solution and wring it out.
- Gently wipe the surface, avoiding soaking the wood.
- Use a toothbrush for crevices or carvings.
- Dry immediately with a clean cloth.
For stubborn grime, try a specialized wood cleaner. Avoid harsh chemicals like bleach, which can damage the wood.
Step 3: Disassemble (If Necessary)
To make restoration easier, disassemble removable parts:
- Remove drawers, doors, or shelves.
- Unscrew hardware like knobs or hinges.
- Label pieces with masking tape to ensure easy reassembly.
Disassembling also helps you access hard-to-reach areas for stripping or sanding.
Step 4: Strip the Old Finish
Most antique furniture has layers of paint, varnish, or lacquer that need removal. Choose a stripping method based on the finish and your preference:
Chemical Stripping
- Apply a gel-based stripper (e.g., Citristrip) with a brush.
- Let it sit for the recommended time (usually 15-30 minutes).
- Scrape off the softened finish with a putty knife.
- Use steel wool for stubborn spots.
- Wipe down with denatured alcohol to neutralize the stripper.
Heat Stripping
- Use a heat gun to soften paint or varnish.
- Hold the gun 6-8 inches from the surface and move it slowly.
- Scrape off the softened material with a paint scraper.
- Work in small sections to avoid scorching the wood.
Safety Note: Work in a well-ventilated area and wear gloves, goggles, and a mask when using chemical strippers or heat guns.
SEO Tip: Subheadings like “how to strip paint from antique furniture” or “best methods for removing varnish” can target related searches.
Step 5: Repair Structural Damage
Fix any structural issues to ensure the piece is sturdy:
- Loose Joints: Apply wood glue to loose joints and clamp them for 24 hours. Reinforce with dowels or screws if needed.
- Cracks or Splits: Fill with wood filler or epoxy, then sand smooth.
- Dents or Gouges: Use wood filler for shallow damage or steam with a damp cloth and iron for minor dents.
- Rotten Wood: Apply wood hardener to stabilize, then fill with epoxy.
For complex repairs, consult a professional or refer to detailed woodworking resources like Ted’s Woodworking Plans for guidance on structural fixes.
Step 6: Sand the Surface
Sanding prepares the wood for staining or painting and removes imperfections:
- Start with 80-grit sandpaper to remove residual finish or rough spots.
- Progress to 120-150-grit for smoothing.
- Finish with 220-grit for a polished surface.
- Sand with the grain to avoid scratches.
- Wipe with a tack cloth to remove dust.
For intricate carvings, use sanding sponges or steel wool to avoid damaging details.
Pro Tip: An orbital sander saves time on flat surfaces, but hand-sanding is best for delicate areas.
Step 7: Test and Choose a Finish
Before applying a finish, test it on an inconspicuous area (e.g., the underside of a table):
- Stain: Enhances the wood’s natural grain. Choose oil-based for depth or water-based for eco-friendliness.
- Paint: Ideal for a modern or distressed look. Chalk paint is popular for antiques.
- Varnish or Lacquer: Adds a protective gloss or satin sheen.
- Wax: Offers a soft, natural finish but requires reapplication.
Consider the piece’s style and era. For example, a dark walnut stain suits Victorian furniture, while a distressed white paint fits Shabby Chic.
Step 8: Apply the Finish
Follow these steps for a flawless finish:
- Staining:
- Apply stain with a brush or rag in thin, even coats.
- Wipe off excess after 5-10 minutes for a lighter tone.
- Let dry for 24 hours between coats.
- Painting:
- Apply a primer for better adhesion.
- Use thin coats of paint, sanding lightly between layers.
- Distress with sandpaper for a vintage look (optional).
- Sealing:
- Apply polyurethane or lacquer with a foam brush for durability.
- Sand lightly with 220-grit between coats for smoothness.
- Use wax for a softer finish, buffing with a cloth for shine.
Step 9: Reassemble and Add Hardware
Once the finish is dry (typically 48-72 hours), reassemble the piece:
- Reattach drawers, doors, or shelves.
- Install new or restored hardware.
- Polish metal hardware with a cleaner like Brasso for a shiny look.
If replacing hardware, choose pieces that match the furniture’s era for authenticity.
Step 10: Maintain Your Restored Furniture
To keep your antique looking pristine:
- Dust weekly with a soft cloth.
- Use coasters to prevent water rings.
- Apply furniture wax every 6-12 months for waxed finishes.
- Avoid direct sunlight to prevent fading.
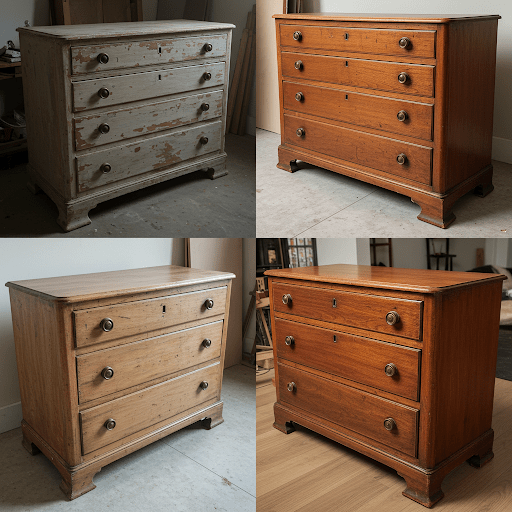
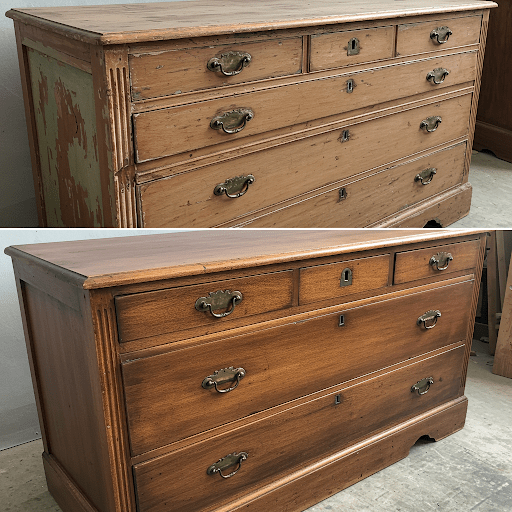
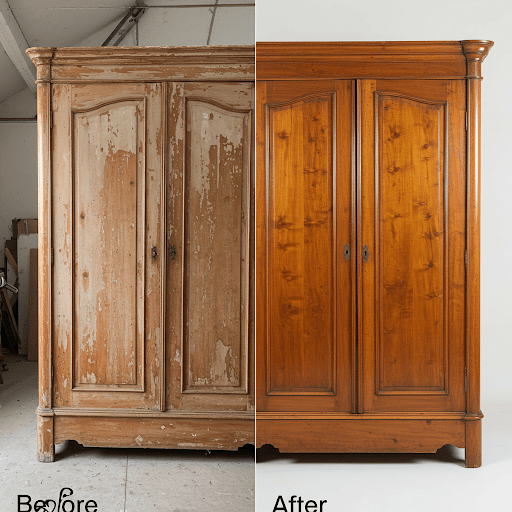
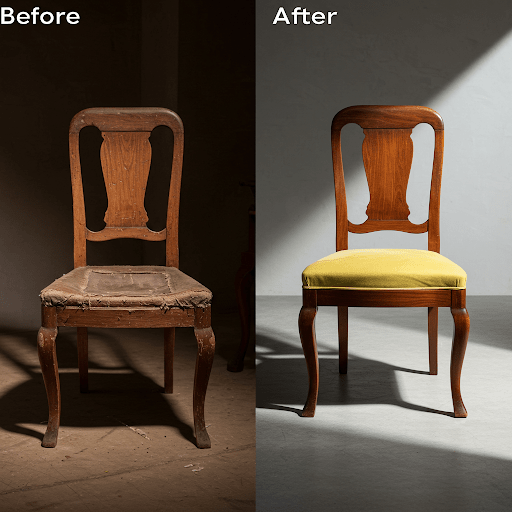
Pro Tip: Document your restoration with before-and-after photos (which you’ll add) to showcase the transformation. Share these on social media or your blog for engagement.
Common Mistakes to Avoid When Restoring Antique Furniture
Even experienced DIYers can make errors. Here are mistakes to watch out for:
- Over-Sanding: Sanding too aggressively can remove veneer or decorative details.
- Skipping Cleaning: Dirt or wax buildup can interfere with stripping or finishing.
- Using the Wrong Stripper: Harsh chemicals can damage delicate wood.
- Ignoring Structural Repairs: A wobbly piece will worsen over time.
- Rushing the Finish: Applying thick coats or skipping drying time leads to uneven results.
- Ignoring Safety: Always wear protective gear and work in a ventilated space.
By taking your time and following the steps above, you’ll avoid these pitfalls and achieve a professional outcome.
Tips for Professional Results
To elevate your restoration project:
- Research the Piece: Learn about its era or maker to preserve authentic features.
- Test Everything: Test strippers, stains, and finishes on a small area first.
- Work in Stages: Tackle one section at a time to stay organized.
- Use Quality Materials: Invest in premium stains or sealants for durability.
- Practice Patience: Rushing leads to mistakes; let each layer dry fully.
- Document the Process: Photos and notes help you track progress and share your work.
For additional woodworking inspiration, explore Ted’s Woodworking Plans, which offers detailed guides for furniture projects and restoration techniques.
How to Add Value to Your Restored Antique Furniture
A well-restored piece can become a valuable asset. Here’s how to maximize its worth:
- Preserve Original Features: Keep hand-carved details or original hardware.
- Choose Timeless Finishes: Neutral stains or classic paint colors appeal to buyers.
- Highlight Craftsmanship: Emphasize the wood’s grain or unique design.
- Market Smartly: Share before-and-after photos on platforms like Etsy or Instagram.
- Get an Appraisal: For high-value pieces, consult an antique expert.
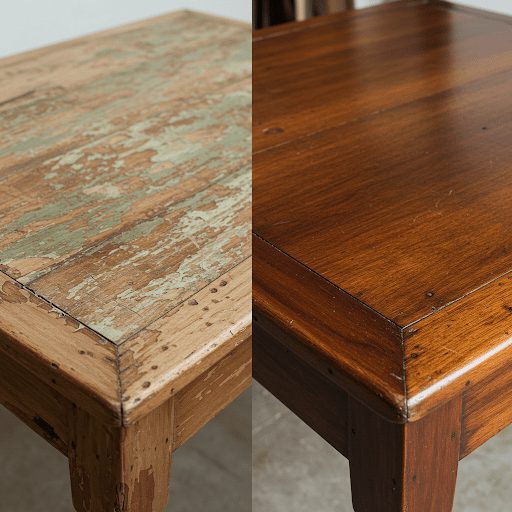
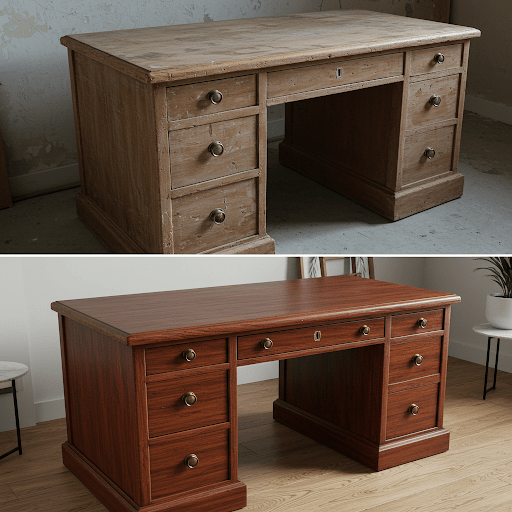
Inspiration: Before-and-After Transformations

Frequently Asked Questions (FAQs)
How much does it cost to restore antique furniture?
Costs vary based on tools, materials, and the piece’s condition. Expect to spend $50-$200 for DIY restoration, including strippers, sandpaper, stains, and sealants. Professional restoration can cost $500-$2,000.
Can I restore furniture without stripping the finish?
If the finish is intact, you can clean, sand lightly, and apply a new topcoat or wax. Stripping is only necessary for damaged or peeling finishes.
How do I know if my furniture is worth restoring?
Consider its sentimental value, historical significance, or resale potential. Solid wood pieces or those from notable eras (e.g., Victorian, Art Nouveau) are often worth the effort.
What’s the best wood for antique furniture restoration?
Common woods like oak, walnut, mahogany, or cherry are durable and ideal for restoration. Veneered pieces require extra care to avoid damaging the thin top layer.
How long does it take to restore antique furniture?
A small project (e.g., a chair) may take 1-2 weekends, while larger pieces (e.g., a dining table) can take 1-2 weeks, depending on drying times and repairs.
Conclusion: Transform Your Antique Furniture with Confidence
Restoring antique wooden furniture like a pro is a rewarding journey that combines creativity, skill, and respect for craftsmanship. By following this step-by-step guide, you can revive a tired piece into a stunning focal point for your home. From assessing the furniture to applying the perfect finish, each step brings you closer to a professional-quality result.
Ready to take on more woodworking projects? Explore Ted’s Woodworking Plans for thousands of detailed blueprints, including furniture builds and restoration guides. Share your before-and-after photos (which you’ll add) with us in the comments or on social media—we’d love to see your transformation!
Happy restoring, and enjoy the satisfaction of bringing history back to life!
Affiliate Disclosure
This article contains affiliate links, including to Ted’s Woodworking Plans. If you make a purchase through these links, we may earn a small commission at no additional cost to you. This helps support our content creation and keeps our guides free for readers. Thank you for your support!
Discover more from WoodReality
Subscribe to get the latest posts sent to your email.
