Woodworking is more than just a craft—it’s a practical skill that empowers homeowners to maintain their spaces, save money, and embrace a sustainable lifestyle. In 2025, with the DIY movement stronger than ever, knowing how to handle common woodworking repairs is a must. From wobbly chairs to cracked tables, these fixes can transform your home without the need for costly replacements. In this comprehensive, SEO-optimized guide, we’ll explore five essential woodworking repairs every homeowner should master. Each section includes detailed step-by-step instructions, tool lists, and pro tips to ensure your repairs look professional. By the end, you’ll be equipped to tackle these projects with confidence—and maybe even take your skills to the next level with resources like Teds Woodworking Plans. Let’s dive in!
Table of Contents
- Why Woodworking Repairs Are Essential for Homeowners
- Repair 1: Fixing a Loose Chair Leg
- Repair 2: Repairing a Cracked Wooden Table
- Repair 3: Fixing a Squeaky Floorboard
- Repair 4: Mending a Broken Drawer
- Repair 5: Patching a Hole in a Wooden Door
- Taking Your Woodworking Skills Further
- Affiliate Disclosure
Why Woodworking Repairs Are Essential for Homeowners
In today’s world, sustainability and self-reliance are at the forefront of homeownership trends. Woodworking repairs allow you to extend the life of your furniture and fixtures, reducing waste and saving money. Imagine the satisfaction of restoring a cracked table or silencing a squeaky floorboard yourself—no need to call a professional or buy something new. These skills are particularly valuable in 2025, as more people turn to DIY solutions to personalize their homes and live more eco-consciously.
This article is your ultimate guide to DIY woodworking repairs, designed for beginners and seasoned homeowners alike. We’ll cover five common issues—loose chair legs, cracked tables, squeaky floorboards, broken drawers, and holes in wooden doors—providing you with clear instructions and expert advice. Each repair is broken down into manageable steps, ensuring you can fix it like a pro with minimal tools and effort. You’ll find everything you need to succeed, from safety tips to finishing touches. Let’s get started with the first repair!
Repair 1: Fixing a Loose Chair Leg
A wobbly chair is more than an annoyance—it’s a safety hazard. Over time, the joints that hold chair legs in place can loosen due to wear, humidity, or weakened glue. Fortunately, fixing a loose chair leg is one of the easiest woodworking repairs you can tackle at home. With a few basic tools and some patience, you’ll have that chair steady in no time.
Why Chair Legs Loosen
Before diving into the fix, it’s worth understanding why this happens. Wood naturally expands and contracts with changes in temperature and humidity, which can weaken glue bonds. Heavy use, like rocking back on a chair or uneven weight distribution, can also stress the joints. Knowing this helps you prevent future issues and ensures your repair lasts.
Tools and Materials Needed
- Wood glue: A strong adhesive like PVA glue works best for wood repairs.
- Clamps: To hold the leg in place while the glue dries.
- Sandpaper (medium grit, 120-150): For cleaning the joint.
- Small brush or toothpick: To apply glue precisely.
- Damp cloth: To wipe away excess glue.
- Optional: Wooden dowel and drill (for extra reinforcement).
Step-by-Step Instructions
- Assess the Damage: Turn the chair upside down and gently wiggle the loose leg. Determine if it’s completely detached or just wobbly. If it’s still partially attached, you may need to carefully pull it apart to clean the joint.
- Clean the Joint: Use medium-grit sandpaper to remove old glue, dirt, or debris from both the leg and the chair’s socket. A clean surface ensures a stronger bond.
- Apply Wood Glue: Using a small brush or toothpick, spread a generous layer of wood glue onto the tenon (the part of the leg that fits into the chair) and inside the socket. Don’t skimp—excess glue can be wiped away later.
- Reattach the Leg: Press the leg firmly back into place, aligning it with the chair’s structure. If it’s a tight fit, gently tap it with a mallet or use your hand to secure it.
- Clamp It Down: Secure the leg with clamps, applying even pressure to keep it in place. Position the clamps so they don’t damage the chair’s finish.
- Clean Up: Wipe away any glue that squeezes out with a damp cloth before it dries.
- Let It Dry: Allow the glue to cure for at least 24 hours (check the glue bottle for exact drying time). Avoid using the chair until it’s fully set.
Pro Tips for a Professional Finish
- Reinforce with a Dowel: For chairs that take heavy use, drill a small hole through the joint and insert a wooden dowel with glue. This adds extra strength.
- Match the Finish: If the repair scuffs the chair, sand lightly and apply a matching wood stain or polish.
- Prevent Future Loosening: Tighten other joints on the chair proactively to avoid uneven stress.
This repair typically takes less than an hour (plus drying time) and costs under $10 if you already own basic tools. It’s a perfect starting point for DIY furniture fixes and builds confidence for more complex projects.
Repair 2: Repairing a Cracked Wooden Table
A cracked wooden table can ruin its aesthetic and functionality, but don’t toss it just yet. Whether the crack is from an impact, age, or wood shrinkage, this repair will restore its beauty and strength. This method works best for small to medium cracks (up to an inch wide); larger splits may require professional help or replacement parts.
Understanding Wood Cracks
Wood cracks when it dries out, gets stressed beyond its capacity, or suffers a direct blow. Tabletops are especially prone due to their exposed surface area. Repairing it promptly prevents the crack from spreading and keeps your table looking great.
Tools and Materials Needed
- Wood filler or two-part epoxy: Choose based on the crack size (filler for small cracks, epoxy for deeper ones).
- Putty knife: To apply and smooth the filler.
- Sandpaper (fine grit, 220-320): For a seamless finish.
- Wood stain or paint: To match the table’s original color.
- Small brush: For staining or painting.
- Masking tape: To protect surrounding areas (optional).
Step-by-Step Instructions
- Prep the Area: Clear the table and clean the crack with a small brush or compressed air to remove dust and debris. A clean crack ensures the filler adheres properly.
- Fill the Crack:
- For small cracks, scoop wood filler with a putty knife and press it into the crack, overfilling slightly.
- For deeper cracks, mix two-part epoxy (per instructions) and pour it into the crack, letting it seep in.
- Smooth It Out: Use the putty knife to level the filler or epoxy, removing excess while keeping it flush with the table surface.
- Let It Dry: Allow the filler/epoxy to cure fully—typically 4-6 hours for filler, 24 hours for epoxy (check product labels).
- Sand the Surface: Once dry, sand the repaired area with fine-grit sandpaper until it’s smooth and blends with the table.
- Finish the Table: Apply wood stain or paint over the repair, feathering it into the surrounding area for a natural look. Let it dry completely.
Pro Tips for a Professional Finish
- Custom Filler: Mix sawdust from the table (use sandpaper to create some) with wood glue for a filler that matches the wood’s texture and color perfectly.
- Test the Stain: Dab a small amount of stain on an inconspicuous spot to ensure it matches before applying it broadly.
- Seal It: Add a clear polyurethane topcoat for durability and protection against future damage.
Repairing a cracked table not only saves you from buying a new one but also adds character to your home. This project can take a few hours, including drying time, and is a fantastic way to practice homeowner woodworking tips.
Repair 3: Fixing a Squeaky Floorboard
Squeaky floorboards are a common complaint in older homes, caused by loose boards rubbing against nails or joists. This repair is quick, affordable, and doesn’t require tearing up your floor. With the right approach, you’ll enjoy silent steps again.
Why Floorboards Squeak
Wood floors squeak when boards shift due to loose fasteners, gaps between the board and subfloor, or wood-on-wood friction. Identifying the cause helps you choose the best fix—whether it’s securing the board or filling a gap.
Tools and Materials Needed
- Hammer: For driving nails.
- Finishing nails or wood screws: Nails are traditional; screws offer a stronger hold.
- Drill: If using screws.
- Wood shims: To fill gaps (optional).
- Talcum powder or lubricant: For minor squeaks (optional).
Step-by-Step Instructions
- Locate the Squeak: Walk across the floor, pressing down to pinpoint the noisy spot. Mark it with a piece of tape or chalk.
- Inspect the Board: Check if it’s loose by pressing on it. If it moves, proceed to secure it.
- Secure the Floorboard:
- For nails: Drive two finishing nails at slight angles into the board, sinking them just below the surface.
- For screws: Drill pilot holes and insert 1.5-2 inch wood screws, countersinking them slightly.
- Fill Gaps (If Needed): If the squeak persists, lift the board slightly (if accessible) and insert a glue-coated wood shim between the board and joist. Tap it in gently.
- Test the Fix: Walk over the area again. If the squeak is gone, you’re done; if not, try additional fasteners or shims.
- Finish Up: Fill nail/screw holes with wood filler and sand smooth. Touch up with matching stain or paint if visible.
Pro Tips for a Professional Finish
- Use Screws for Longevity: Screws hold better than nails and are less likely to loosen over time.
- Lubricate Minor Squeaks: For small creaks, sprinkle talcum powder or spray a wood-safe lubricant between boards to reduce friction.
- Work from Below: If you have access to the subfloor (e.g., a basement), secure the board from underneath to hide fasteners.
This repair takes 15-30 minutes per squeak and costs next to nothing if you have basic tools. It’s a must-know for DIY woodworking repairs that improve your home’s comfort.
Repair 4: Mending a Broken Drawer
A broken drawer—whether it’s sticking, falling apart, or has a detached front—can disrupt your daily routine. This repair covers common drawer issues, helping you restore functionality with minimal effort.
Common Drawer Problems
Drawers break due to loose joints, warped wood, or worn slides. Humidity can also cause swelling, making them stick. Addressing the root cause ensures a lasting fix.
Tools and Materials Needed
- Wood glue: For reattaching joints or the front.
- Clamps: To hold pieces while drying.
- Screwdriver: For tightening or adding screws.
- Sandpaper: To smooth slides or rough edges.
- Replacement screws/nails: If originals are missing or damaged.
- Wax or soap: To lubricate slides (optional).
Step-by-Step Instructions
- Remove the Drawer: Pull it out fully and set it on a flat surface. Inspect for loose joints, a detached front, or sticky slides.
- Fix Loose Joints: Apply wood glue to any separated corners, press them together, and clamp until dry (4-6 hours). Wipe excess glue with a damp cloth.
- Reattach the Front: If the drawer face is off, align it with the box, secure with screws or nails, and reinforce with glue if needed.
- Smooth the Slides: Sand the drawer’s sides and the cabinet runners to remove rough spots or swelling. Test the fit.
- Test and Adjust: Slide the drawer back in. If it sticks, apply wax or rub a bar of soap along the slides for smoother movement.
Pro Tips for a Professional Finish
- Reinforce with Brackets: Add small L-brackets inside the drawer for extra durability.
- Check Alignment: Ensure the drawer box is square by measuring diagonally; adjust if uneven.
- Prevent Sticking: In humid climates, use a dehumidifier near wooden furniture to reduce swelling.
Mending a drawer takes about an hour and is a practical woodworking repair skill for any homeowner. It’s a small fix with a big impact on usability.
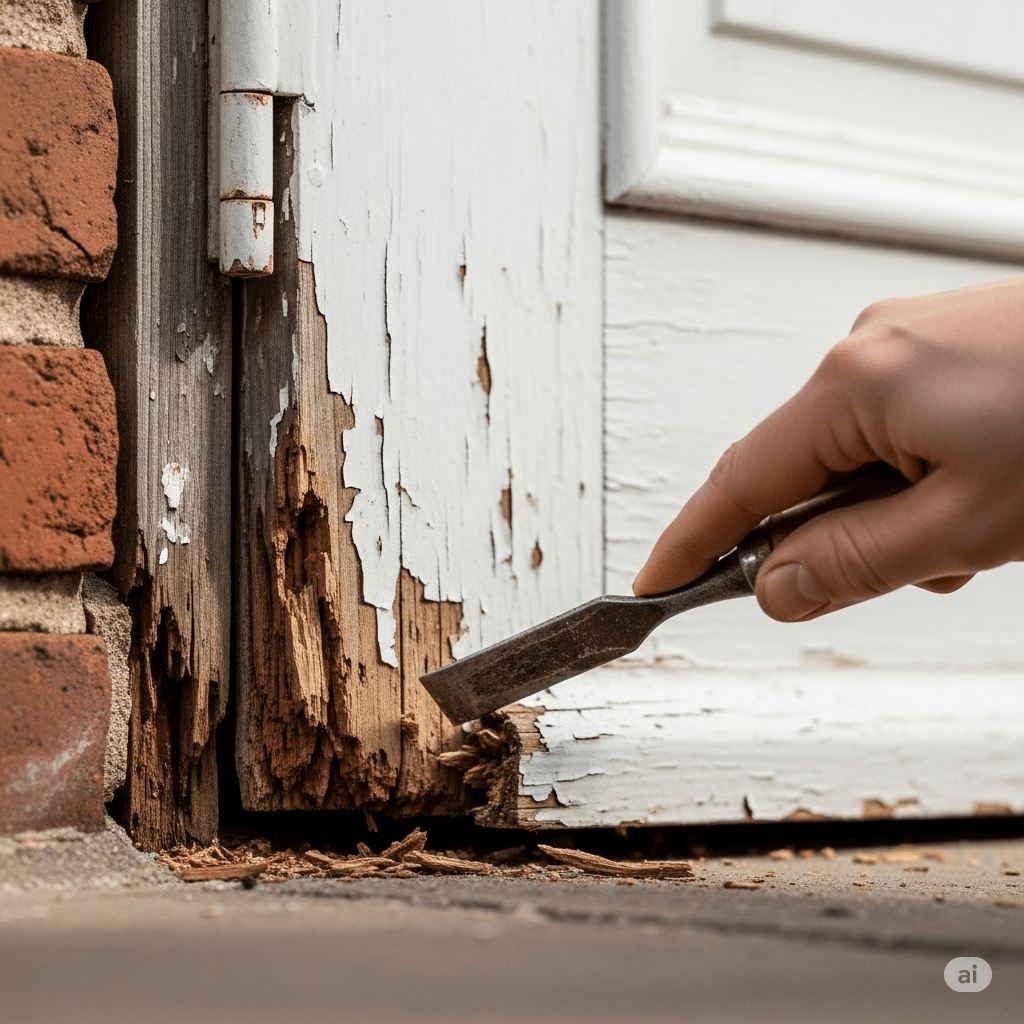
Repair 5: Patching a Hole in a Wooden Door
A hole in a wooden door—whether from a doorknob, an accident, or wear—doesn’t mean you need a new door. This repair works for small to medium holes (up to 6 inches) and leaves your door looking as good as new.
Why Doors Get Holes
Hollow-core doors are lightweight and common in homes but prone to damage. Solid wood doors can also dent or crack. Patching restores both appearance and structure.
Tools and Materials Needed
- Expanding foam: To fill the hole’s interior.
- Putty knife: For applying and smoothing filler.
- Sandpaper: To finish the surface.
- Wood filler: For the outer layer.
- Paint or stain: To match the door.
- Utility knife: To trim foam.
Step-by-Step Instructions
- Prepare the Hole: Clean out debris with a brush or vacuum. If edges are jagged, trim them with a utility knife for a neater repair.
- Fill with Foam: Spray expanding foam into the hole, filling it about halfway (it expands). Let it dry fully—usually 4-6 hours.
- Trim the Foam: Once hard, use a utility knife to cut the foam flush with the door’s surface.
- Apply Wood Filler: Spread filler over the foam with a putty knife, building it up slightly above the surface. Smooth it out.
- Sand It Down: After the filler dries (check the label, usually 1-2 hours), sand it smooth with fine-grit sandpaper.
- Paint or Stain: Apply a matching finish, blending it into the surrounding area. Add a second coat if needed.
Pro Tips for a Professional Finish
- Support Large Holes: For bigger damage, tape a piece of cardboard behind the hole before adding foam for stability.
- Match Texture: Lightly sand the filler to mimic the door’s grain before painting.
- Seal It: Use a clear sealant over the repair to protect it from moisture and wear.
This repair takes a few hours, mostly waiting for drying, and costs less than $20. It’s a game-changer for DIY furniture fixes and home maintenance.
Taking Your Woodworking Skills Further
Mastering these five repairs is just the beginning. Woodworking offers endless opportunities to enhance your home, from building custom shelves to crafting heirloom furniture. If you’re inspired to go beyond repairs, check out Teds Woodworking Plans. This resource provides thousands of detailed designs and tutorials, perfect for beginners and advanced woodworkers alike. Whether you want to create a new dining table or refine your skills, it’s a natural next step after conquering these fixes.
Affiliate Disclosure
This article contains affiliate links. If you make a purchase through these links, I may earn a commission at no additional cost to you. Thank you for supporting my work!
Final Thoughts
These five woodworking repairs—fixing a loose chair leg, repairing a cracked table, silencing a squeaky floorboard, mending a broken drawer, and patching a hole in a door—equip you with the skills to maintain your home like a pro. Each project is affordable, approachable, and rewarding, making them ideal for homeowners in 2025 and beyond. With detailed instructions and pro tips, you’re ready to tackle any woodworking challenge. So grab your tools, start fixing, and enjoy the satisfaction of a job well done!
Discover more from WoodReality
Subscribe to get the latest posts sent to your email.
