Introduction
Our pets are more than just animals; they are part of the family. Just like we enjoy a comfortable bed at the end of the day, our furry companions also deserve a cozy spot to rest. While pet beds come in various styles and materials, DIY wooden pet beds stand out as one of the best options.
Not only are wooden pet beds durable and stylish, but they can also be customized to fit your home decor and your pet’s unique needs. Whether you have a small dog, a large cat, or multiple pets, crafting a DIY wooden pet bed is a rewarding project that saves money while adding a personal touch.
In this article, we’ll guide you through 10 amazing DIY wooden pet bed ideas, complete with step-by-step instructions, materials needed, and tips for making the most comfortable and stylish beds. By the end, you’ll have the confidence to create a beautiful, long-lasting resting place for your beloved pet!
1. Benefits of DIY Wooden Pet Beds
Before diving into the actual DIY projects, let’s discuss why wooden pet beds are an excellent choice over store-bought or fabric-based pet beds.
Cost-Effective and Budget-Friendly
High-quality wooden pet beds in stores can be expensive, often costing over $100 or more. By making your own, you can save a significant amount of money by using affordable or even reclaimed materials.
Customization Options
Unlike generic pet beds, a DIY wooden bed can be tailored to your pet’s size, personality, and your home’s decor. Want a rustic aesthetic? Use reclaimed wood. Prefer a modern, sleek look? Choose polished hardwood.
Durability and Longevity
Fabric or plastic pet beds wear out quickly. Wooden pet beds, when properly built and maintained, last for years. They can withstand scratching, chewing, and even playful jumping!
Eco-Friendly Choice
Wood is a sustainable and natural material, especially if you use reclaimed or responsibly sourced wood. This helps reduce waste and is an environmentally friendly option.
Healthier for Pets
Many store-bought pet beds contain synthetic materials that can trap bacteria and allergens. Wood is naturally more resistant to dust mites and allergens, ensuring a healthier sleeping space for your pet.
2. Essential Tools and Materials Needed
Before you start building your DIY wooden pet bed, it’s essential to gather the right tools and materials.
Basic Tools Required
- Saw (Hand saw or circular saw) – To cut wooden planks
- Drill and screws – For secure assembly
- Measuring tape – To ensure correct dimensions
- Sandpaper or electric sander – For a smooth, safe finish
- Wood glue – For additional stability
- Clamps – To hold pieces together during assembly
- Paintbrushes or rollers – If you plan to paint or stain the wood
Types of Wood Suitable for Pet Beds
Choosing the right wood type ensures durability and aesthetics. Here are the best options:
- Pine – Affordable and easy to work with
- Oak – Strong and long-lasting
- Cedar – Naturally repels insects and has a pleasant scent
- Plywood – A budget-friendly option for lightweight designs
- Pallet Wood – Perfect for rustic and eco-friendly beds
Additional Materials
- Pet-safe paint or stain – Avoid toxic chemicals
- Cushions or pet mattress – For extra comfort
- Non-toxic sealant – Protects the wood from moisture and wear
3. Safety Considerations When Building a Pet Bed
When making a DIY pet bed, safety should be your top priority.
Use Non-Toxic Materials
Some paints, finishes, and adhesives contain harmful chemicals. Always choose pet-safe, water-based paints, stains, and sealants.
Ensure Stability and Sturdiness
A wobbly pet bed can be unsafe, especially for older pets or those with joint problems. Use thick screws and wood glue to reinforce the structure.
Smooth Out All Edges
Rough wood can cause splinters, which are dangerous for both pets and humans. Sand all surfaces thoroughly for a smooth, safe finish.
Avoid Small, Detachable Parts
Avoid using small decorative elements that could become choking hazards, such as buttons, beads, or nails that might come loose.
4. How to Choose the Right Size for Your Pet’s Bed
To ensure your pet’s maximum comfort, you must build the bed in the right size.
Step 1: Measure Your Pet
- Have your pet lie down in their usual sleeping position.
- Measure from their nose to tail and add 6-10 inches to ensure extra room.
- Measure their width to determine the right width of the bed.
Step 2: Consider Pet Weight and Height
- Small pets (Cats, Small dogs like Chihuahuas, Pomeranians, etc.): 18-24 inches long
- Medium pets (Beagles, Bulldogs, Cocker Spaniels): 24-36 inches long
- Large pets (Golden Retrievers, German Shepherds, Labradors): 36-48 inches long
Step 3: Decide on Bed Type
- Ground-level beds: Ideal for older pets or pets with mobility issues
- Elevated beds: Great for airflow and keeping pets cool
- Enclosed or canopy-style beds: Best for pets who like privacy
5. 10 DIY Wooden Pet Bed Ideas
Now that we’ve covered the basics, let’s explore 10 amazing DIY wooden pet bed designs!
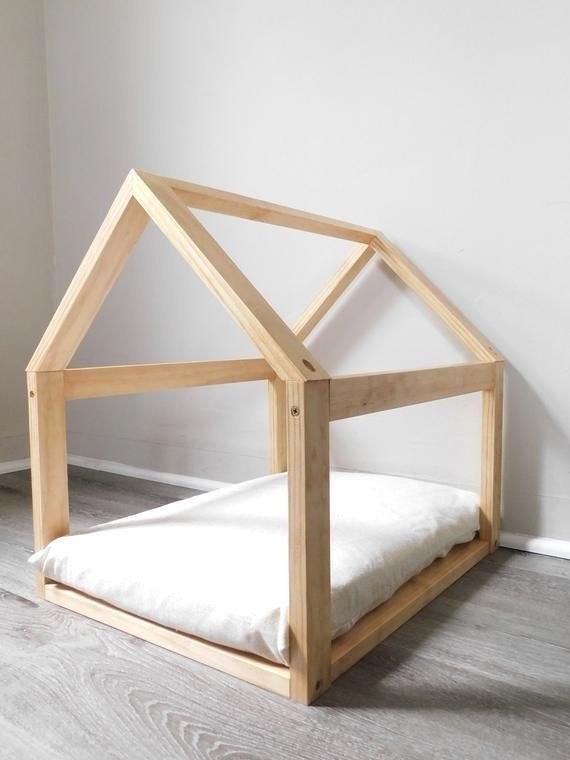
5.1 Classic Wooden Frame Pet Bed

A simple and sturdy wooden bed that works well for all pets.
Steps to Build:
- Cut four planks for the frame and a plywood sheet for the base.
- Attach the planks using screws and wood glue.
- Sand the surface and apply pet-safe paint or stain.
- Add a soft cushion or mattress for comfort.
5.2 Elevated Wooden Pet Bed
An elevated design improves airflow and keeps your pet cool.
Steps to Build:
- Cut four wooden legs and attach them to a wooden base.
- Reinforce the frame for stability.
- Sand and stain the wood.
5.3 Rustic Pallet Wood Pet Bed
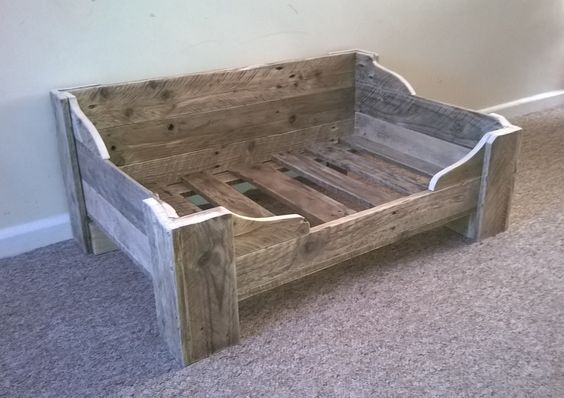
Perfect for a farmhouse or rustic-style home.
Steps to Build:
- Disassemble old pallets and cut them to size.
- Secure the frame with screws and sand for smoothness.
- Stain or paint the wood to enhance the rustic look.
5.4 Modern Minimalist Pet Bed
A sleek, low-profile design with clean lines.
Steps to Build:
- Use high-quality wood like oak or walnut for a polished finish.
- Cut the planks to create a low-profile rectangular frame.
- Sand and finish with a natural wood stain.
5.5 Crate-Style Pet Bed with Storage
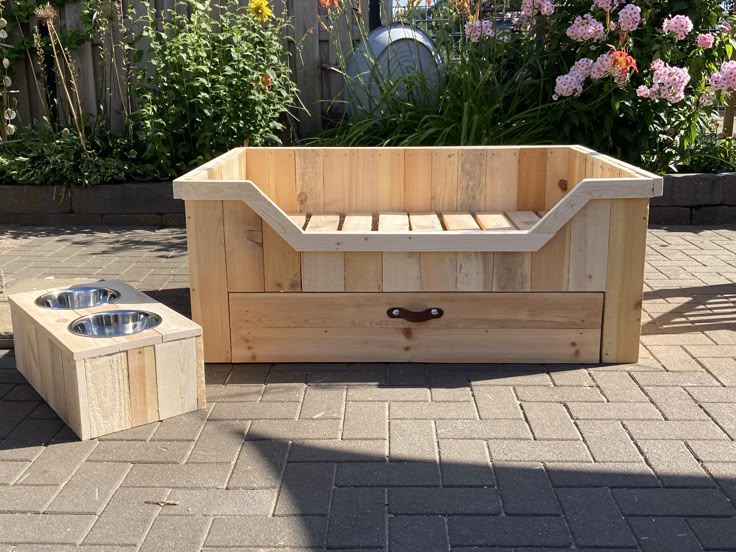
A functional pet bed with storage for toys and accessories.
Steps to Build:
- Construct a wooden crate with an open front.
- Add a sliding drawer underneath for extra storage.
- Place a cushion inside for comfort.
5.6 Canopy Wooden Pet Bed
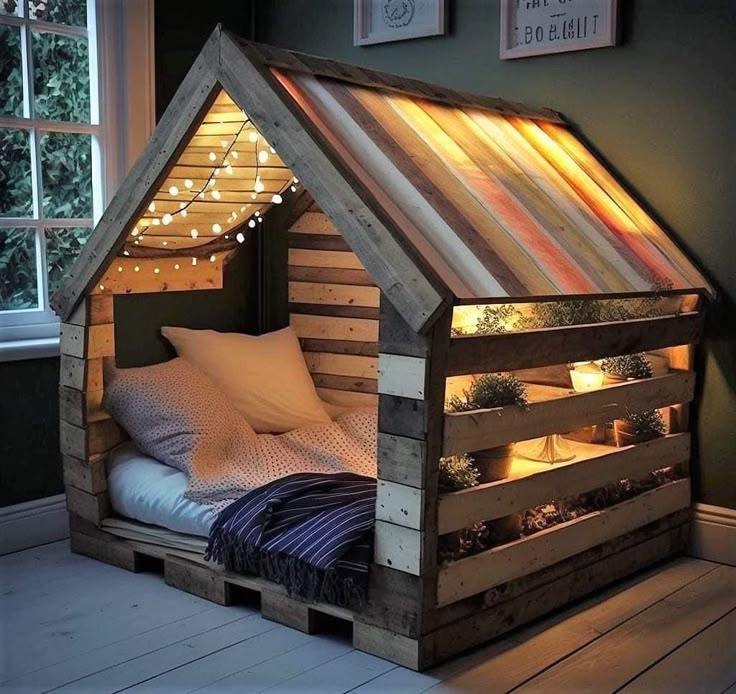
A canopy-style wooden pet bed adds a touch of luxury and provides shade and privacy for pets that love a cozy, enclosed space.
How to Build a Canopy Pet Bed
- Construct the Base: Cut a rectangular wooden frame and attach a plywood base for support.
- Add Vertical Support: Attach four wooden dowels or posts at each corner to form the canopy frame.
- Secure the Canopy Fabric: Drape a lightweight fabric or curtain over the frame to create an enclosed feel.
- Finishing Touches: Sand all edges, paint or stain the wood, and add a plush pet bed cushion inside.
This elegant and functional pet bed works well in homes with bohemian, cottagecore, or modern decor styles.
5.7 Rocking Wooden Pet Bed
If your pet enjoys gentle motion, a rocking wooden pet bed is a fun and calming choice.
Step-by-Step Guide
- Create a Rocking Base: Cut two curved wooden pieces for the bottom supports to enable rocking motion.
- Assemble the Frame: Attach a rectangular frame on top of the curved supports.
- Ensure Stability: Add side rails to prevent excessive tilting and secure the structure.
- Add a Cushion: Place a soft, machine-washable cushion for maximum comfort.
This pet bed is ideal for anxious pets, as the gentle rocking motion can help soothe them to sleep.
5.8 Convertible Wooden Pet Bed and Bench

This multi-purpose pet bed doubles as a seating bench, making it a great space-saving solution for small apartments.
Building Process
- Construct a Wooden Box Frame: Use thick wooden planks to create a rectangular frame that can support human weight.
- Hinge the Top Lid: Attach a hinged lid that lifts to reveal the pet bed inside.
- Add Cushioning: Place a foam mattress inside for your pet’s comfort.
- Final Touches: Sand, stain, or paint to match your home’s interior.
This is a great option for those who want a functional, stylish pet bed that blends seamlessly with home furniture.
5.9 Log Cabin-Style Wooden Pet Bed
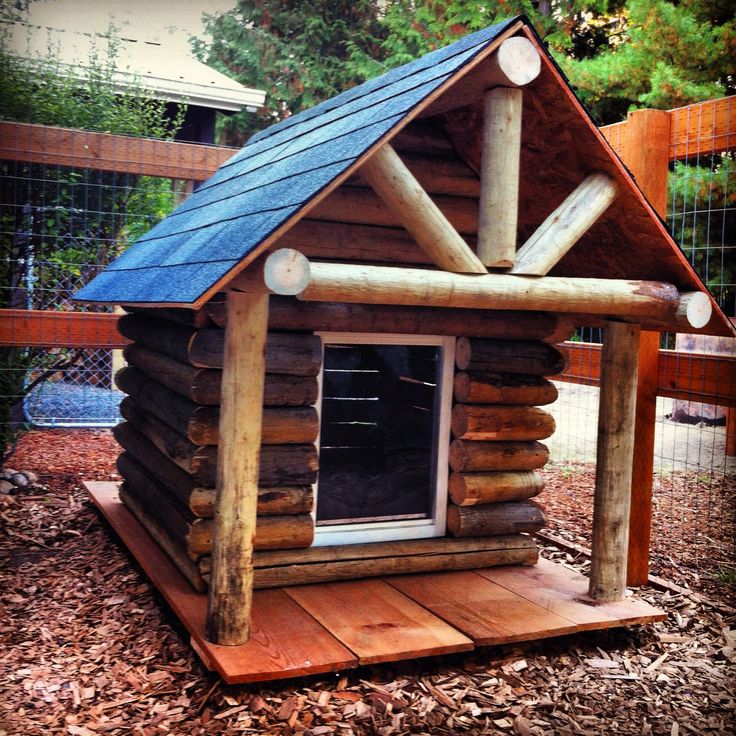
For pet owners who love a rustic or outdoorsy aesthetic, a log cabin-style pet bed is a fun and unique choice.
How to Build It
- Select Small Logs or Thick Wooden Branches: Cut them to uniform lengths for a clean, structured look.
- Assemble the Cabin Walls: Stack and secure the logs together using wood glue and screws.
- Build the Roof: Create a slanted roof to mimic a real cabin design.
- Finishing Touches: Sand and apply a clear protective coat to highlight the natural wood grain.
This sturdy and aesthetic pet bed is perfect for pets that enjoy a cozy, den-like space.
5.10 DIY Wooden Pet Bunk Bed (For Multiple Pets)
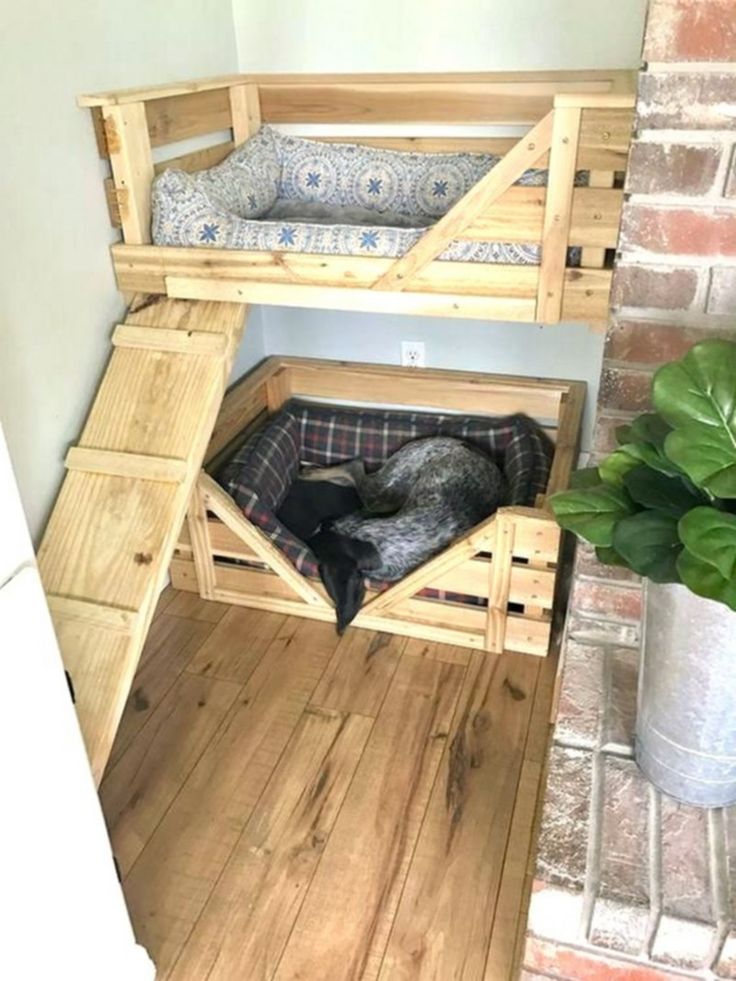
If you have more than one pet, a bunk bed design provides separate sleeping areas while saving floor space.
How to Make a Wooden Pet Bunk Bed
- Build Two Wooden Frames: Create two separate bed frames, one for the top and one for the bottom bunk.
- Add Vertical Support: Use thick wooden beams to hold the beds securely in place.
- Attach a Small Ladder or Ramp: Ensure easy access to the top bunk.
- Secure Everything: Reinforce the structure to handle playful pets safely.
This bunk bed is ideal for multi-pet households and provides a fun, space-efficient sleeping arrangement.
6. Finishing Touches: Painting, Staining, and Cushion Selection
Choosing Pet-Safe Paints and Stains
When finishing your wooden pet bed, always use non-toxic, pet-safe materials.
- Best Paint Types: Water-based, non-toxic paints (e.g., milk paint or chalk paint)
- Best Stains: Natural, chemical-free wood stains
- Best Sealants: Polyurethane alternatives like beeswax or linseed oil
Selecting the Right Cushion for Comfort
- Memory foam pads – Ideal for senior pets or those with joint issues
- Washable cushion covers – Ensure easy cleaning and hygiene
- Hypoallergenic fabrics – Great for pets with sensitive skin
Personalizing Your DIY Pet Bed
- Engrave your pet’s name on the frame for a special touch
- Add decorative carvings or stencils for a unique look
- Use color themes that match your home’s interior
7. Maintenance and Care for Wooden Pet Beds
Regular Cleaning Tips
- Wipe with a damp cloth – Helps remove dust and pet hair
- Use mild soap and water – Avoid harsh chemicals
- Vacuum pet cushions weekly – Keeps them fresh and free of dander
Preventing Wear and Tear
- Reapply sealant yearly – Protects against moisture and scratches
- Check for loose screws – Tighten as needed for safety
- Use anti-scratch pads – Helps prevent claw marks
8. Where to Find More DIY Pet Bed Plans
Need detailed blueprints for your pet bed project? Check out Ted’s Woodworking Plans for thousands of expert woodworking designs, including pet beds.
9. Ready-Made Wooden Pet Beds for Sale
Don’t have time to build a DIY pet bed? Browse Etsy’s handmade wooden pet beds for stylish, handcrafted options. Support small businesses while finding the perfect bed for your furry friend!
10. Final Thoughts and Conclusion
DIY wooden pet beds offer a customized, stylish, and budget-friendly alternative to store-bought options. Whether you build a simple frame bed, a luxury canopy bed, or a multi-pet bunk bed, these projects are fun, rewarding, and durable.
By choosing to create a handmade wooden pet bed, you ensure that your pet has a comfortable, safe, and eco-friendly place to rest. Plus, you get the satisfaction of crafting something special for your beloved furry friend!
Start Your DIY Project Today!
Grab your tools, pick a design, and start building a cozy, stylish wooden pet bed your pet will love!
Affiliate Disclosure
This article contains affiliate links. If you purchase through these links, we may earn a small commission at no extra cost to you. This helps support our content and allows us to provide more helpful DIY guides.
Discover more from WoodReality
Subscribe to get the latest posts sent to your email.
