
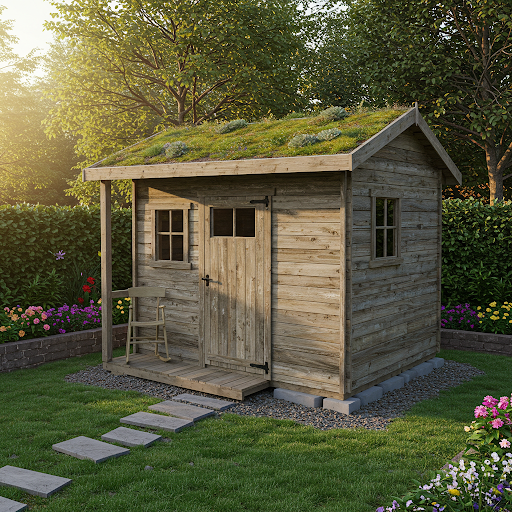
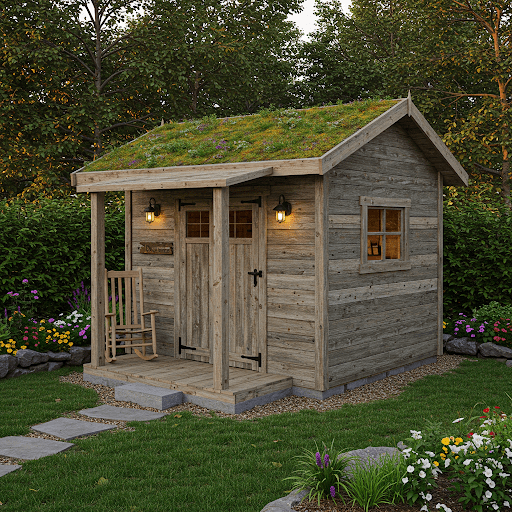
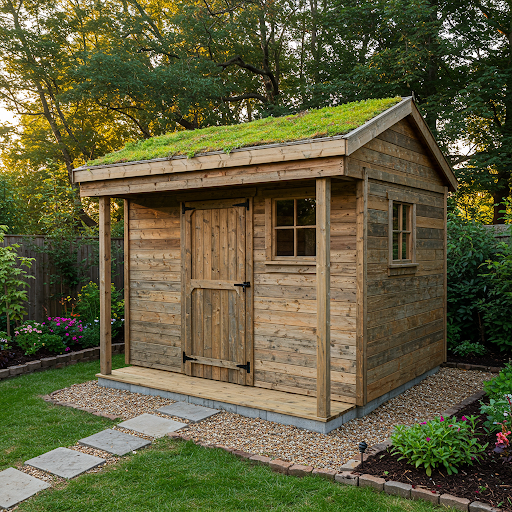
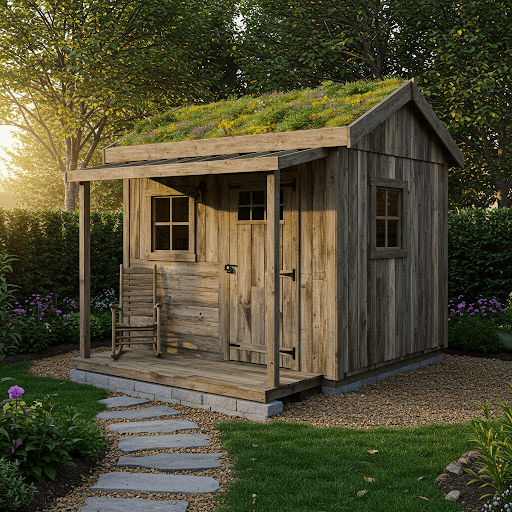
Imagine stepping into your backyard and being greeted by a charming, eco-friendly structure—a reclaimed wood garden shed with a vibrant green roof. This isn’t just a shed; it’s a statement of sustainability, a functional space for storage or relaxation, and a beautiful addition to your garden. Combining the rustic appeal of reclaimed wood with the environmental benefits of a green roof, this project is perfect for homeowners who value both aesthetics and eco-conscious living.
In this comprehensive guide, we’ll walk you through everything you need to know about building a reclaimed wood garden shed with a green roof. From sourcing materials to designing the green roof, we’ll cover every step in detail, ensuring you have the knowledge and inspiration to create your own backyard masterpiece. Whether you’re a seasoned DIYer or a beginner looking for a rewarding project, this article will provide actionable tips, design ideas, and resources like Ryan Shed Plans to help you along the way. Let’s dive in and explore how to bring this sustainable vision to life.
Why Build a Reclaimed Wood Garden Shed with a Green Roof?
Before we get into the nitty-gritty of construction, let’s explore why this project is worth your time and effort. A reclaimed wood garden shed with a green roof offers a unique blend of practicality, beauty, and environmental benefits.
The Appeal of Reclaimed Wood
Reclaimed wood—sourced from old barns, factories, or other structures—brings a sense of history and character to any project. Its weathered texture and natural imperfections create a rustic, timeless look that’s hard to replicate with new lumber. Beyond aesthetics, using reclaimed wood is a sustainable choice. It reduces the demand for new timber, minimizes waste, and gives new life to materials that might otherwise end up in a landfill.
Benefits of a Green Roof
A green roof, also known as a living roof, is a roof covered with vegetation and a growing medium. It’s more than just a pretty feature—it offers a host of benefits:
- Environmental Impact: Green roofs absorb rainwater, reducing runoff and helping to manage stormwater. They also improve air quality by filtering pollutants and producing oxygen.
- Insulation: The layers of soil and plants provide natural insulation, keeping the shed cooler in summer and warmer in winter.
- Biodiversity: Green roofs attract pollinators like bees and butterflies, supporting local ecosystems.
- Aesthetic Value: A roof bursting with greenery adds a whimsical, natural element to your garden, blending the shed seamlessly with its surroundings.
Practical Uses for a Garden Shed
A garden shed is a versatile addition to any backyard. Use it to store gardening tools, outdoor equipment, or seasonal decorations. Alternatively, transform it into a cozy retreat—a reading nook, art studio, or meditation space. The green roof enhances its appeal, making it a focal point in your garden rather than just a utilitarian structure.
Planning Your Reclaimed Wood Garden Shed with Green Roof
Building a shed with a green roof requires careful planning to ensure structural integrity, proper drainage, and a thriving rooftop garden. Let’s break down the key steps to get started.
Step 1: Assess Your Space and Needs
Before you begin, evaluate your backyard to determine the best location and size for your shed:
- Space: Measure the available area. A typical garden shed ranges from 6×8 feet to 10×12 feet, but you can adjust based on your needs. Ensure there’s enough clearance around the shed for maintenance and access.
- Purpose: Decide how you’ll use the shed. If it’s for storage, prioritize shelving and floor space. If it’s a retreat, consider windows, ventilation, and interior finishes.
- Sunlight: Green roofs thrive in areas with at least 4-6 hours of sunlight daily. Choose a spot that gets adequate sun for your plants.
Step 2: Source Reclaimed Wood
Finding high-quality reclaimed wood is crucial for this project. Here are some tips:
- Local Sources: Check with local salvage yards, demolition companies, or reclamation businesses. Old barns, factories, or even shipping pallets can be great sources.
- Quality Check: Inspect the wood for rot, insect damage, or excessive warping. Reclaimed wood should be structurally sound, even if it’s weathered.
- Preparation: Clean the wood by removing nails, screws, or other hardware. Sand it lightly to remove splinters while preserving its rustic charm.
Step 3: Gather Materials and Tools
In addition to reclaimed wood, you’ll need the following materials:
- Foundation: Concrete blocks, gravel, or pressure-treated wood for the base.
- Framing: New or reclaimed lumber for the shed’s frame (ensure it’s strong enough to support the green roof).
- Green Roof Layers: Waterproof membrane, drainage layer, filter fabric, growing medium, and plants (succulents, sedums, or native grasses work well).
- Hardware: Screws, nails, hinges, and a latch for the door.
- Tools: Circular saw, drill, hammer, level, measuring tape, and a ladder.
For detailed shed blueprints, Ryan Shed Plans offers over 12,000 shed plans and woodworking designs, including customizable options that can be adapted for a green roof. Their step-by-step guides make the process accessible, even for beginners.
Designing Your Reclaimed Wood Garden Shed
The design of your shed should balance functionality, aesthetics, and the structural requirements of a green roof. Here’s how to approach it.
Shed Structure
- Foundation: Start with a solid foundation to prevent settling. A gravel base with concrete blocks works well for small sheds. For larger sheds, consider a concrete slab.
- Frame: Build a sturdy frame using 2×4 or 2×6 lumber. The frame must support the added weight of the green roof, which can be 10-20 pounds per square foot when dry and up to 50 pounds when saturated.
- Walls: Attach reclaimed wood planks to the frame, overlapping them slightly for a rustic look. Leave space for a door and at least one window for ventilation and natural light.
- Roof Pitch: A green roof requires a slight pitch (at least 1:12) to ensure proper drainage. A flat roof can work, but you’ll need to install a robust drainage system to prevent water pooling.
Green Roof Design
A green roof consists of several layers to support plant growth while protecting the shed:
- Waterproof Membrane: Apply a heavy-duty waterproof membrane (like EPDM rubber) to the roof deck to prevent leaks.
- Root Barrier: Add a root barrier to protect the membrane from plant roots.
- Drainage Layer: Use a drainage mat or gravel layer to allow excess water to flow off the roof.
- Filter Fabric: Place a filter fabric over the drainage layer to prevent soil from clogging it.
- Growing Medium: Add 4-6 inches of lightweight growing medium, such as a mix of compost, perlite, and sand.
- Plants: Choose low-maintenance, drought-tolerant plants like sedums, mosses, or native grasses. These thrive in shallow soil and require minimal care.
Aesthetic Touches
- Door and Windows: Use reclaimed wood to craft a simple door and window frames. Add a vintage latch for charm.
- Finish: Leave the reclaimed wood natural or apply a non-toxic, eco-friendly sealant to protect it from the elements.
- Green Roof Edging: Install a wooden or metal edge around the roof to contain the growing medium and plants.
Step-by-Step Guide to Building Your Shed
Now that you’ve planned and designed your shed, it’s time to build. Follow these steps for a successful project.
Step 1: Prepare the Foundation
- Clear the site of grass, rocks, and debris.
- Level the ground using a shovel and a level.
- Lay down a layer of gravel (4-6 inches deep) to promote drainage.
- Place concrete blocks or pressure-treated wood skids on the gravel, ensuring they’re level. This will elevate the shed and prevent moisture damage.
Step 2: Build the Floor Frame
- Construct a rectangular floor frame using pressure-treated 2×6 lumber.
- Secure the frame with galvanized screws.
- Attach reclaimed wood planks or plywood to the frame to create the floor. Ensure the floor is sturdy, as it will support the entire structure.
Step 3: Construct the Walls
- Build four wall frames using 2×4 lumber. Include studs every 16 inches for stability.
- Cut openings for the door and window.
- Attach reclaimed wood planks to the exterior of the frames, overlapping them for a rustic look.
- Stand the walls upright and secure them to the floor frame with screws.
Step 4: Build the Roof Frame
- Construct a roof frame with a slight pitch (1:12 or greater) using 2×6 lumber.
- Add cross-bracing to support the weight of the green roof.
- Attach the roof frame to the walls, ensuring it’s securely fastened.
Step 5: Install the Green Roof Layers
- Cover the roof deck with a waterproof membrane, overlapping seams and sealing them with adhesive.
- Add a root barrier over the membrane.
- Install a drainage layer, followed by filter fabric.
- Spread the growing medium evenly across the roof.
- Plant your chosen vegetation, spacing plants 6-12 inches apart to allow for growth.
Step 6: Add the Door, Windows, and Finishing Touches
- Build a door using reclaimed wood and hang it with heavy-duty hinges.
- Install a window for light and ventilation.
- Add a latch to the door and seal any gaps with weatherstripping.
- Apply a natural sealant to the reclaimed wood to protect it from moisture and UV rays.
Maintaining Your Reclaimed Wood Garden Shed with Green Roof
To ensure your shed lasts for years, regular maintenance is key.
Shed Maintenance
- Inspect the Wood: Check for signs of rot or insect damage annually. Replace any damaged boards promptly.
- Reapply Sealant: Every 1-2 years, reapply a weatherproof sealant to protect the reclaimed wood.
- Clean the Exterior: Remove dirt, leaves, and debris from the shed’s exterior to prevent mold growth.
Green Roof Care
- Watering: During the first year, water the green roof regularly to help plants establish. After that, most plants will survive on rainfall alone, but water during prolonged dry spells.
- Weeding: Remove weeds to prevent them from competing with your plants.
- Drainage Check: Ensure the drainage layer is functioning properly. Clear any blockages to prevent water buildup.
- Plant Health: Trim dead or overgrown plants to maintain a tidy appearance.
Design Variations for Your Reclaimed Wood Garden Shed
One of the joys of building with reclaimed wood is the ability to customize your shed. Here are a few design variations to consider:
1. Rustic Retreat with a Porch
Extend the roofline to create a small covered porch at the front of the shed. Add a reclaimed wood bench or rocking chair for a cozy seating area.
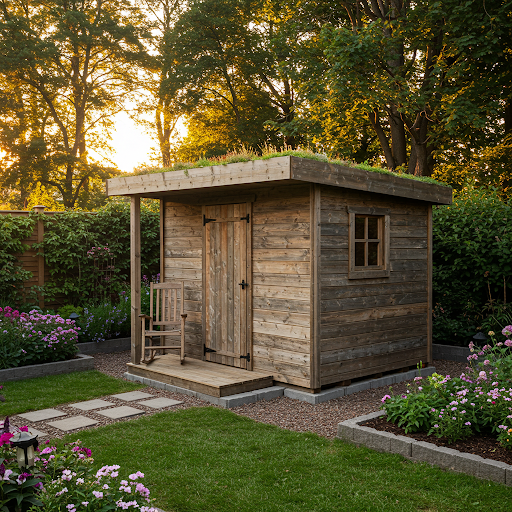
2. Modern Minimalist Shed
Pair the reclaimed wood with sleek, modern elements like large glass windows or a metal door. Use a lighter stain to highlight the wood’s natural grain.
3. Cottage-Style Shed
Add decorative trim, window boxes, and a pastel-colored door for a charming cottage look. Plant wildflowers on the green roof for a whimsical touch.
4. Multi-Functional Shed
Incorporate built-in shelving, a fold-down workbench, or even a loft for extra storage. This makes the shed a versatile space for gardening, crafting, or relaxing.
Why Use Ryan Shed Plans for This Project?
Building a shed—especially one with a green roof—requires precise planning and structural know-how. That’s where Ryan Shed Plans comes in. With over 12,000 shed plans and woodworking designs, Ryan Shed Plans provides detailed blueprints, material lists, and step-by-step instructions to guide you through the process. Whether you’re adapting a standard shed plan for a green roof or starting from scratch, their resources can save you time and ensure a professional result. Plus, their plans are beginner-friendly, making this ambitious project accessible to all skill levels.
Environmental and Cost Benefits of This Project
Environmental Impact
- Sustainability: Using reclaimed wood reduces the need for new lumber, preserving forests and reducing carbon emissions.
- Green Roof Benefits: The living roof improves air quality, supports biodiversity, and reduces your property’s environmental footprint.
- Energy Efficiency: The green roof’s insulation properties can lower energy costs if you use the shed as a workspace or retreat.
Cost Savings
- Reclaimed Wood: Sourcing reclaimed wood is often cheaper than buying new lumber, especially if you find it locally or repurpose materials you already have.
- DIY Savings: Building your own shed saves on labor costs compared to hiring a contractor.
- Long-Term Value: A well-built shed with a green roof adds value to your property, making it a worthwhile investment.
Enhancing Your Reclaimed Wood Garden Shed
Once your shed is complete, consider these additions to make it even more functional and inviting:
- Solar Lighting: Install solar-powered lights inside and outside the shed for eco-friendly illumination.
- Rainwater Collection: Add a rain barrel to collect runoff from the green roof, which you can use to water your garden.
- Interior Decor: Furnish the shed with a small table, chair, or shelving to suit its purpose.
- Pathway: Create a stone or gravel pathway leading to the shed for easy access and a polished look.
The Joy of a Reclaimed Wood Garden Shed with Green Roof
A reclaimed wood garden shed with a green roof is more than just a backyard structure—it’s a testament to creativity, sustainability, and craftsmanship. It provides a functional space for storage or relaxation while enhancing your garden’s beauty and supporting the environment. Whether you use it to store tools, grow plants, or escape with a good book, this shed will quickly become your favorite spot in the yard.
With the right planning and resources like Ryan Shed Plans, you can bring this eco-friendly vision to life. So, gather your reclaimed wood, choose your green roof plants, and start building. Your sustainable backyard masterpiece awaits!
Affiliate Disclosure
This article contains affiliate links. If you click on links to Ryan Shed Plans and make a purchase, I may earn a small commission at no additional cost to you. These commissions help support the creation of free content like this article. Thank you for your support!
Discover more from WoodReality
Subscribe to get the latest posts sent to your email.
