Transform discarded wood into beautiful, sustainable home decor with these beginner-friendly reclaimed wood projects. Learn how to source materials, choose the right tools, and create eco-friendly pieces that elevate your space.
Introduction to Reclaimed Wood Projects
In an era where sustainability and creativity collide, reclaimed wood projects have surged in popularity among DIY enthusiasts, homeowners, and eco-conscious decorators. Reclaimed wood—salvaged from old barns, pallets, or discarded furniture—offers a unique blend of rustic charm, environmental benefits, and affordability. Whether you’re a beginner woodworker or a seasoned craftsman, turning wood scraps into stunning home decor is an accessible and rewarding endeavor.
This comprehensive guide explores the world of reclaimed wood projects, covering everything from sourcing materials to step-by-step tutorials for creating eye-catching decor. With the right tools, techniques, and inspiration, you can craft pieces that not only enhance your home but also tell a story of sustainability. Expect to discover beginner-friendly projects, advanced techniques, and tips for optimizing your creations for both functionality and aesthetics.
By the end of this article, you’ll have a toolbox full of ideas, practical advice, and resources—including access to Ted’s Woodworking Plans, a treasure trove of over 16,000 woodworking blueprints—to bring your reclaimed wood visions to life.
Why Choose Reclaimed Wood for Home Decor?
Reclaimed wood is more than just a trendy material; it’s a sustainable choice that adds character to any project. Here’s why it’s a go-to for DIY home decor:
1. Environmental Benefits
- Reduces Waste: Reusing wood from old structures or pallets keeps materials out of landfills.
- Lowers Carbon Footprint: Salvaging wood eliminates the need for new lumber, reducing deforestation and energy-intensive processing.
- Promotes Circular Economy: Reclaimed wood projects support sustainable practices by giving materials a second life.
2. Unique Aesthetic Appeal
- Rustic Charm: Weathered textures, knots, and natural imperfections create a one-of-a-kind look.
- Versatility: Reclaimed wood suits various styles, from farmhouse to industrial to modern minimalist.
- Storytelling Element: Each piece carries a history, adding depth and conversation starters to your decor.
3. Cost-Effectiveness
- Affordable Sourcing: Reclaimed wood is often free or low-cost from pallets, barns, or construction sites.
- High-Value Results: Handmade reclaimed wood pieces rival expensive store-bought decor in quality and style.
4. Customization Potential
- Endless Possibilities: From wall art to furniture, reclaimed wood adapts to countless project types.
- Staining and Finishing Options: Enhance natural beauty with stains, paints, or clear coats to match your vision.
Sourcing Reclaimed Wood: Where to Find Quality Materials
The success of your reclaimed wood projects hinges on sourcing quality materials. Here are the best places to find reclaimed wood, along with tips for ensuring it’s project-ready:
1. Local Pallet Yards
- Why: Shipping pallets are often discarded after use, making them a free or cheap source of wood.
- Tips: Look for heat-treated (HT) pallets, which are safer than chemically treated ones. Avoid pallets with stains, mold, or heavy damage.
- Where: Check with local warehouses, distribution centers, or recycling facilities.
2. Construction Sites and Demolition Zones
- Why: Old barns, houses, or commercial buildings yield high-quality beams, planks, and siding.
- Tips: Always get permission from site managers. Inspect wood for nails, rot, or insect damage.
- Where: Contact local contractors or visit demolition sites in your area.
3. Reclaimed Wood Suppliers
- Why: Specialty suppliers offer curated, pre-cleaned wood for convenience.
- Tips: Compare prices, as reclaimed wood can be pricier than new lumber. Ask about the wood’s origin for authenticity.
- Where: Search for “reclaimed wood suppliers near me” or check online marketplaces like Etsy or eBay.
4. Thrift Stores and Flea Markets
- Why: Old furniture, crates, or wooden signs can be disassembled for unique wood pieces.
- Tips: Look for solid wood items rather than particleboard or veneer. Negotiate prices for bulk buys.
- Where: Visit local thrift stores, flea markets, or estate sales.
5. Community Resources
- Why: Neighbors, friends, or local businesses may have scrap wood to donate.
- Tips: Post in local buy-nothing groups or on platforms like Craigslist or Nextdoor.
- Where: Join community forums or attend neighborhood clean-up events.
Preparing Reclaimed Wood
Before starting your project, prepare the wood to ensure safety and quality:
- Clean: Scrub with a wire brush and mild soap to remove dirt. For stubborn grime, use a pressure washer (low setting).
- Remove Hardware: Extract nails, staples, or screws using a pry bar or claw hammer.
- Sand: Smooth rough surfaces with 80-120 grit sandpaper. Finish with 220 grit for a polished look.
- Inspect: Check for rot, mold, or pests. Cut away damaged sections.
- Dry: Ensure wood is fully dry to prevent warping. Store in a dry, ventilated area.
Essential Tools for Reclaimed Wood Projects
To transform reclaimed wood into stunning decor, you’ll need a basic set of tools. Here’s a beginner-friendly list, plus optional tools for advanced projects:
Basic Tools (Beginner)
- Circular Saw or Hand Saw: For cutting wood to size.
- Power Drill: For drilling holes and driving screws.
- Sander (Orbital or Belt): To smooth surfaces and remove imperfections.
- Measuring Tape and Carpenter’s Square: For precise measurements and angles.
- Clamps: To hold wood pieces securely during assembly.
- Safety Gear: Safety glasses, gloves, and a dust mask to protect against splinters and dust.
Optional Tools (Intermediate to Advanced)
- Table Saw: For precise, straight cuts on larger pieces.
- Router: To create decorative edges or joinery.
- Jigsaw: For curved or intricate cuts.
- Nail Gun: Speeds up assembly for large projects.
- Wood Planer: To even out uneven or warped wood.
Recommended Resource
For detailed woodworking plans that guide you through tool usage and project steps, check out Ted’s Woodworking Plans. With over 16,000 blueprints, it’s a valuable resource for beginners and experts alike, offering ideas for reclaimed wood projects like furniture, decor, and more.
Top 10 Reclaimed Wood Projects for Home Decor
Below are 10 detailed, beginner-to-intermediate reclaimed wood projects, complete with step-by-step instructions, materials lists, and tips for success. Each project is designed to be SEO-friendly, visually appealing for Pinterest, and achievable with basic tools.
1. Reclaimed Wood Wall Art
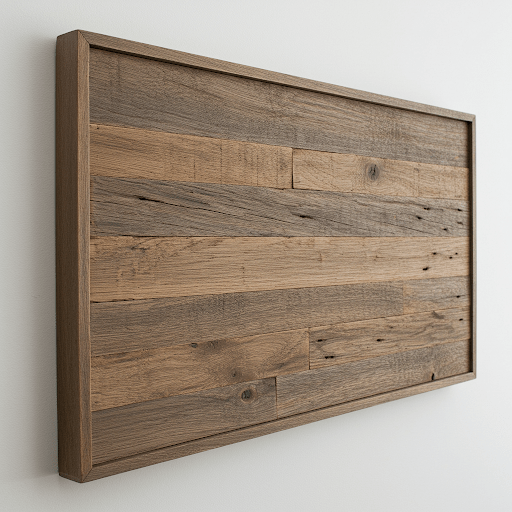
Create a rustic focal point with a geometric or abstract wall art piece.
Materials:
- Reclaimed wood planks (various lengths, 1-2” thick)
- Wood glue
- Screws or nails
- Sandpaper (80 and 220 grit)
- Stain or paint (optional)
- Picture hanging hardware
Tools:
- Circular saw
- Drill
- Clamps
- Measuring tape
Steps:
- Plan Design: Sketch a geometric pattern (e.g., chevron, herringbone) or abstract layout. Aim for a 24”x36” piece for impact.
- Cut Wood: Use a circular saw to cut planks into varying lengths based on your design.
- Sand: Smooth all surfaces with 80-grit sandpaper, then finish with 220-grit.
- Assemble: Lay planks on a flat surface. Glue edges together and clamp until dry (4-6 hours). Reinforce with screws or nails on the back.
- Finish: Apply stain or paint for a polished look. Seal with polyurethane for durability.
- Mount: Attach picture hanging hardware to the back. Hang on a feature wall.
Tips:
- Mix wood tones for visual interest.
- Optimize for SEO with keywords like “DIY reclaimed wood wall art” and “rustic wall decor.”
- Create a Pinterest pin with a styled image of the art in a cozy living room.
Time: 6-8 hours
Cost: $10-20 (if wood is free)
2. Reclaimed Wood Floating Shelf
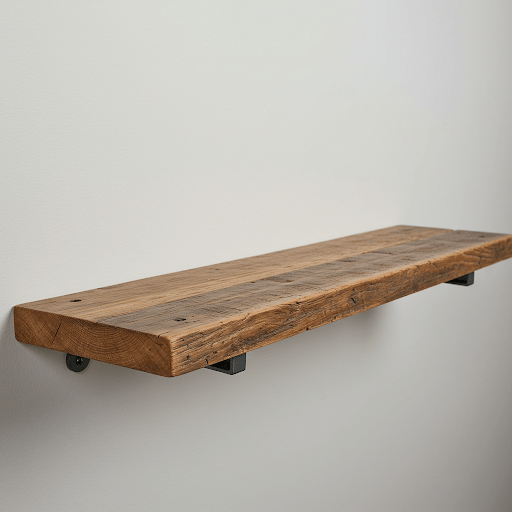
Add functional storage with a sleek, modern floating shelf.
Materials:
- Reclaimed wood plank (2”x10”x36”)
- L-brackets (2-3, heavy-duty)
- Wall anchors and screws
- Wood stain or clear coat
- Sandpaper
Tools:
- Circular saw
- Drill
- Level
- Stud finder
Steps:
- Cut and Sand: Trim the plank to 36” (or desired length). Sand thoroughly.
- Finish: Apply stain or clear coat. Let dry for 24 hours.
- Locate Studs: Use a stud finder to mark wall studs where the shelf will hang.
- Install Brackets: Secure L-brackets to the wall with screws and anchors, ensuring they’re level.
- Attach Shelf: Screw the wood plank onto the brackets from the underside.
- Style: Decorate with plants, books, or candles.
Tips:
- Use keywords like “DIY floating shelf reclaimed wood” and “rustic shelf ideas.”
- For Pinterest, photograph the shelf styled with greenery and minimalist decor.
- Reinforce brackets for heavy loads.
Time: 4-5 hours
Cost: $15-25
3. Reclaimed Wood Coffee Table
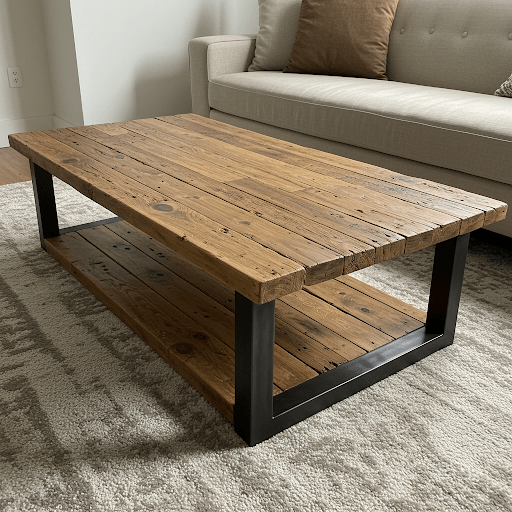
Build a rustic centerpiece for your living room.
Materials:
- Reclaimed wood planks (for tabletop, 2”x12”x48”)
- Reclaimed wood for legs (4 pieces, 2”x4”x16”)
- Wood screws
- Wood glue
- Sandpaper
- Polyurethane
Tools:
- Circular saw
- Drill
- Clamps
- Measuring tape
Steps:
- Cut Tabletop: Trim planks to 48” lengths. Arrange side by side to form a 48”x24” tabletop.
- Assemble Tabletop: Glue plank edges together. Clamp and let dry. Reinforce with screws on the underside.
- Cut Legs: Trim 2”x4” pieces to 16” for legs. Sand smooth.
- Attach Legs: Screw legs to the underside of the tabletop, 2-3 inches from each corner.
- Finish: Sand the entire table. Apply polyurethane for a durable finish.
- Style: Place in your living room with decor like books or a tray.
Tips:
- Optimize for “DIY reclaimed wood coffee table” and “rustic furniture plans.”
- Pinterest loves styled coffee table images with cozy throws and candles.
- Add hairpin legs for a modern twist.
Time: 8-10 hours
Cost: $20-40
4. Reclaimed Wood Picture Frame

Showcase photos or art with a rustic frame.
Materials:
- Reclaimed wood strips (1”x2”x8’ total)
- Glass pane (8”x10” or custom size)
- Backing board (plywood or cardboard)
- Wood glue
- Nails
- Sandpaper
- Stain
Tools:
- Miter saw or hand saw
- Hammer or nail gun
- Clamps
Steps:
- Cut Frame Pieces: Cut four wood strips at 45-degree angles to form an 8”x10” frame.
- Assemble Frame: Glue mitered corners together. Clamp until dry. Reinforce with nails.
- Sand and Finish: Smooth with sandpaper. Apply stain for a warm tone.
- Add Glass and Backing: Insert glass pane, photo, and backing board. Secure with small nails or clips.
- Hang: Attach hanging hardware or prop on a shelf.
Tips:
- Use keywords like “DIY reclaimed wood picture frame” and “rustic photo frame.”
- Create a Pinterest pin with the frame displayed on a gallery wall.
- Experiment with distressed finishes for extra character.
Time: 3-4 hours
Cost: $5-15
5. Reclaimed Wood Serving Tray

Craft a versatile tray for entertaining or decor.
Materials:
- Reclaimed wood planks (1”x6”x24” for base)
- Reclaimed wood strips (1”x2”x24” for sides)
- Handles (metal or rope)
- Wood glue
- Screws
- Sandpaper
- Polyurethane
Tools:
- Circular saw
- Drill
- Clamps
Steps:
- Cut Base: Trim planks to form a 24”x12” base. Glue and screw together.
- Cut Sides: Cut strips for four sides (two 24”, two 12”). Attach to the base with glue and screws.
- Add Handles: Drill holes for rope handles or screw on metal handles.
- Sand and Finish: Smooth all surfaces. Apply polyurethane for food-safe durability.
- Style: Use for serving drinks or as a centerpiece with candles.
Tips:
- Optimize for “DIY reclaimed wood serving tray” and “rustic tray decor.”
- Pinterest-friendly with images of the tray styled with coffee mugs or seasonal decor.
- Line with food-safe sealant if used for serving.
Time: 5-6 hours
Cost: $10-20
6. Reclaimed Wood Mirror Frame
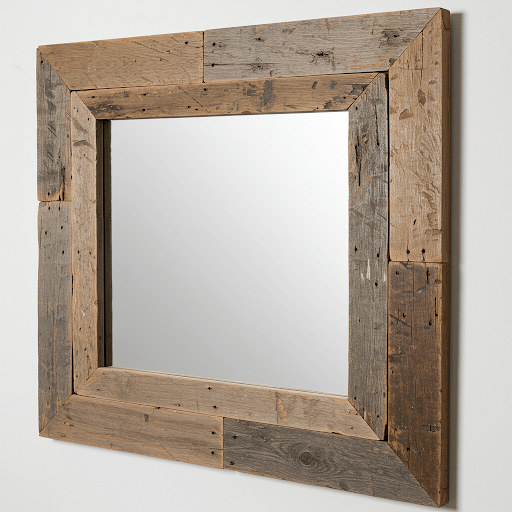
Elevate a plain mirror with a rustic wood frame.
Materials:
- Reclaimed wood planks (1”x4”x8’ total)
- Round or rectangular mirror (24” diameter or 24”x36”)
- Wood glue
- Nails
- Sandpaper
- Hanging hardware
Tools:
- Miter saw
- Hammer or nail gun
- Clamps
Steps:
- Cut Frame Pieces: Cut wood to frame the mirror, mitering corners for a seamless look.
- Assemble Frame: Glue and nail pieces together. Clamp until dry.
- Sand and Finish: Smooth surfaces and apply stain or paint.
- Attach Mirror: Secure the mirror to the frame with adhesive or clips.
- Hang: Add hanging hardware and mount on a wall.
Tips:
- Use keywords like “DIY reclaimed wood mirror frame” and “rustic bathroom decor.”
- Pinterest loves mirrors styled in bathrooms or entryways.
- Distress edges for a vintage look.
Time: 6-8 hours
Cost: $20-40
7. Reclaimed Wood Headboard
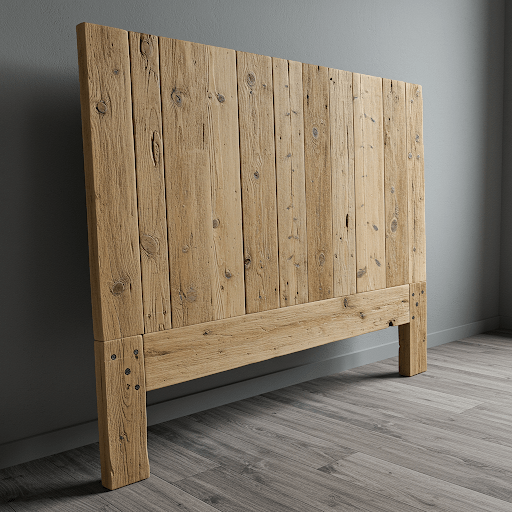
Create a statement piece for your bedroom.
Materials:
- Reclaimed wood planks (2”x6”x10’ total for queen-size)
- Wood screws
- Wood glue
- Sandpaper
- Polyurethane
Tools:
- Circular saw
- Drill
- Clamps
Steps:
- Cut Planks: Trim planks to 60” (queen-size width). Arrange vertically or horizontally.
- Assemble: Glue planks together. Reinforce with screws on the back.
- Add Supports: Attach 2”x4” supports to the back to attach to the bed frame.
- Sand and Finish: Smooth surfaces and apply polyurethane.
- Install: Secure to the bed frame with screws.
Tips:
- Optimize for “DIY reclaimed wood headboard” and “rustic bedroom decor.”
- Pinterest-friendly with styled bedroom images featuring cozy bedding.
- Vary plank lengths for a dynamic look.
Time: 10-12 hours
Cost: $30-50
8. Reclaimed Wood Planter Box
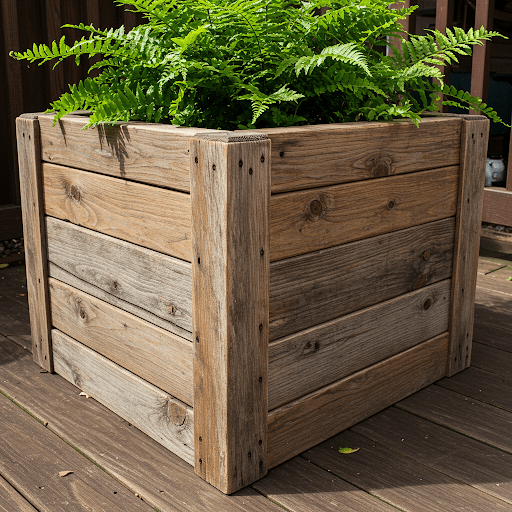
Grow herbs or flowers in a rustic planter.
Materials:
- Reclaimed wood planks (1”x6”x6’ total)
- Wood screws
- Landscape fabric
- Sandpaper
- Exterior paint or sealant
Tools:
- Circular saw
- Drill
- Staple gun
Steps:
- Cut Wood: Cut planks for a 24”x12”x12” box (base and four sides).
- Assemble Box: Screw sides to the base. Reinforce with glue.
- Line Interior: Staple landscape fabric inside to hold soil.
- Sand and Finish: Smooth surfaces and apply exterior sealant.
- Plant: Fill with soil and add plants.
Tips:
- Use keywords like “DIY reclaimed wood planter box” and “rustic garden decor.”
- Pinterest loves planters styled with vibrant flowers or herbs.
- Add legs for elevated planters.
Time: 4-5 hours
Cost: $10-20
9. Reclaimed Wood Candle Holder

Craft a cozy accent for tabletops.
Materials:
- Reclaimed wood block (4”x4”x12”)
- Tea light candles (3-5)
- Sandpaper
- Wood stain
Tools:
- Drill with spade bit
- Sandpaper
Steps:
- Cut Block: Trim wood to 12” length.
- Drill Holes: Use a spade bit to drill shallow holes for tea lights.
- Sand and Finish: Smooth surfaces and apply stain.
- Add Candles: Place tea lights in holes.
Tips:
- Optimize for “DIY reclaimed wood candle holder” and “rustic table decor.”
- Pinterest-friendly with images of lit candles in a cozy setting.
- Vary hole sizes for visual interest.
Time: 2-3 hours
Cost: $5-10
10. Reclaimed Wood Coat Rack
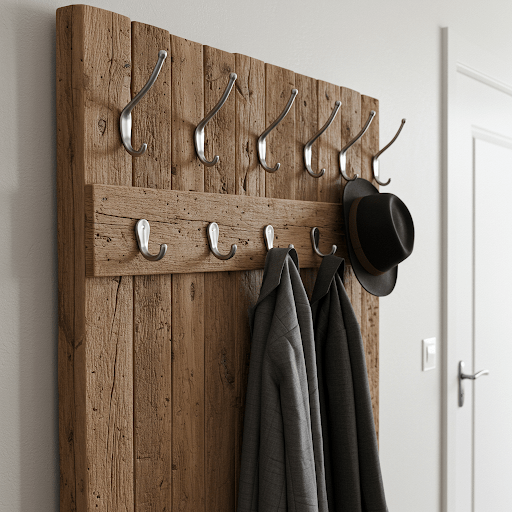
Build a functional entryway organizer.
Materials:
- Reclaimed wood plank (1”x8”x36”)
- Hooks or knobs (4-6)
- Wood screws
- Sandpaper
- Stain
Tools:
- Drill
- Stud finder
Steps:
- Cut and Sand: Trim plank to 36”. Sand smooth.
- Finish: Apply stain or paint.
- Attach Hooks: Screw hooks evenly across the plank.
- Mount: Secure to the wall using screws and wall anchors.
- Style: Hang coats, hats, or bags.
Tips:
- Use keywords like “DIY reclaimed wood coat rack” and “rustic entryway decor.”
- Pinterest loves styled entryway images with organized accessories.
- Add a shelf above for extra storage.
Time: 3-4 hours
Cost: $10-20
Advanced Techniques for Reclaimed Wood Projects
For woodworkers ready to elevate their skills, try these advanced techniques to enhance your reclaimed wood projects:
1. Epoxy Resin Inlays
- Why: Adds a modern, glossy finish to tables or wall art.
- How: Carve grooves in the wood, fill with colored epoxy, and sand smooth.
- Tools: Router, epoxy resin kit, sander.
2. Distressing
- Why: Enhances rustic charm with a weathered look.
- How: Use hammers, chains, or sandpaper to create dents and scratches before staining.
- Tools: Hammer, sandpaper, stain.
3. Joinery
- Why: Creates stronger, seamless connections without visible screws.
- How: Use dovetail or mortise-and-tenon joints for furniture.
- Tools: Chisel, router, clamps.
4. Live Edge Finishing
- Why: Preserves natural wood edges for organic beauty.
- How: Sand and seal the live edge while keeping its natural shape.
- Tools: Sander, polyurethane.
For detailed plans incorporating these techniques, explore Ted’s Woodworking Plans for professional-grade blueprints.
Finishing and Sealing Reclaimed Wood Projects
A proper finish protects your project and enhances its beauty. Here’s how to choose and apply finishes:
Types of Finishes
- Stain: Enhances wood grain and color. Choose water-based for easy cleanup or oil-based for richer tones.
- Paint: Adds bold color or a distressed look. Use chalk paint for a matte, vintage finish.
- Polyurethane: Seals wood for durability. Opt for water-based for low odor or oil-based for outdoor projects.
- Wax: Provides a soft, natural sheen. Ideal for decorative pieces.
Application Tips
- Prep: Sand the wood to 220 grit for a smooth surface.
- Test: Apply finish to a scrap piece to check color and sheen.
- Apply: Use a brush, rag, or spray for even coverage. Apply 2-3 thin coats, sanding lightly between coats.
- Dry: Allow 24-48 hours for full curing.
Food-Safe Finishes
For projects like cutting boards or trays, use:
- Mineral oil
- Beeswax
- Food-grade polyurethane
Safety Tips for Reclaimed Wood Projects
Working with reclaimed wood requires extra precautions:
- Wear PPE: Use safety glasses, gloves, and a dust mask to protect against splinters and dust.
- Check for Hazards: Inspect wood for nails, chemicals, or mold before starting.
- Ventilate: Work in a well-ventilated area, especially when sanding or applying finishes.
- Secure Wood: Use clamps to prevent slipping during cutting or drilling.
- Tool Maintenance: Keep blades sharp and tools in good condition to avoid accidents.
Marketing Your Reclaimed Wood Projects
Turn your projects into a side hustle- Selling Your Creations:
- Etsy Shop: Create a shop to sell wall art, trays, or furniture. Use high-quality photos and detailed descriptions.
- Social Media: Share process videos on Instagram or TikTok. Use hashtags like #ReclaimedWoodProjects and #DIYHomeDecor.
- Local Markets: Sell at craft fairs or farmers’ markets for direct customer interaction.
- Custom Orders: Offer personalized designs for higher profits.
SEO Keywords for Listings:
- “Handmade reclaimed wood decor”
- “Rustic home decor for sale”
- “Custom wood furniture”
Pinterest Strategy:
- Create pins with vibrant, styled images.
- Use descriptions with keywords like “DIY reclaimed wood ideas” and “sustainable home decor.”
- Join group boards for woodworking or home decor.
FAQs About Reclaimed Wood Projects
Q: Is reclaimed wood safe to use for furniture?
A: Yes, if properly cleaned and inspected. Remove nails, check for mold, and sand thoroughly to ensure safety.
Q: Where can I find free reclaimed wood?
A: Check pallet yards, construction sites, or community groups. Always get permission before taking wood.
Q: What’s the best finish for outdoor reclaimed wood projects?
A: Use exterior-grade polyurethane or marine varnish for weather resistance.
Q: How do I prevent reclaimed wood from warping?
A: Store wood in a dry, ventilated area and seal it with a quality finish to protect against moisture.
Q: Can beginners tackle reclaimed wood projects?
A: Absolutely! Start with simple projects like candle holders or picture frames and use resources like Ted’s Woodworking Plans for guidance.
Conclusion
Reclaimed wood projects offer a perfect blend of sustainability, creativity, and style, allowing you to transform discarded materials into stunning home decor. From rustic wall art to functional furniture, the possibilities are endless, and the process is accessible to woodworkers of all skill levels. By sourcing quality wood, using the right tools, and applying the techniques outlined in this guide, you can create pieces that elevate your space and resonate with eco-conscious consumers.
Ready to dive deeper? Explore Ted’s Woodworking Plans for thousands of detailed blueprints to inspire your next reclaimed wood masterpiece. Start building today, and share your creations with the world—your home (and the planet) will thank you.
Affiliate Disclosure
This article contains affiliate links, including links to Ted’s Woodworking Plans. If you make a purchase through these links, we may earn a small commission at no additional cost to you. This helps support our content creation and keeps our resources free for readers. We only recommend products we believe in and that align with the goals of this article. Thank you for your support!
Discover more from WoodReality
Subscribe to get the latest posts sent to your email.
