Transforming a room with a stunning wooden accent wall is one of the most impactful and budget-friendly ways to elevate your home’s aesthetic. In 2025, accent walls remain a top interior design trend, blending rustic charm with modern minimalism. Best of all, you can create a professional-looking wooden accent wall for under $100, even if you’re a beginner with no woodworking experience.
In this comprehensive guide, I’ll walk you through every step of the process, from planning and sourcing affordable materials to installation and finishing touches. Whether you’re refreshing a living room, bedroom, or office, this DIY project will add warmth and character to your space without breaking the bank.
Why Build a Wooden Accent Wall?
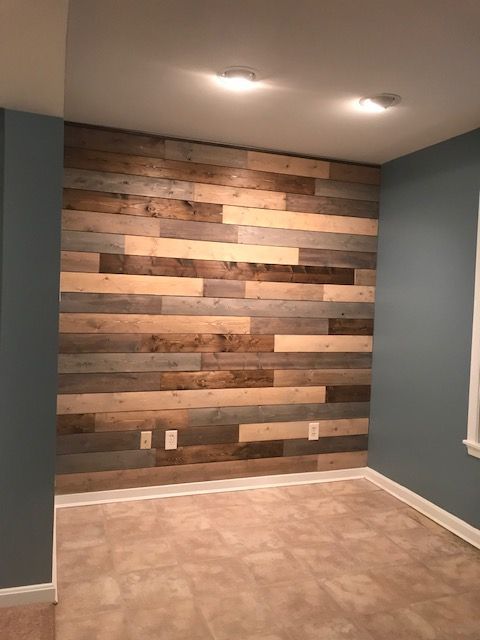
A wooden accent wall is a versatile design element that instantly adds texture, warmth, and personality to any room. According to a 2024 Houzz report, accent walls are among the top 10 home improvement projects for increasing property appeal, with 68% of homeowners citing them as a cost-effective way to enhance interior spaces. For me, the motivation was simple: I wanted to transform my bland living room into a cozy, modern space without spending hundreds on professional contractors or expensive materials. By keeping costs under $100, I created a shiplap-inspired accent wall that became the focal point of my home.
This guide is designed for beginners and budget-conscious DIYers. I’ll share my exact process, including cost-saving tips, creative sourcing strategies, and lessons learned from my experience. With careful planning and a little elbow grease, you can achieve professional results while staying within a tight budget. Let’s dive into the step-by-step process to create your own wooden accent wall.
Step 1: Planning Your Wooden Accent Wall
Define Your Vision and Purpose
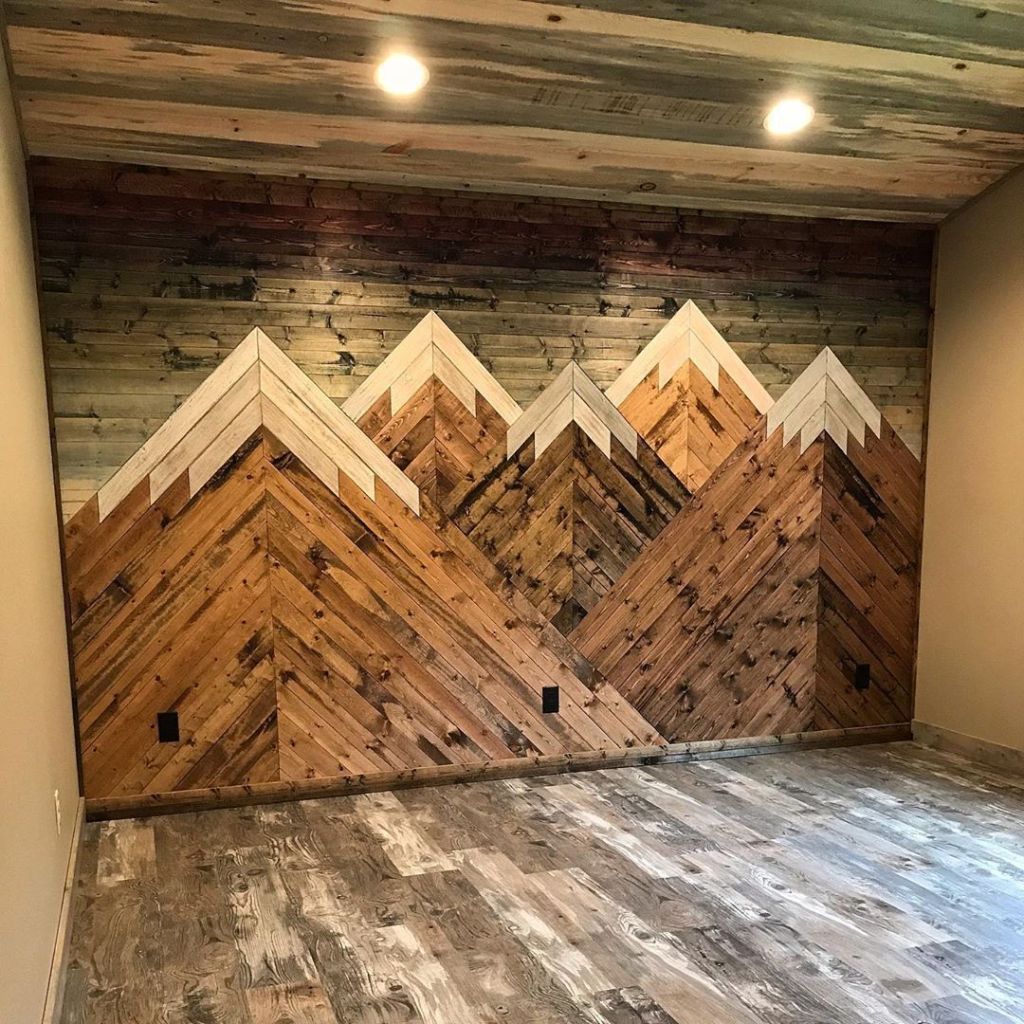
Before starting, decide on the style and purpose of your accent wall. Wooden accent walls come in various designs, such as shiplap, plank, herringbone, or reclaimed wood patchwork, each offering a unique vibe. For my project, I chose a shiplap-style wall for its clean, modern look and affordability. Consider the following:
- Room and Function: Will the wall be in a living room, bedroom, or office? I chose my living room’s TV wall to create a cozy backdrop for movie nights.
- Style Preference: Shiplap is timeless, while herringbone adds a geometric flair. Reclaimed wood suits rustic or industrial aesthetics.
- Wall Size: Measure the wall to estimate material needs. My wall was 8×10 feet (80 square feet), a standard size for a feature wall in a small to medium room.
Set a Budget
My goal was to keep costs under $100. Here’s a rough breakdown of expenses (detailed later):
- Wood (Plywood or Pallets): $40 (reclaimed and discounted)
- Fasteners and Adhesives: $20
- Paint or Stain: $15
- Tools (Borrowed or Used): $15
- Miscellaneous (Sandpaper, Caulk): $10
- Total: ~$95
By focusing on reclaimed materials and minimal tool purchases, I stayed within budget while achieving a high-end look.
Check Wall Conditions
Inspect the wall for structural issues, such as cracks, moisture, or uneven surfaces. A flat, dry wall ensures easier installation and longevity. My wall was in good condition, but I patched minor dents with spackle ($5) to create a smooth base.
Research Design Inspiration
To refine my vision, I browsed Pinterest and Instagram for accent wall ideas. I also found inspiration in the largest resource of woodworking plans, which offers over 16,000 detailed blueprints for projects like accent walls, furniture, and more. Their plans include material lists and 3D diagrams, making it easier for beginners to visualize and execute complex designs. I selected a shiplap-style plan that aligned with my budget and skill level, ensuring a professional result without costly mistakes.
Check Local Regulations
While accent walls typically don’t require permits, check with your local building authority or HOA if you’re in a rented space or condo. Some HOAs have restrictions on interior modifications, so confirm to avoid issues.
Step 2: Sourcing Affordable Materials

Building a wooden accent wall for under $100 requires creative sourcing. Here’s how I kept costs low:
Reclaimed and Discounted Wood
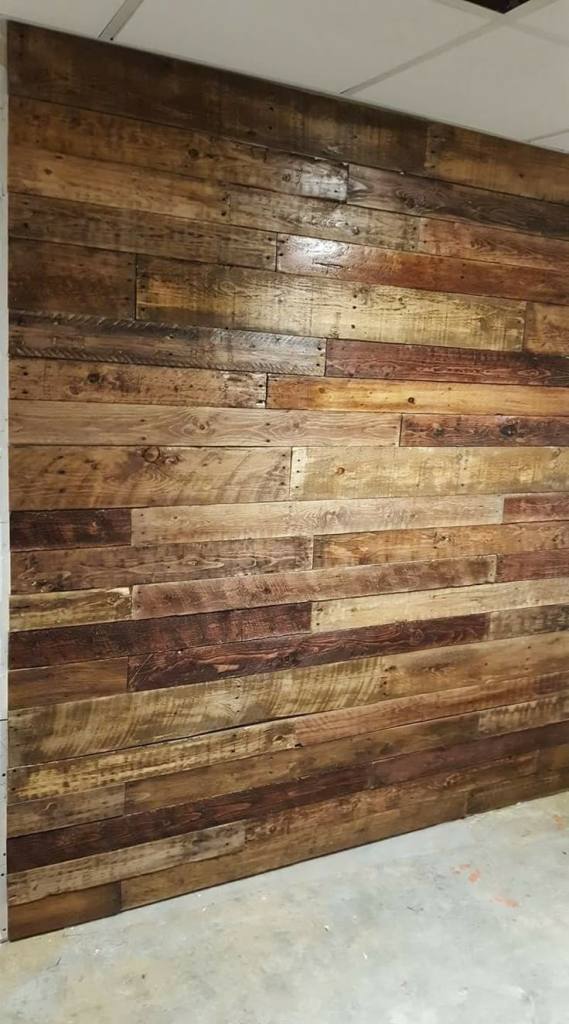
Wood is the primary expense, but you can save significantly by using reclaimed or discounted materials. I sourced free pallet wood from a local warehouse and supplemented it with $30 worth of ¼-inch plywood from a home improvement store’s discount bin.
Tips for Finding Cheap Wood:
- Online Marketplaces: Check Craigslist, Facebook Marketplace, or Freecycle for free or low-cost pallets, lumber, or plywood. I found a stack of pallets on Craigslist for free.
- Salvage Yards: Architectural salvage yards sell reclaimed wood at 50-70% off retail prices. Look for weathered boards for a rustic look.
- Local Businesses: Warehouses, furniture stores, or construction sites often discard usable pallets or scrap wood. Always ask permission before taking.
- Home Improvement Stores: Shop discount bins for slightly damaged plywood or lumber. I bought two 4×8-foot plywood sheets for $15 each.
Choosing Wood:
- Plywood: Thin plywood (¼-inch) is lightweight, affordable, and easy to cut into shiplap-style strips. It’s ideal for beginners.
- Pallets: Free or cheap, but require dismantling and sanding. Ensure pallets are heat-treated (marked “HT”) to avoid chemical residues.
- Reclaimed Boards: Barn wood or fence boards add character but may need cleaning and sealing.
Fasteners and Adhesives
I spent $20 on construction adhesive ($10 for two tubes) and 1.5-inch brad nails ($10 for a bulk pack). Liquid Nails or similar adhesives work well for securing wood to drywall. Brad nails ensure a clean, professional finish.
Paint or Stain
To enhance the wood’s natural beauty, I used a whitewash stain ($10 for a small can) for a modern, coastal vibe. Alternatively, exterior paint ($10-15) or clear sealant ($8) can protect the wood and match your decor.
Tools
As a beginner, I didn’t own many tools. I borrowed a circular saw, level, and stud finder from a friend and bought a used jigsaw for $15 on Facebook Marketplace. A brad nailer is optional but speeds up installation; I rented one for $10/day from Home Depot.
Tool List:
- Essential: Jigsaw or circular saw, measuring tape, level, stud finder, sandpaper (80-120 grit), paintbrush or roller.
- Optional: Brad nailer, miter saw (for precise cuts), caulk gun.
- Cost-Saving Tip: Borrow or rent tools to avoid buying expensive equipment. Check local tool libraries or neighbors.
Miscellaneous
I spent $10 on sandpaper, caulk, and painter’s tape to smooth rough edges and seal gaps for a polished look.
Step 3: Preparing the Wall
Measure and Mark the WallMeasure your wall’s dimensions to calculate material needs. My 8×10-foot wall required approximately 80 square feet of wood, accounting for slight overlaps in shiplap-style installation. Mark the wall’s center and corners with a pencil, and use a stud finder to locate studs for secure mounting.
Clean and Prep the Surface
Remove any existing fixtures (e.g., outlet covers, baseboards) and clean the wall with a damp cloth to remove dust. Patch holes or cracks with spackle ($5) and sand lightly for a smooth base. If your wall has heavy texture, consider sanding or applying a thin layer of joint compound to flatten it.
Plan the Layout
Decide on the plank orientation (horizontal, vertical, or diagonal). Horizontal shiplap is classic and beginner-friendly, while vertical planks elongate a room. I chose horizontal planks for a timeless look. Sketch the layout on paper or use a design app to visualize spacing and cuts.
Step 4: Cutting and Preparing the Wood
Cutting Plywood or Pallets
I used ¼-inch plywood sheets, cut into 6-inch-wide strips to mimic shiplap boards. This approach is cheaper than buying pre-made shiplap and allows customization.
Steps:
- Measure and Mark: Mark 6-inch strips on the plywood using a straightedge and pencil. For an 8×10-foot wall, I needed about 16 strips (4×8 sheets yield eight 6-inch strips each).
- Cut Strips: Use a circular saw or jigsaw with a fine-tooth blade for clean cuts. Wear safety goggles and work in a well-ventilated area.
- Sand Edges: Sand cut edges with 80-grit sandpaper to remove splinters. For pallets, sand thoroughly to achieve a smooth finish.
- Test Fit: Lay out strips on the floor to ensure they fit the wall’s dimensions. Trim as needed for outlets or corners.
Tip: If using pallets, dismantle them with a pry bar and hammer, removing nails carefully. Check for damage or rot before cutting.
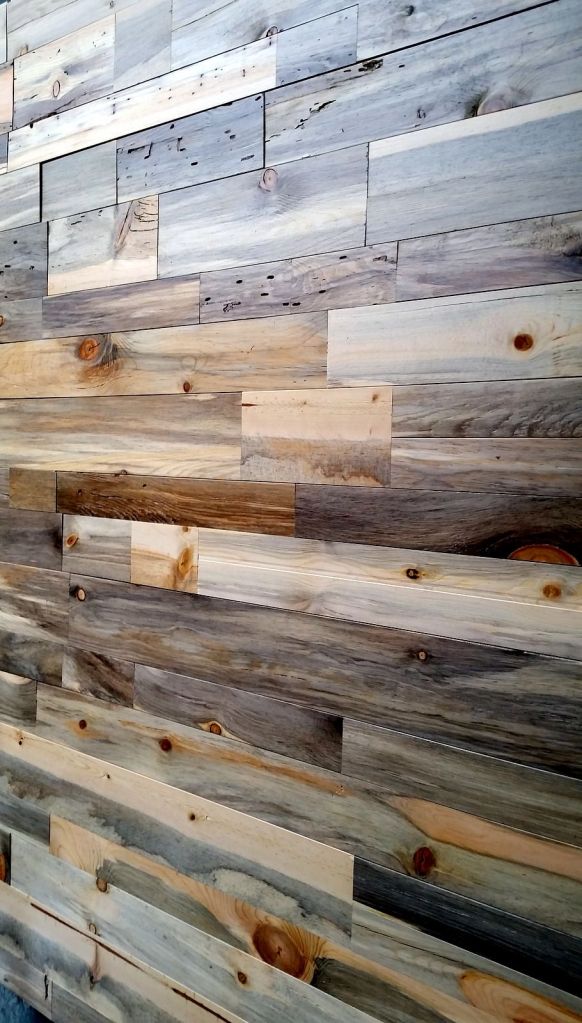
Staining or Painting
Apply stain or paint before installation to avoid mess on the wall. I used a whitewash stain, applying it with a brush in thin layers for a natural, weathered look. Let the wood dry for 24 hours. If painting, use a primer for better adhesion on raw wood.
Cost-Saving Tip: Buy “oops” paint (mis-tinted cans) from hardware stores for $5-10. Alternatively, use leftover paint from other projects.
Step 5: Installing the Accent Wall
Start with a Level Base
A level first row is crucial for a professional finish. Use a 4-foot level to draw a straight line across the wall at the baseboard height. If your floor is uneven, shim the first row to ensure it’s level.
Attach the First Row
Apply a thin bead of construction adhesive to the back of the first plywood strip and press it onto the wall along the marked line. Secure with brad nails into the studs (every 16-24 inches). I spaced nails 12 inches apart for extra stability.
Tip: Use a stud finder to mark stud locations with painter’s tape for easy nailing.
Install Subsequent Rows
For a shiplap look, overlap each row slightly (about 1/8 inch) to create a subtle gap. This mimics traditional shiplap without expensive tongue-and-groove boards. Continue applying adhesive and nailing each strip, checking for level every few rows.
For Corners and Outlets:
- Corners: Measure and cut strips to fit snugly against adjacent walls. Use a jigsaw for precise cuts.
- Outlets: Cut openings for electrical outlets using a jigsaw. Measure carefully and test-fit before attaching.
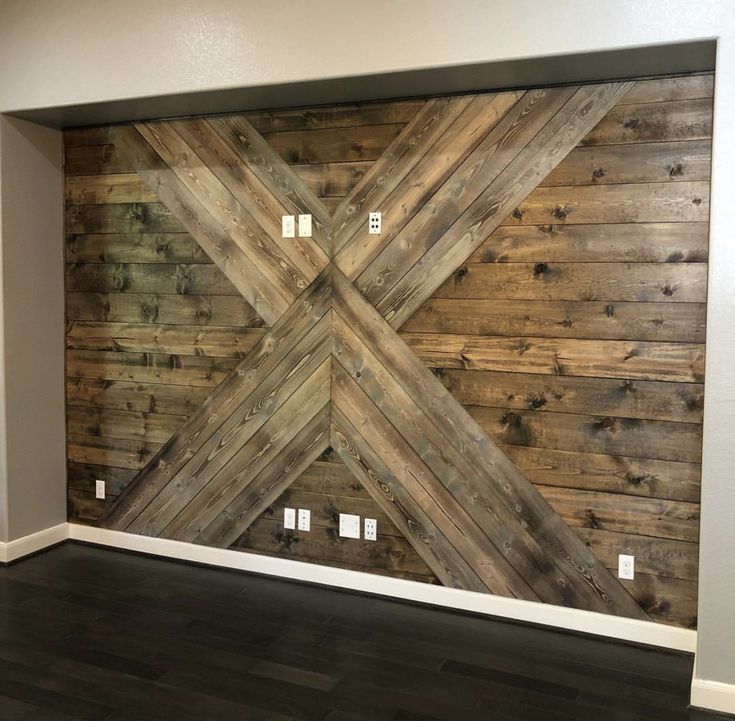
Create a Pattern (Optional)
For a unique look, consider a herringbone or chevron pattern. These require more precise cuts (45-degree angles) and planning but add a modern flair. The woodworking plan resource I used offered detailed herringbone templates, which helped me visualize the layout. Access to over 16,000 woodworking plans like these can simplify complex designs, ensuring accuracy even for beginners.
Step 6: Finishing the Accent Wall

Fill Gaps and Nail Holes
Use paintable caulk ($5) to fill gaps between planks or at corners for a seamless look. Apply wood filler ($5) to nail holes, then sand lightly with 120-grit sandpaper.
Final Painting or Sealing
If you didn’t pre-stain or paint, apply a final coat now. I touched up my whitewashed wall with a second coat of stain for uniformity. Alternatively, a clear polyurethane sealant ($8) protects the wood and enhances durability, especially in high-traffic areas.
Reinstall Fixtures
Reattach baseboards, outlet covers, or trim. For a polished look, paint baseboards to match or contrast the wall. I used leftover white paint for a crisp finish.
Add Decor
Enhance the wall with minimal decor, such as a floating shelf ($10-15 to build) or framed art. Keep it simple to let the wood’s texture shine.
Step 7: Cost Breakdown and Savings Tips

Here’s the final cost breakdown for my 8×10-foot accent wall:
- Plywood (2 sheets, ¼-inch): $30 (discount bin)
- Pallet Wood: $0 (sourced free from Craigslist)
- Construction Adhesive: $10
- Brad Nails: $10
- Whitewash Stain: $10
- Caulk and Wood Filler: $10
- Used Jigsaw: $15
- Spackle and Sandpaper: $10
- Total: $95
Savings Tips:
- Use Reclaimed Materials: Pallets, scrap wood, or discounted plywood cut costs significantly.
- Borrow Tools: Avoid buying expensive tools by borrowing or renting. Check tool libraries or ask neighbors.
- Shop Discount Bins: Home Depot and Lowe’s often have damaged plywood at 50-70% off.
- DIY Stain: Mix white paint with water for a homemade whitewash stain ($5).
- Plan Efficiently: Use a woodworking plan from a resource like the one with over 16,000 plans to minimize waste and errors.
Step 8: Lessons Learned and Tips for Beginners
As a first-time DIYer, I encountered a few challenges but learned valuable lessons:
- Measure Twice, Cut Once: Double-check measurements to avoid wasting wood.
- Level Is Key: An uneven first row can throw off the entire wall. Invest time in leveling.
- Test Stain Colors: Test stain on a scrap piece to ensure the desired look.
- Work in Sections: Install the wall in small sections to maintain control and accuracy.
- Ask for Help: A friend can assist with holding planks or checking alignment, saving time and frustration.
For beginners, I recommend using a resource with over 16,000 woodworking plans, such as the one I found invaluable for my project. These plans provide step-by-step guidance, material lists, and diagrams, making complex projects like accent walls accessible to novices.
Conclusion
Creating a wooden accent wall for under $100 is an achievable, rewarding DIY project that adds style and value to your home. By sourcing reclaimed materials, following a detailed plan, and applying simple techniques, you can achieve a professional look without advanced skills or a big budget. My 8×10-foot shiplap-style wall transformed my living room into a cozy, modern space for just $95, proving that impactful home upgrades don’t have to be expensive.
For beginners, I highly recommend exploring the largest resource of woodworking plans, which offers over 16,000 blueprints for projects like accent walls, furniture, and more. These plans helped me stay on track and avoid costly mistakes. Start your project today, and enjoy the satisfaction of crafting a stunning feature wall with your own hands!
Affiliate Disclosure
This article contains affiliate links, including to a resource with over 16,000 woodworking plans. If you click through and make a purchase, I may earn a small commission at no additional cost to you. I only recommend products I believe in, and these commissions help support the creation of free content like this guide. Thank you for your support!
Discover more from WoodReality
Subscribe to get the latest posts sent to your email.
