Are you a budding woodworker, a passionate DIY enthusiast, or simply someone who needs a dedicated workspace but constantly battles with limited space? Do you dream of tackling projects with confidence, but the thought of a sprawling, permanent workbench seems out of reach? What if we told you that you could build a robust, versatile, and portable workbench in less time than it takes to watch a movie marathon – perhaps even under 4 hours?
Yes, you read that right.
In this comprehensive guide, we’re going to walk you through the entire process of building your very own portable workbench. This isn’t just any workbench; it’s a game-changer for anyone working in a garage, a small apartment, a shared space, or even outdoors. It’s sturdy enough for serious work, yet light and compact enough to store away in a closet or hang on a wall.
Forget complicated plans, expensive materials, or specialized tools. This project is designed for beginners, focusing on simplicity, efficiency, and maximum utility. By the end of this article, you’ll not only have the knowledge to construct this essential piece of shop furniture, but you’ll also understand the principles of efficient woodworking that will serve you in countless future projects.
Get ready to transform your workspace and unleash your inner maker. Let’s dive into building the beginner’s portable workbench that will empower your DIY journey!
Why a Portable Workbench? The Unseen Benefits for Every Maker
Before we grab our tools, let’s understand why a portable workbench isn’t just a convenience, but a necessity for many. If you’re searching for “DIY workbench plans,” “small shop workbench,” or “collapsible woodworking table,” you’ve likely encountered some of these challenges:
- Space Constraints: This is the most obvious. Garages filled with cars, apartments with no dedicated workshop, shared basements – a permanent workbench is often not an option. A portable workbench allows you to set up, work, and then reclaim your space.
- Versatility: Need to work on a project outside? Move it. Need to cut a long board in the driveway? Take your workbench to the material, not the other way around. This mobility significantly expands your working possibilities.
- Cost-Effectiveness: Often, portable workbench designs utilize less material and simpler joinery, making them more budget-friendly than large, permanent builds. This makes it an ideal “workbench under $100” project if you source smart.
- Beginner-Friendly: Building a portable workbench is an excellent foundational project. It teaches basic cuts, joinery, and assembly without the pressure of complex angles or intricate designs. It’s the perfect “easy workbench plan” to build confidence.
- Organization: A well-designed portable bench can also offer storage solutions, keeping essential tools at hand while you work, and neatly stowed when you’re done.
- Ergonomics: You can design your portable workbench to be at an optimal working height for you, reducing strain and making your projects more enjoyable.
This isn’t just about building a table, it’s about building freedom and efficiency into your making process.
Understanding Our “Under 4 Hours” Philosophy: Speed Meets Quality
Achieving a quality build in under 4 hours isn’t about rushing; it’s about smart planning, efficient execution, and focusing on functional design over excessive aesthetics. Here’s how we’ll do it:
- Simple Design: We’ll use straightforward cuts and robust but easy-to-assemble joinery. No complex angles or dadoes unless absolutely necessary.
- Common Materials: Readily available dimensional lumber (e.g., 2x4s) and plywood will be our go-to.
- Essential Tools: We’ll stick to basic power tools that many beginners already own or can easily access.
- Batching Tasks: Instead of cutting one piece, then assembling, then cutting another, we’ll cut all similar pieces at once.
- Pre-Drilling & Screws: For speed and strength, we’ll primarily rely on screws, ensuring pre-drilling to prevent splitting.
This approach ensures that even a novice woodworker can follow along confidently and successfully complete this “quick workbench build.”
Design Overview: What Makes This Workbench So Great?
💡 Quick Resource: Looking for 16,000+ More Plans?
If this specific project has you eager for more, or if you need plans for more complex pieces (like ultimate tool chests, sheds, or full-sized workbenches), check out Ted’s Woodworking Plans. It offers a massive library of 16,000+ detailed, step-by-step blueprints, saving you the countless hours of designing and measuring.
Our portable workbench design prioritizes stability, portability, and ease of construction. Here’s a quick look at the features we’ll incorporate:
- Robust Frame: Built from common 2x4s, providing excellent rigidity.
- Plywood Top: A sturdy, flat work surface that can withstand abuse.
- Collapsible Legs (Option 1: Folding Sawhorse Style): This is our primary focus for speed, mimicking a durable sawhorse design that can fold flat.
- OR Removable Legs (Option 2: Pocket-Hole/Bolt-On): A slightly more robust, but still portable, option we’ll briefly cover.
- Integrated Shelf: Adds storage and further increases rigidity.
- Lightweight Enough to Move: Designed so one person can easily reposition or store it.
Let’s visualize the finished product:

Looks good, right? Now, let’s gather what we need.
Materials List: What You’ll Need to Buy
One of the beauties of this “workbench under $100” type project is the affordability of materials. We’re leveraging common lumberyard stock.
- Lumber:
- (3) 2x4x8′ construction-grade lumber (actual size ~1.5″ x 3.5″)
- (1) 3/4″ thick plywood sheet, 2’x4′ (for the top and shelf – often sold as “handi-panels” or “project panels” which saves you from buying a full 4×8 sheet if you don’t need it)
- Hardware:
- (100-150) 2.5″ construction screws (e.g., GRK R4, Spax, or other general exterior/deck screws for strong hold)
- (20-30) 1.25″ wood screws (for attaching plywood top/shelf)
- (4) 3″ heavy-duty butt hinges (for folding legs, if using that option)
- (4) 1/4″ x 3″ carriage bolts with matching washers and wing nuts (for removable leg option, or if you want extra security for folding legs)
- Optional but Recommended:
- Wood glue (Titebond III is excellent for strength)
- Sandpaper (80-120 grit for initial smoothing, 180-220 for final finish)
- Wood finish (e.g., polyurethane, Danish oil, or even just paste wax for protection)
Total Estimated Cost: Roughly $60 – $120, depending on lumber prices in your area and if you opt for premium screws or finishes. This easily qualifies as a “budget woodworking project.”
Tools List: Essential Gear for Your 4-Hour Build
This project is designed for minimal tooling, making it an ideal “beginner woodworking project.”
- Measuring & Marking:
- Tape Measure
- Pencil
- Speed Square or Combination Square
- Cutting:
- Miter Saw (Recommended for speed and accuracy): This will significantly help you stay within the 4-hour window.
- Alternative: Circular Saw with a straight edge guide: Perfectly fine, just takes a little more setup per cut.
- Alternative: Hand Saw: Definitely possible, but will add considerable time beyond the 4-hour target.
- Drilling & Fastening:
- Cordless Drill/Driver
- Drill bit set (especially 1/8″ and 3/16″ for pilot holes)
- Countersink bit (optional, but gives a cleaner finish)
- Impact Driver (optional, but makes driving screws much faster)
- Clamping:
- (2-4) Bar Clamps or F-Clamps (essential for holding pieces together during assembly)
- Safety Gear (NON-NEGOTIABLE!):
- Safety Glasses
- Hearing Protection
- Dust Mask
Cut List: Precision is Key, But Don’t Sweat Perfection
Before we start cutting, let’s get our dimensions straight. Remember, construction lumber (like 2x4s) is rarely its nominal size. A “2×4″ is actually about 1.5″ x 3.5”. Always measure your specific stock if critical dimensions are needed, but for this project, standard measurements will suffice.
From 2x4s:
- Long Sides (Top Frame): (2) @ 45″
- Short Sides (Top Frame): (2) @ 21″
- Long Rails (Shelf & Lower Supports): (2) @ 42″
- Legs (Determine your height): (4) @ 30″ (This will result in a workbench roughly 34″ high with 3/4″ top, a comfortable height for many. Adjust for your personal preference – a good rule of thumb is to stand with your arms bent at 90 degrees, and the workbench height should be around your knuckles.)
- Leg Supports/Stretchers: (2) @ 18″ (These will connect the folding legs or provide lateral stability for fixed legs)
- Folding Leg Reinforcements (If using folding legs): (4) @ 12″ (These are short pieces to give hinges more bite)
From 3/4″ Plywood (2’x4′ sheet):
- Workbench Top: (1) @ 24″ x 48″
- Bottom Shelf: (1) @ 21″ x 45″ (This fits inside the frame we’re building)
Quick Tip for Batching Cuts: Cut all pieces of the same length at the same time. For example, cut both 45″ top frame pieces, then both 21″ pieces, and so on. This saves time resetting your saw.
Let’s Build! Step-by-Step Instructions
This is where the rubber meets the road! Follow these steps, and you’ll be well on your way to completing your “easy workbench plans” in record time.
Step 1: Assemble the Top Frame
This is the foundation of your workbench. We’ll create a rectangular box that will support the plywood top.
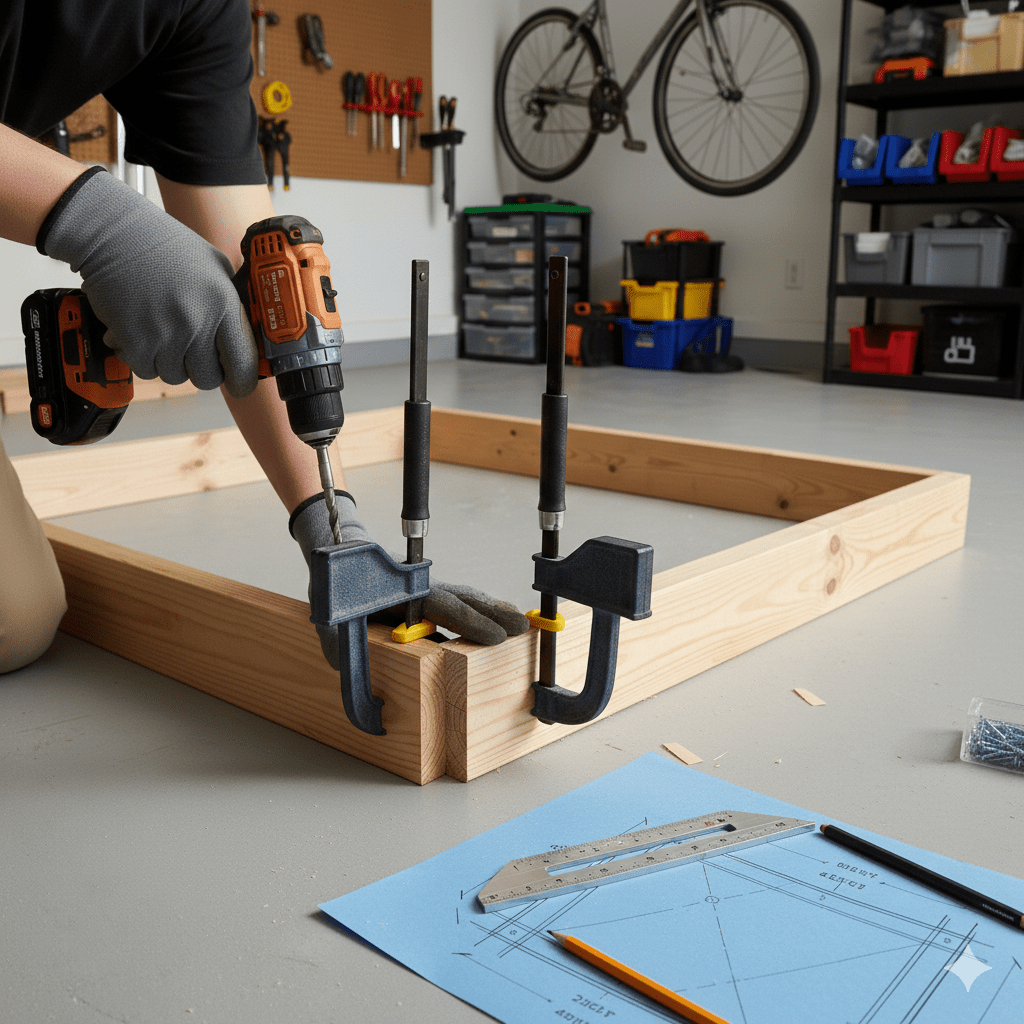
- Layout: Take your two 45″ 2x4s (long sides) and two 21″ 2x4s (short sides). We’re going to use butt joints, where the short sides fit between the long sides. This makes the overall dimensions of your frame 48″ x 24″ (external).
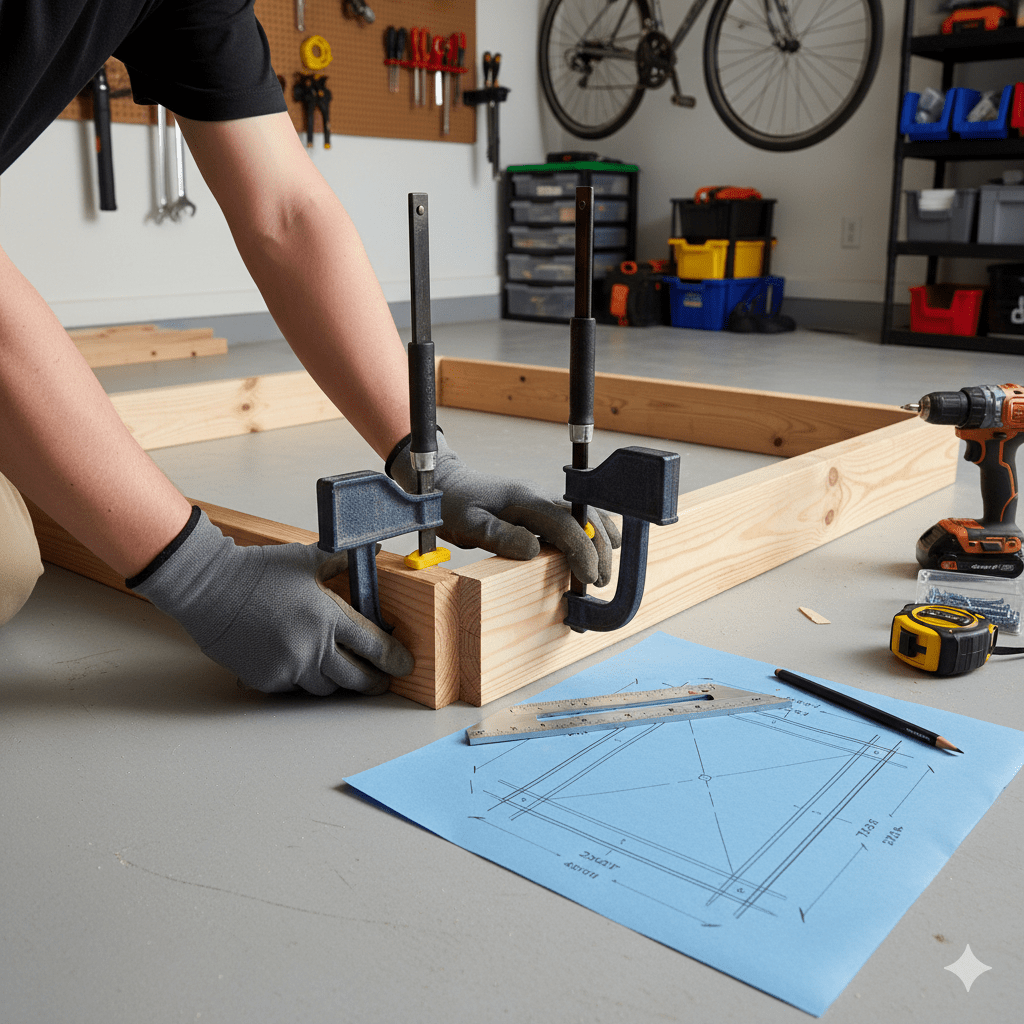
2. Pre-Drill Pilot Holes: At each corner, hold the 21″ piece flush with the end of the 45″ piece. Use clamps to secure them. Using a 1/8″ drill bit, pre-drill two pilot holes through the end of the 45″ piece and into the end grain of the 21″ piece. Pilot holes are crucial to prevent splitting the wood, especially when screwing into end grain. If you have a countersink bit, use it now to allow your screw heads to sit flush or slightly below the surface.
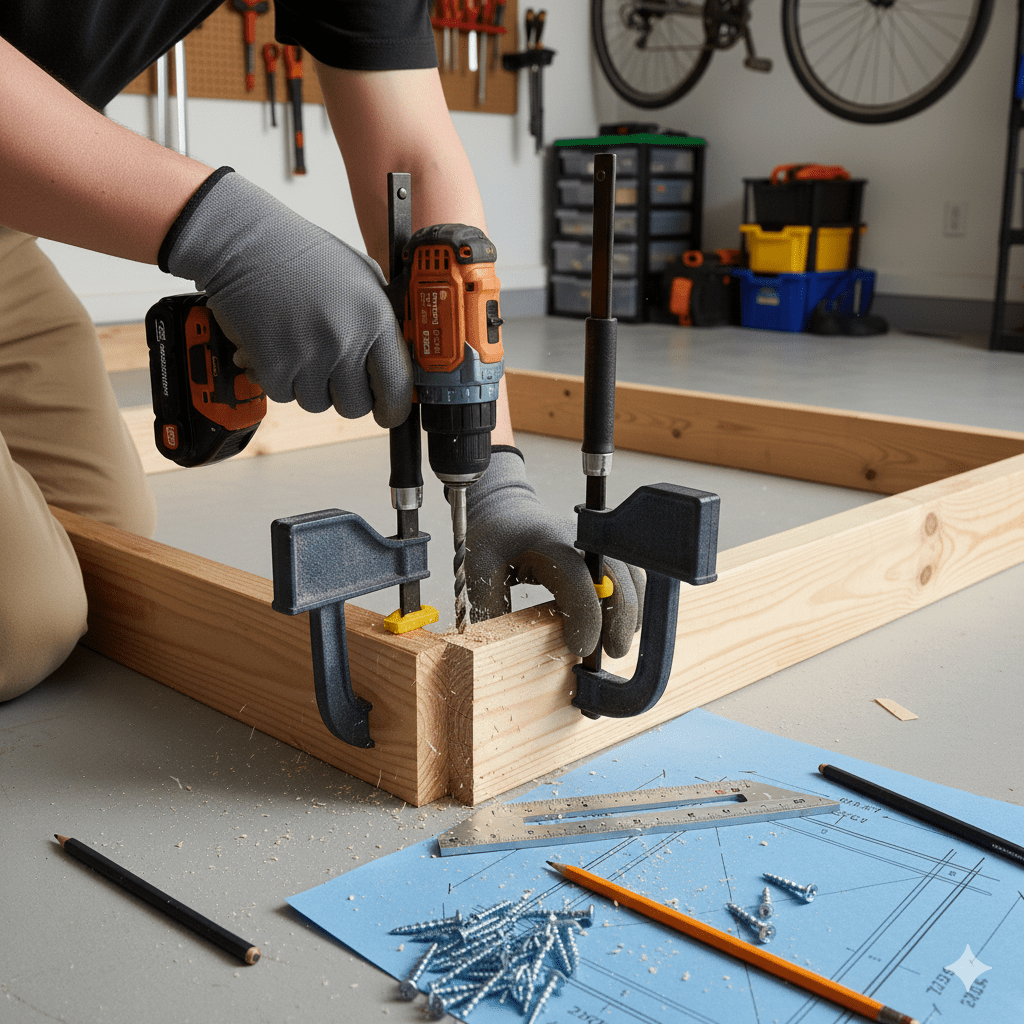
3. Assemble with Screws: Drive two 2.5″ construction screws into each corner. If you’re using wood glue, apply a thin bead to the joint surfaces before clamping and screwing. This significantly increases the strength of the joint. Ensure your frame is square by measuring the diagonals – they should be equal. Adjust as needed before tightening screws fully. This is your sturdy top frame complete!
Step 2: Attach the Workbench Top
Now that the frame is rigid and square, let’s turn it over and attach the plywood top.
- Placement: Lay your 24″ x 48″ piece of 3/4″ plywood flat on your working surface (or the floor). Center the 2×4 frame you just built onto the plywood. The frame should align perfectly with the edges of the plywood top.
- Affixing the Top: Use your 1.25″ wood screws to secure the top. Place screws approximately every 6 to 8 inches along the perimeter, and add a few screws across the interior of the frame for maximum rigidity. It is critical to pre-drill pilot holes here, too, especially near the edges of the plywood, to prevent the wood from blowing out. The wood glue applied between the 2×4 frame and the plywood will bond the two pieces and dramatically reduce flex and vibration when working.
- Flip It: Carefully flip the entire assembly over so the new plywood top is facing up. Congratulations! You now have a solid, flat workbench surface!
Workshop Wisdom: Protecting Your Plywood Top
While construction plywood is tough, your workbench will take a beating. To ensure longevity and easy cleanup, consider a quick finish. You don’t have time for multiple coats of poly, so here are two fast options:
- Paste Wax: Apply a layer of hard furniture wax (like a carnauba or bee’s wax blend). This acts as a sacrifice layer, protects against spills (especially glue), and allows wood dust and debris to be swept away easily.
- Quick Danish Oil: A simple penetrating oil finish can be wiped on and often dries in a few hours. It gives good protection without creating a thick, easily damaged film. Avoid using standard polyurethane unless you have time for proper drying.
Step 3: Assemble the Legs (The Portable Magic)
We are focusing on Option 1: The Folding Sawhorse Style Legs as it is the fastest and most portable method.
- Pair the Legs: Take your four 30″ legs. Group them into two pairs. These will form the sawhorse-style assemblies.
- Attach Reinforcements: For each pair, take two 12″ reinforcement pieces. We are going to sandwich the folding hinges between the 30″ legs and these shorter pieces. Position a reinforcement piece about 6 inches down from the top of each leg. Secure the reinforcement pieces to the inside face of the legs using glue and 2.5″ screws.
- Mount the Hinges: This is the key to portability. Lay two legs side-by-side, face up. Place two of the 3″ butt hinges on the side of the legs. Center one hinge about 3 inches down from the top, and the second hinge about 3 inches up from the bottom.
- Crucial Step: Ensure the hinges are mounted so the legs can fold outwards (like an A-frame) when supporting the bench, and fold inwards (flat) when stored. Secure the hinges with the short screws provided, driving them into the reinforcement wood you attached in the previous step for maximum holding power.
- Repeat: Complete the second folding leg assembly with the remaining two legs and two hinges.
Step 4: Connect the Folding Legs to the Workbench Frame
Now we connect the leg assemblies to the underside of the main frame.
- Position: Place the folding leg assemblies approximately 6 inches in from the ends of the long side of the workbench frame.
- Install Stretchers: Take your two 18″ stretchers. These pieces go between the folding legs on the underside of the bench. They serve two vital purposes: they keep the legs positioned correctly, and they provide incredible lateral stability.
- Secure: Use glue and 2.5″ screws to attach the 18″ stretchers directly to the underside of the workbench frame, right next to the folding leg assemblies. Drive screws through the stretcher and up into the 2×4 frame.
- Final Leg Attachment: Now, drive screws through the outside of the workbench’s 2×4 frame directly into the top of the folding leg assemblies. Ensure you hit the sturdy 30″ leg pieces. Use four screws per side for a rock-solid connection.
Step 5: Install the Lower Shelf Rails and Shelf
The lower shelf doesn’t just provide storage; it acts as a permanent cross-brace, making the entire “mobile workbench” unit incredibly rigid.
- Placement: Identify the height where you want your shelf. A good spot is about 8 to 10 inches from the ground. Mark the inside of the 30″ legs on both ends of the workbench.
- Attach Long Rails: Take your two 42″ long rails. Using glue and 2.5″ screws, attach these rails horizontally between the legs on the long sides, ensuring the top of the rail aligns with your mark. Drive screws through the rail and into the 30″ legs. (If using folding legs, these rails connect the two sets of legs for maximum stability).
- Drop in the Shelf: Take your 21″ x 45″ plywood shelf. Drop it onto the newly installed 42″ rails. It should fit snugly.
- Secure the Shelf: Use 1.25″ screws to fasten the shelf to the top edge of the rails. This creates a solid, heavy base that helps counteract rocking or tipping during heavy work.
The Final Count: Adding Features to Optimize Your Portable Workbench
Congratulations! If you followed the batching and assembly method efficiently, you should be very close to the 4-hour mark. Now that the main structure is complete, let’s optimize it for better usability—critical for a truly great mobile workbench.
A. Workbench Dog Holes
If you plan to use clamps, dog holes are essential. They allow you to hold material flat against the bench.
- Tools: A large Forstner bit (3/4″ or 1″) and a power drill.
- Procedure: Carefully measure and mark a grid pattern (e.g., 6 inches apart) across your workbench top. Drill the holes through the plywood top, ensuring they go completely through. These holes allow you to insert bench dogs or use specialized clamps, maximizing the versatility of your small woodworking bench.
B. Vise Options for Portability
A workbench isn’t complete without a way to hold stock securely. Since we need to maintain portability, here are fast, non-permanent vise solutions:
- Quick-Release Bar Clamps: Use quick-release clamps and clamp them to the side of your bench top. This is the fastest and easiest method.
- Built-in Face Vise (Advanced): If you have an extra 2×4, you can screw it to the side of the bench and use two large bolts or wooden pegs as a simple, fast wooden face vise.
C. Mobility: Caster Considerations
While this is a portable workbench, if you move it frequently within a small shop, adding casters is a highly sought-after feature (often searched as “workbench plans with casters”).
- The Problem with Folding Legs: Adding casters to the folding legs is difficult.
- The Solution: Build a simple, rolling dolly slightly smaller than the base of the workbench. When you want mobility, lift the bench onto the dolly. When you need stability, lift it off. This maintains the bench’s portability and stability perfectly.
Conclusion: Launching Your DIY Journey
You did it! In a few short hours, you’ve moved past browsing easy workbench plans to building a fully functional, sturdy, and genuinely portable workbench. This project is the perfect launchpad for all your future DIY and woodworking endeavors.
This bench isn’t just a place to hold wood; it’s a dedicated space that legitimizes your craft, organizes your tools, and stands ready wherever your projects take you—from the garage to the driveway, or even a shared patio.
Now that you have your foundational piece of shop furniture, the only limit is your imagination.
Ready for the Next Challenge?
The satisfaction of finishing this portable workbench DIY project is just the beginning. To keep the momentum going, and to access a lifetime supply of woodworking inspiration, consider exploring Ted’s Woodworking Plans. It’s the ultimate resource library designed to turn your confidence from this simple build into the skill needed for any advanced project you can dream up. Click here to unlock 16,000 premium woodworking plans today!
Discover more from WoodReality
Subscribe to get the latest posts sent to your email.
