If you’re anything like me, you hate dealing with damp, unusable firewood. There’s nothing worse than getting ready for a cozy fire only to find that your wood is wet and moldy. That’s why I decided to build my own firewood storage shed—and let me tell you, it’s one of the best DIY projects I’ve ever tackled.
In this guide, I’ll walk you through the entire process of building a firewood storage shed, from choosing the right location to assembling the final structure. Plus, I’ll share a helpful video and a game-changing resource that made my build ten times easier.
Why You Need a Firewood Storage Shed
Before we get into the build, let’s talk about why a firewood storage shed is a must-have. Properly storing firewood keeps it dry, prevents mold, and ensures it’s always ready to burn. A well-built shed also keeps pests away and extends the lifespan of your firewood by improving airflow and reducing moisture buildup.
Another benefit is organization. Instead of stacking firewood haphazardly in a corner of your yard, a dedicated storage shed keeps everything neat and accessible. No more scrambling to find dry logs when temperatures drop!
If you rely on firewood as a primary or backup heat source, then proper storage is essential. It helps maintain a consistent burn, reduces smoke, and ensures a more efficient heating system.
Now, let’s get started on the build!
Step 1: Gather Your Materials and Tools
Here’s what you’ll need to build a sturdy firewood storage shed:
Materials:
- Pressure-treated 4×4 posts (for the base and frame)
- Pressure-treated 2x4s (for support beams and bracing)
- Plywood or wooden planks (for the floor and walls)
- Corrugated metal or asphalt shingles (for the roof)
- Screws, nails, and brackets
- Concrete mix (if you want to secure posts in the ground)
- Wood stain or sealant (to protect against weather)
- Gravel or pavers (for extra drainage under the shed)
- Waterproof tarp or cover (optional for extreme conditions)
- Hinges and latches (if you want to add doors for extra protection)
Tools:
- Circular saw or handsaw
- Power drill
- Measuring tape
- Level
- Hammer
- Safety gear (gloves, goggles, etc.)
- Post-hole digger (if setting posts in concrete)
- Paintbrush (for applying sealant)
- Speed square (for ensuring right angles)
Step 2: Choose the Right Location
Pick a dry, elevated spot where water won’t pool. You also want to ensure the shed gets good airflow and is easily accessible. I built mine near my back porch so I wouldn’t have to trek through the snow to grab logs in the winter.
If possible, choose a location that gets some sunlight. Sun exposure will help keep moisture levels low and prevent mold growth on your firewood.
Also, consider wind direction. Placing the shed in a way that maximizes natural airflow will help your firewood dry faster and stay dry longer.

Step 3: Build the Base and Frame
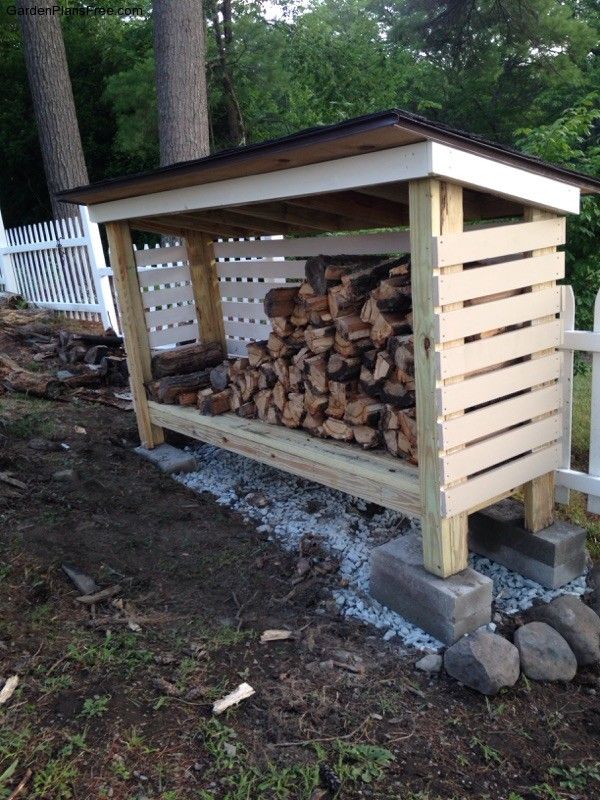
- Lay the Foundation – If you want a rock-solid base, dig four holes (about 12 inches deep), insert 4×4 posts, and secure them with concrete. Let them dry for at least 24 hours.
- Build the Floor – Attach 2×4 beams across the base, leaving a slight gap between boards to allow airflow. You can also place gravel or pavers under the shed to improve drainage.
- Frame the Walls – Construct a simple rectangular frame using 2x4s, leaving space for airflow between slats.
- Add Cross Bracing – Reinforce the frame with diagonal 2×4 braces to ensure stability.
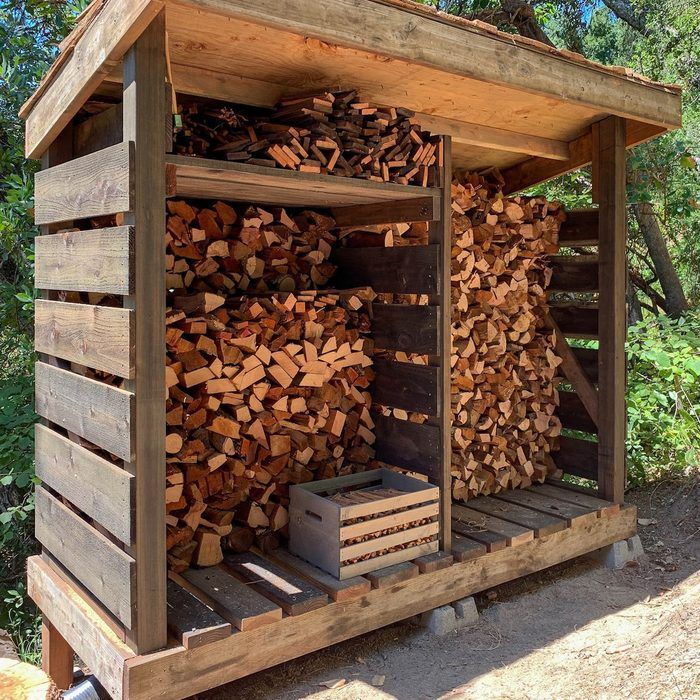
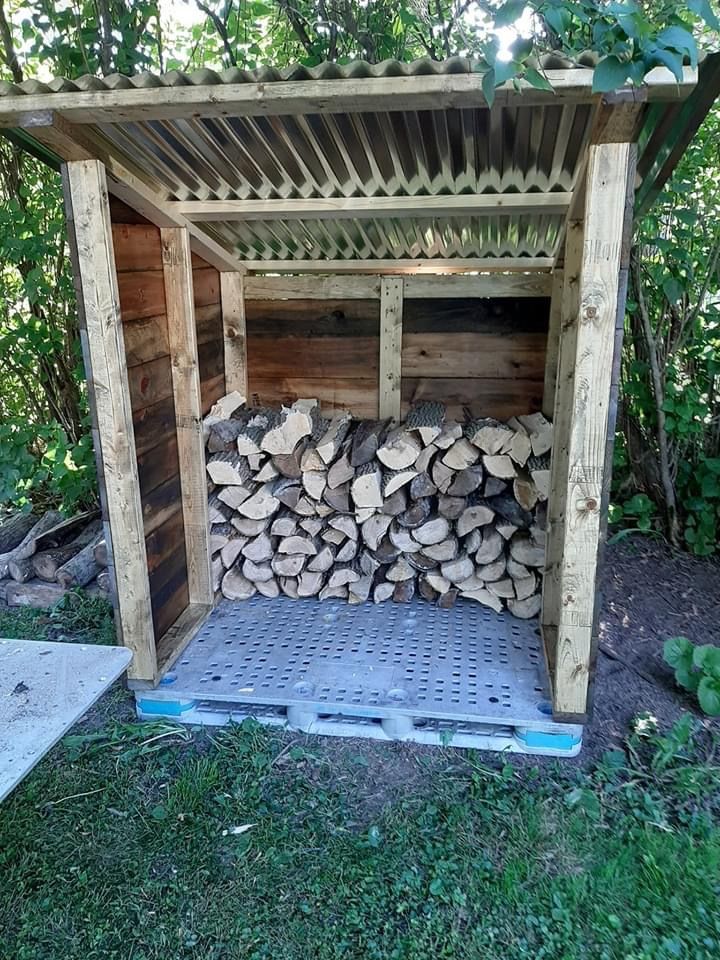
Step 4: Install the Roof and Walls
- Attach plywood or wooden planks to the back and sides, leaving the front open for easy access.
- Use corrugated metal or shingles to create a sloped roof that lets rain and snow slide off.
- If you live in a high-wind area, secure the roof with additional fasteners to prevent damage.
- Consider adding a slight overhang to keep rain from splashing onto the firewood.
- If your region experiences heavy snowfall, reinforce the roof structure to handle extra weight.
Step 5: Apply a Wood Sealant
To protect against rot and insects, apply a quality wood stain or sealant. Trust me, this step is worth it—it’ll add years to your shed’s lifespan. Reapply sealant every couple of years for long-term durability.
Step 6: Organize Your Firewood
Stack your firewood neatly, leaving space between logs for airflow. Store the oldest wood in front so you use it first. If possible, elevate the firewood slightly off the floor to prevent moisture absorption from the ground.
Using a pallet as a base is a great way to keep your firewood off the ground and improve airflow.
Video Tutorial: Watch the Build in Action
To make things even easier, check out this detailed video tutorial that walks through each step visually:
Watching the process really helped me when I was building mine, so I highly recommend following along.
Read Also:
How to Build a Storage Shed from Scratch: A Step-by-Step Guide
DIY Shed Building Plans: A Step-By-Step Guide to Building the Perfect Shed
How to Build Shed Doors: A Step-by-Step Guide for DIY Enthusiasts
Final Thoughts & A Game-Changing Resource
Building a firewood storage shed is a simple yet rewarding project. Not only does it protect your firewood, but it also keeps your outdoor space looking tidy.
If you want even more detailed plans with professional blueprints, I highly recommend checking out Ryan’s Shed Plans. It’s a goldmine of over 12,000 shed plans, including step-by-step guides and material lists.
➡️ Get Instant Access to Ryan’s Shed Plans Here
(Disclosure: This is an affiliate link, which means I earn a small commission at no extra cost to you. I only recommend resources I personally use and trust.)
With the right tools, materials, and a little bit of patience, you’ll have a fully functional firewood storage shed in no time. It’s a great DIY project that will serve you well for years to come.
Happy building, and enjoy your perfectly dry firewood all year round!
Discover more from WoodReality
Subscribe to get the latest posts sent to your email.
