Introduction
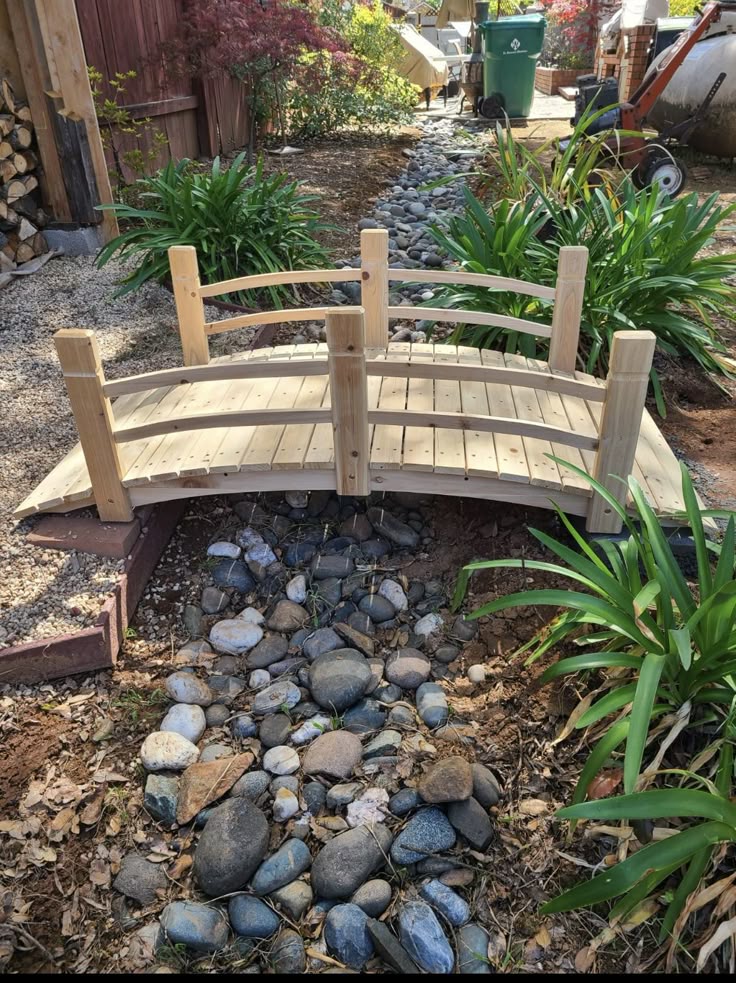
A wooden garden bridge can be a stunning addition to any backyard, offering both functionality and aesthetics. Whether you want to span a small pond, a dry creek bed, or simply create a focal point in your garden, building your own wooden bridge is a rewarding DIY project.
In this guide, I’ll take you through the entire process step by step, sharing my personal experience and best practices for constructing a sturdy and beautiful wooden garden bridge. We’ll also include a free blueprint, a relevant YouTube tutorial, and a special offer for woodworking enthusiasts at the end.
1. Planning Your Garden Bridge
Before grabbing your tools, it’s essential to plan everything out. A well-thought-out blueprint will ensure your bridge is structurally sound and fits perfectly into your garden.
1.1. Determine the Purpose and Location
- Will the bridge be purely decorative, or will it need to support foot traffic?
- Are you spanning a pond, stream, or just a small gap in your landscape?
- What style do you want? Arched, flat, or something more intricate?
1.2. Measuring the Span
- Use a tape measure to determine the exact width and length your bridge needs to be.
- Add extra length on both ends if you want an overhanging design.
1.3. Choosing a Design
- Flat Bridge: Easier to build, suitable for shorter spans.
- Arched Bridge: More elegant but requires precise cutting.
- Bridges with Railings: Safer for high-traffic areas.
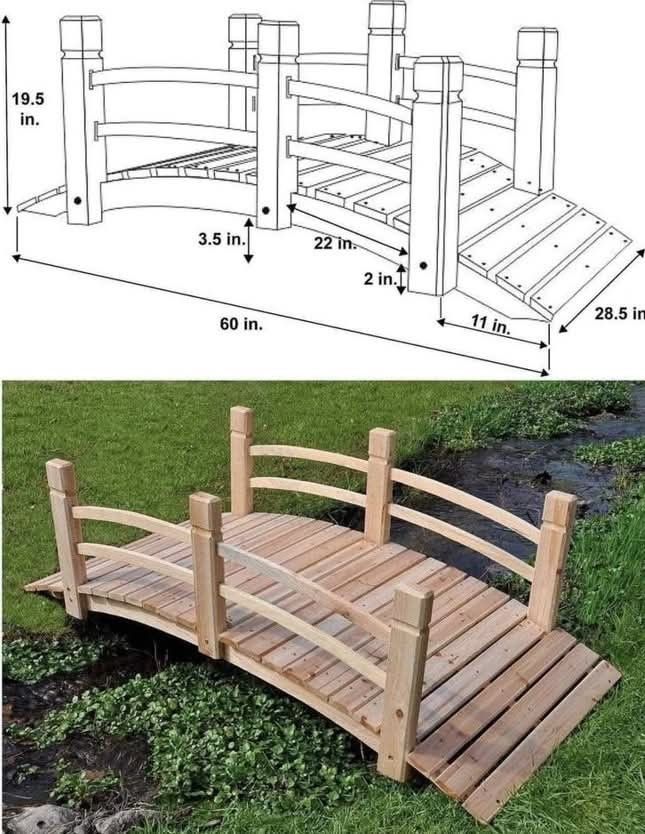
1.4. Blueprint & Free Plans
There are many free blueprints available online that offer detailed instructions. Here are some great resources:
- Arched Garden Bridge Plans – Construct101
- Free Wooden Garden Bridge Plans – MyOutdoorPlans
- HowToSpecialist DIY Garden Bridge Plans
2. Materials and Tools Needed
Once you have your blueprint, it’s time to gather the materials and tools.
2.1. Choosing the Right Wood
Your bridge will be exposed to the elements, so it’s crucial to use durable, weather-resistant wood:
- Cedar – Naturally resistant to rot and insects.
- Redwood – Beautiful and durable, but expensive.
- Pressure-Treated Lumber – Affordable and long-lasting but may require sealing.
2.2. Essential Tools
To build a garden bridge, you’ll need the following tools:
- Circular saw or jigsaw (for curved cuts)
- Power drill with wood drill bits
- Screwdriver
- Carpenter’s square
- Measuring tape
- Sandpaper or power sander
- Clamps
- Safety gear (gloves, safety glasses)
2.3. Hardware & Fasteners
- Galvanized screws (rust-resistant)
- Wood glue (for extra strength)
- Lag bolts (for attaching railings)
- Waterproof wood sealant or stain
3. Designing the Bridge Structure
A well-constructed bridge balances beauty and function. Let’s look at key design elements.
3.1. Arched vs. Flat Bridges
- Arched bridges are more visually appealing and allow water to pass underneath.
- Flat bridges are easier to build and suitable for smaller spans.
3.2. Railings vs. No Railings
- If your bridge is high off the ground, adding railings is a good idea.
- If it’s just a few inches above the ground, railings may not be necessary.
3.3. Customization Options
- Decorative side panels
- Carved posts or railings
- Built-in lighting for nighttime ambiance
4. Step-by-Step Construction Process
Now that everything is planned, let’s start building.
Step 1: Cutting the Stringers (Bridge Supports)
- Using your blueprint, mark the shape of the stringers on your wood.
- If you’re making an arched bridge, use a flexible strip of wood to trace a smooth curve.
- Cut along the lines with a jigsaw or circular saw.
- Sand the edges to remove rough spots.
Step 2: Assembling the Frame
- Attach cross braces between the stringers for support.
- Make sure everything is square and level.
- Secure the pieces with screws or bolts.
Step 3: Attaching the Decking
- Cut decking boards to the correct length.
- Lay them perpendicular to the stringers, leaving small gaps for drainage.
- Screw them into place with galvanized screws.
Step 4: Adding Railings (Optional)
- Cut railing posts and attach them to the bridge frame.
- Secure horizontal rails between the posts.
- Add decorative details if desired.
5. Finishing Touches for Longevity
5.1. Sanding for a Smooth Finish
- Use fine-grit sandpaper or a power sander.
- Focus on edges and handrails to prevent splinters.
5.2. Applying a Protective Coating
- Wood Stain: Enhances the wood grain and provides protection.
- Clear Sealer: Protects the wood while maintaining its natural look.
- Paint: Adds color and extra weather resistance.
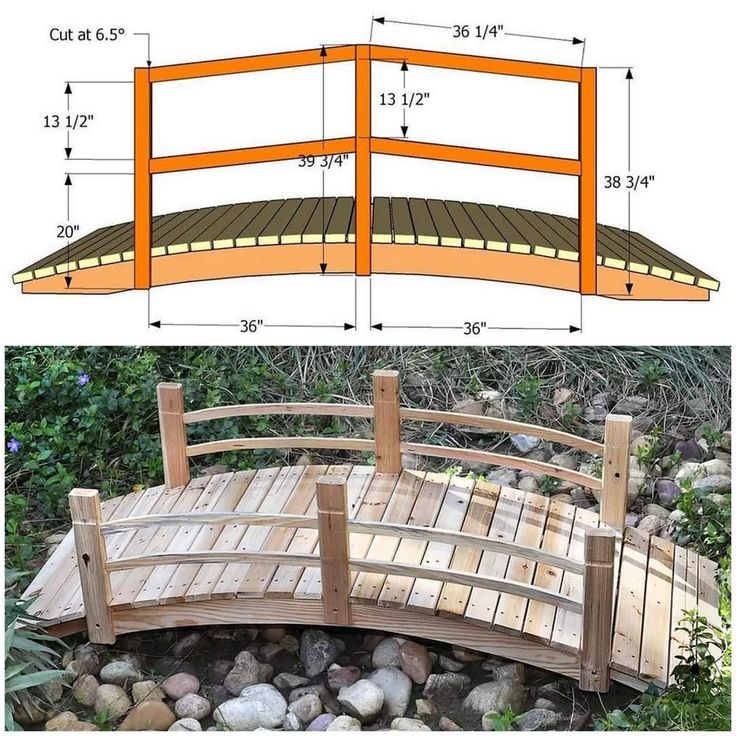
6. Free Wooden Bridge Blueprint & Video Guide
For a free detailed blueprint, check out:
🔗 Download Free Garden Bridge Plans
Read Also:
How to Build a Raised Garden Bed from Wood: The Ultimate DIY Guide
Build Your Dream Wooden Garden Arbor
Step-by-Step Video Guide: Here’s a helpful YouTube tutorial that walks you through the entire process:
7. Common Mistakes & How to Avoid Them
Mistake #1: Using the Wrong Wood
Avoid untreated softwoods like pine unless you plan to seal them properly.
Mistake #2: Not Leaving Gaps Between Deck Boards
Gaps allow water drainage and prevent warping.
Mistake #3: Skipping the Sealant
Even durable woods need protection against moisture.
8. Expanding Your Woodworking Skills
If you love woodworking and want to take on more projects, I highly recommend Teds Woodworking Plans. With over 16,000 step-by-step woodworking plans, it’s the ultimate resource for DIYers.
🎯 Get Instant Access to Teds Woodworking Plans Here:
👉 Click Here to Get Teds Woodworking Plans
Affiliate Disclosure: I may earn a commission if you purchase through this link, at no extra cost to you.
Conclusion
Building a wooden garden bridge is an incredibly satisfying project. With the right materials, careful planning, and patience, you can create a beautiful and functional bridge that enhances your garden’s charm.
Whether you follow a flat design for simplicity or an arched bridge for elegance, your handcrafted structure will be a proud addition to your landscape.
Frequently Asked Questions (FAQs)
Q1: How long does it take to build a garden bridge?
It depends on the complexity of the design. A simple bridge can take a weekend, while an intricate arched bridge may take a few days.
Q2: Can I build a garden bridge without power tools?
Yes, but it will take more time and effort. A handsaw and manual drill can be used instead of power tools.
Q3: What is the best wood for an outdoor bridge?
Cedar, redwood, and pressure-treated lumber are all excellent choices due to their durability and weather resistance.
Q4: How do I maintain my wooden bridge?
- Regularly check for loose screws or boards.
- Reapply sealant or stain every few years to protect against the elements.
Q5: Where can I find more woodworking plans?
Check out Teds Woodworking Plans for thousands of easy-to-follow DIY projects.
Discover more from WoodReality
Subscribe to get the latest posts sent to your email.
