If you’ve ever dreamed of fresh eggs, sustainable living, or simply bonding with a flock of cheerful chickens, building your own coop is the perfect first step. As someone who’s built over a dozen coops (and learned from plenty of mistakes!), I’ll guide you through every detail—from choosing the right lumber to outsmarting crafty raccoons. By the end, you’ll have a coop that’s both functional and charming. Let’s dive in!
Table of Contents
- Why Build Your Own Chicken Coop?
- Tools & Materials: A Complete Checklist
- Designing Your Coop for Homesteading Success
- Step-by-Step Construction Guide
- Predator-Proofing Like a Pro
- Seasonal Adjustments: Winterizing & Summer Cooling
- Maintenance & Cleaning Routines
- Choosing the Best Chicken Breeds for Beginners
- FAQs & Troubleshooting
- Free Video Tutorial + Pro Blueprints
1. Why Build Your Own Chicken Coop?
Cost Savings
Pre-built coops cost $500–$2,500, but DIY builds average $300–$800 (even cheaper with salvaged materials). For example, my first 8×6-foot coop cost just $420 using reclaimed pallet wood and secondhand roofing.
Customization
Homesteading means adapting to your land. A DIY coop lets you:
- Match your aesthetic (rustic, modern, barn-style).
- Add features like integrated compost bins or rainwater collection.
- Adjust sizing for future flock expansion.
Sustainability
Use eco-friendly materials like cedar (naturally rot-resistant) or recycled hardware cloth.
2. Tools & Materials: A Complete Checklist
Tools Table
| Tool | Purpose | Budget Option |
|---|---|---|
| Circular Saw | Cutting lumber & plywood | Hand saw ($15) |
| Drill/Driver | Driving screws & drilling pilot holes | Manual screwdriver ($5) |
| Staple Gun | Securing hardware cloth | Hammer + U-nails |
| Post Hole Digger | Installing buried predator barriers | Shovel + elbow grease |
Materials Table
| Material | Purpose | Cost per Unit |
|---|---|---|
| Pressure-treated 2x4s | Floor frame & walls | $3.50 per 8-foot board |
| ½-inch hardware cloth | Predator-proofing vents & windows | $1.50 per sq.ft |
| Corrugated metal | Roofing | $12 per 8-foot panel |
| Exterior-grade screws | Long-lasting hold | $8 per 1-lb box |
Pro Tip: Check Facebook Marketplace or salvage yards for discounted materials! I once scored 50 sq.ft of hardware cloth for $20.
3. Designing Your Coop for Homesteading Success
Size Guidelines
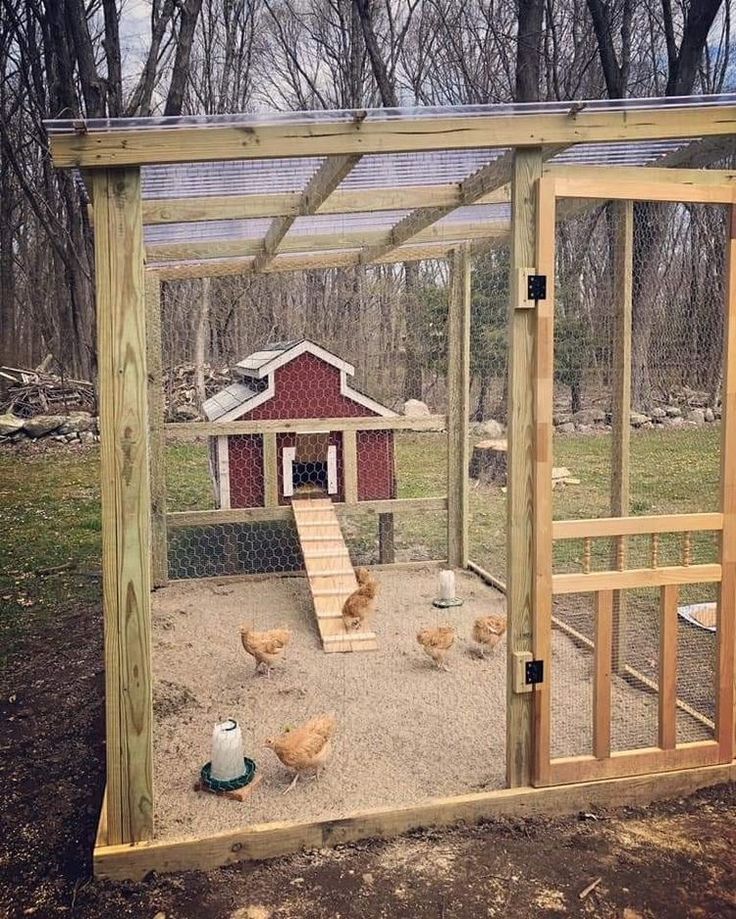
- Small Flock (3–6 hens): 4×6-foot coop + 10×10-foot run.
- Large Flock (10+ hens): 8×8-foot coop + 20×20-foot run.
Homestead Integration Ideas
Dual-Purpose Roof: Install solar panels to power coop lighting or electric fences. your flock will thank you with fresh eggs for years to come! Got questions? Drop them in the comments below—I’m happy to help! 🐔
Compost Corner: Place the coop near your garden to streamline compost collection.
Mobile Runs: Use a chicken tractor (portable run) to fertilize different garden zones.
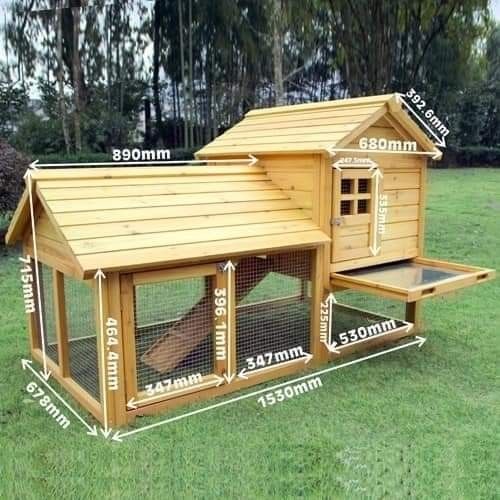
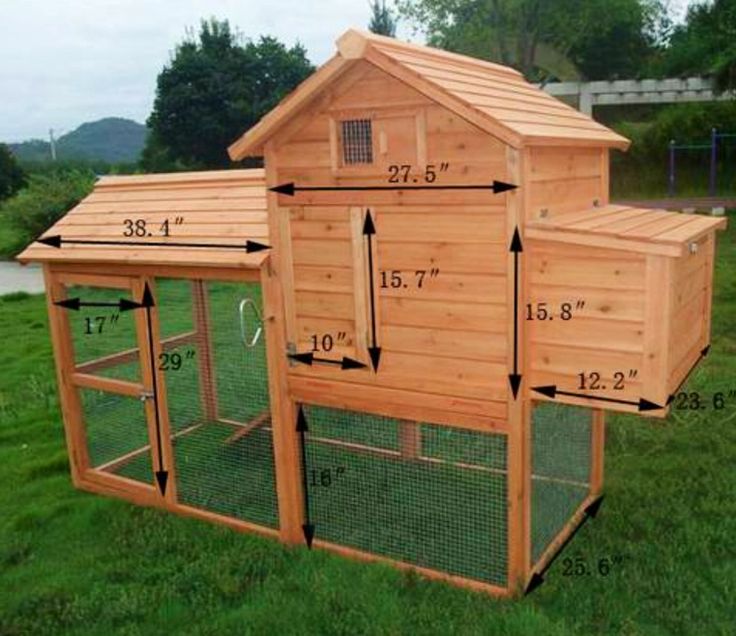
Free Chicken Coop Blueprint (8×4-Foot Coop)
If you’re interested in a simple, beginner-friendly coop design, here’s a basic plan you can follow:Coop Size: 8×4 feet
Capacity: 6–8 chickens
Features:
- Nesting Boxes: 3 boxes (12×12 inches each)
- Roosts: Two roosting bars (2×2 inches) spaced 18 inches apart
- Ventilation: One window and roof vent for airflow
Materials Needed:
- Pressure-treated lumber (2x4s)
- Exterior-grade plywood
- Hardware cloth
- Corrugated metal roofing
Instructions:
- Build the foundation using pressure-treated lumber.
- Frame walls with vertical studs and horizontal supports.
- Attach plywood sheathing and hardware cloth for predator-proofing.
- Install roofing material.
For detailed plans, consider downloading free PDF blueprints from websites like Construct101 or The Spruce. If you need more comprehensive designs or want precision without guesswork, I recommend checking out professional plans from services like Ted’s Woodworking
4. Step-by-Step Construction Guide
Step 1: Foundation Options (Detailed Breakdown)
A. Concrete Blocks
- Pros: Affordable, easy to level.
- Cons: Less stable in windy areas.
B. Skid Foundation
- Use pressure-treated 4×4 beams.
- Ideal for uneven terrain.
C. Concrete Piers
- Pour concrete into sonotubes.
- Best for permanent, large coops.
My Pick: Skid foundation—it’s mobile and requires no digging.
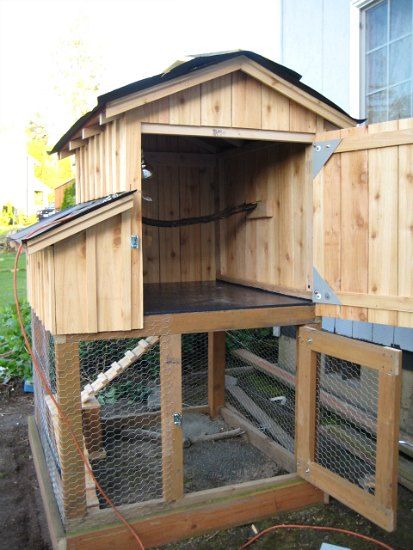
Step 2: Framing Walls (Pro Tips)
- Double-check diagonal measurements to ensure square walls.
- Pre-drill holes to prevent wood splitting.
Step 3: Roofing Hacks
- Pitch Matters: A 30° slope sheds rain/snow efficiently.
- Overhangs: Extend the roof 12 inches to protect walls from water damage.
5. Predator-Proofing Like a Pro
Common Predators & Solutions
| Predator | Weakness | Solution |
|---|---|---|
| Raccoons | Nimble paws | Locking carabiner latches |
| Foxes | Digging | Bury hardware cloth 12″ deep |
| Hawks | Overhead attacks | Install run roof or netting |
Pro Tip: Motion-activated lights deter nocturnal predators.
6. Seasonal Adjustments
Winterizing Your Coop
- Insulation: Line walls with reflective foil insulation ($0.50/sq.ft).
- Ventilation: Keep a 1-inch gap at the roof peak to prevent moisture buildup.
Summer Cooling Strategies
- Shade Cloth: Drape over the run (70% UV block).
- Frozen Treats: Freeze watermelon slices for hens to peck.
7. Maintenance & Cleaning
Weekly Tasks
- Scrape roosts with a putty knife.
- Refresh nesting boxes with dried lavender (repels mites).
Deep Cleaning (Every 3 Months)
- Remove all bedding.
- Spray walls with apple cider vinegar (1:1 ratio with water).
- Sprinkle diatomaceous earth on floors to deter pests.
8. Best Chicken Breeds for Beginners
| Breed | Eggs/Year | Temperament |
|---|---|---|
| Rhode Island Red | 260 | Friendly, hardy |
| Australorp | 250 | Calm, cold-tolerant |
| Silkie | 100 | Docile, kid-friendly |
My First Flock: 3 Rhode Island Reds + 2 Australorps = 5 eggs daily!
9. FAQs & Troubleshooting
Q: Why are my hens eating their own eggs?
A: Usually due to calcium deficiency. Add crushed oyster shells to their feed.
Q: How do I stop the coop from smelling?
A: Use deep litter method: Layer pine shavings & sprinkle baking soda monthly.
10. Video Tutorial: Building a Coop in 48 Hours
Save Time with Ted’s Woodworking Plans!
If you want precision without the guesswork, check out Ted’s Woodworking. Their chicken coop plans include:
- 3D diagrams for visual learners.
- Material cut lists to avoid wasted lumber.
- Lifetime access to 16,000+ projects (sheds, barns, furniture).
👉 Get Ted’s Woodworking Plans Here 👈
(Disclosure: As an affiliate, I earn a commission if you buy through this link—at no extra cost to you. Thanks for supporting my blog!)
Final Checklist Before Building
✅ Permits: Verify local zoning laws.
✅ Predator Audit: Identify common threats in your area.
✅ Flock Size: Start small (3–6 hens). Building a chicken coop is more than a DIY project—it’s a gateway to homesteading, sustainability, and daily fresh eggs. Got questions? Drop them below, and I’ll help you troubleshoot! 🐓
Discover more from WoodReality
Subscribe to get the latest posts sent to your email.

Pingback: How to Build a Wooden Compost Bin: A Step-By-Step Guide – WoodReality
Pingback: DIY Potting Bench Plans: How I Built the Ultimate Garden Workspace – WoodReality
Pingback: How to Build a Dog House: A Step-By-Step Guide For Beginners – WoodReality
Pingback: How to Build a Raised Garden Bed from Wood: The Ultimate DIY Guide – WoodReality
Pingback: How to Build a Duck Coop: A Step-by-Step DIY Guide – WoodReality